
Bumper Mounting Brackets: A Truck Owner's Install Guide
October 24, 2026 · Francisco Hornelas

Most shops will tell you to pick the bumper face first, then hunt for hardware that makes it fit. That's backwards, and it's why trucks come back with a crooked Peterbilt 389 bumper, a loose Kenworth W900 chrome bumper, or cracked mounts under a shiny new face.
Start with the bumper mounting brackets. They set the height, hold the load path, and decide if that 18 inch drop bumper clears a dock or drags on it. If the brackets are bent, rusted, or wrong for the frame, a premium bumper won't fix the problem. It'll hide it for a few weeks.
Table of Contents
- How Bumper Mounting Brackets Carry Crash and Tow Loads
- Choosing Brackets That Match Your Truck
- Stainless 304, Stainless 430, or Chrome-Plated Carbon Steel
- Inspecting Brackets and Frame Before You Install
- Installing Brackets and Bumper the Right Way
- Compliance Limits and Costly Mistakes to Avoid
- Ordering Your Bumper and Next Steps for Your Fleet
How Bumper Mounting Brackets Carry Crash and Tow Loads
The bumper face gets the attention, but the brackets decide how it sits and where its load goes. On a Class 8 truck, bumper mounting brackets are structural parts that transfer force from the bumper beam into the frame horns and rails. Crooked or flexible brackets can leave the bumper poorly aligned when it takes a hit.
The European Aluminium crash management case study describes three jobs for a bumper system: limit damage in low-speed impacts, reduce repair costs in medium-speed impacts, and preserve the load path in harder crashes. That same case study uses a 15 km/h medium-speed insurance impact as its benchmark and notes that the system must also handle towing forces.
Check the front end and its load path before judging a bracket by its size.
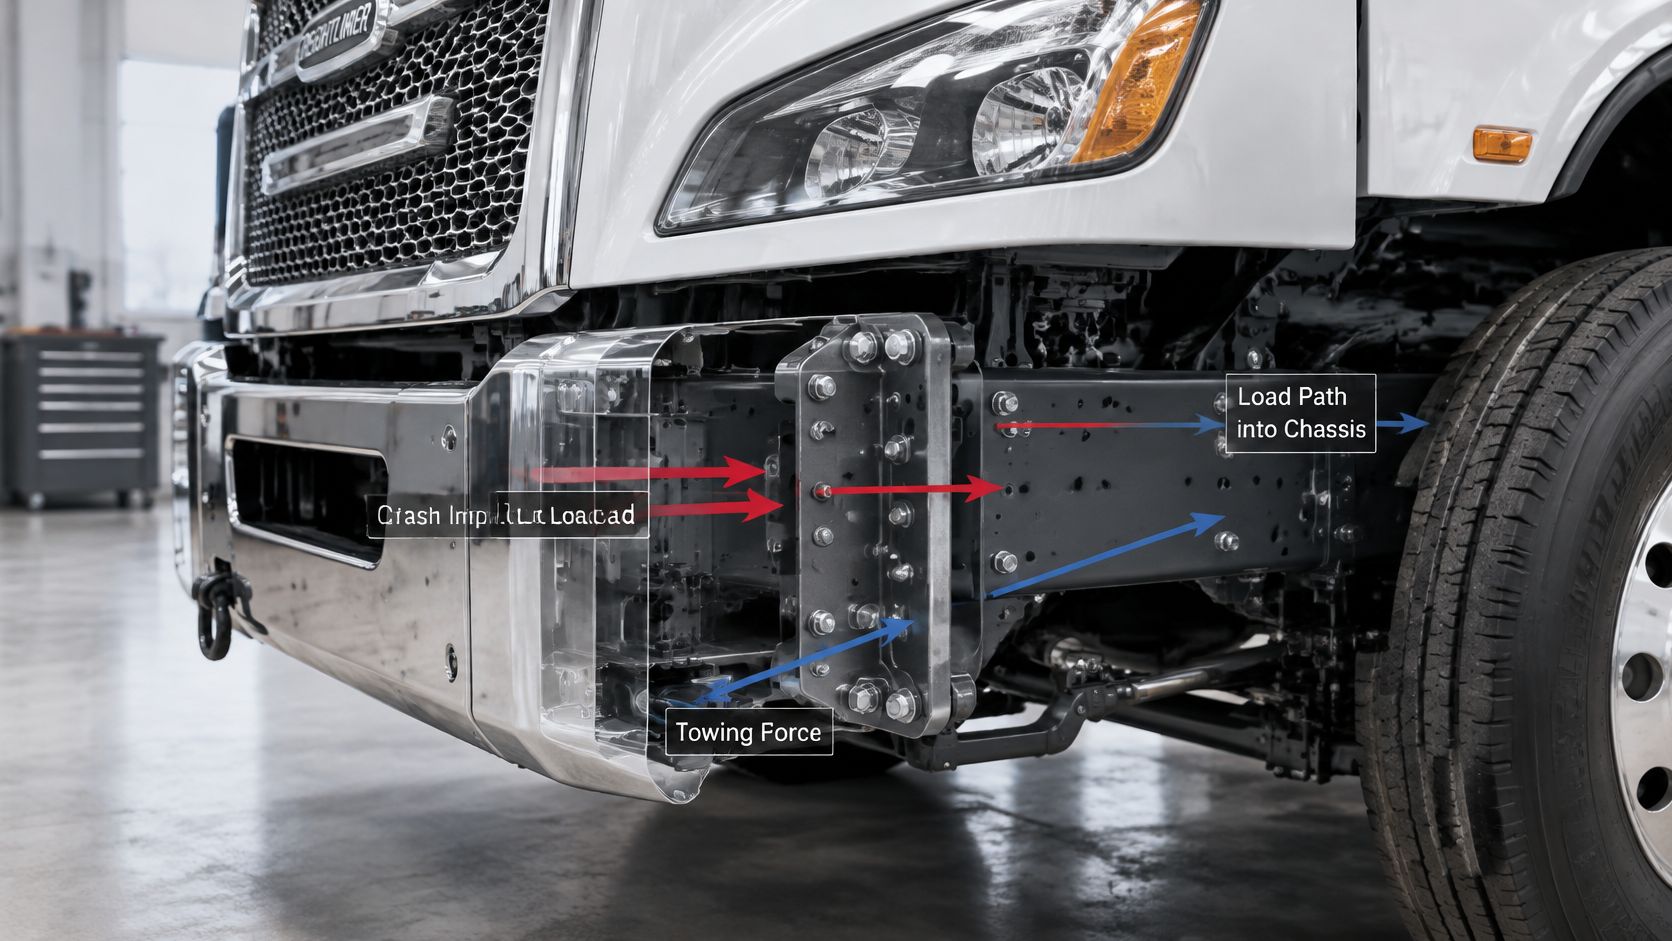
Small Energy Share, Big Control
A finite element study modeled a full-overlap frontal impact. The metal bumper absorbed about 2,857.5 joules, while the left bracket took 90.64 joules and the right took 94.75 joules, according to the Springer finite element bumper impact analysis.
Together, the brackets took about 185.39 joules, roughly 6.5% of the bumper's energy in that model. The beam handled about 93.5%. Brackets carry only a small share of the energy, but they set alignment and spacing and control where the force travels next.
Corner impacts change the result. The Springer finite element bumper impact analysis reports about 1.1548 joules for a corner-impact bracket, compared with roughly 90 to 95 joules per bracket in the frontal case above. That difference shows how much bracket engagement shifts when the hit is off-center. A twisted bracket can make an otherwise square impact load one corner first.
A bracket doesn't need to absorb most of the energy to ruin the hit. It only needs to aim the bumper wrong.
More Than Crash Load
Tow points, fog lights, sensors, wiring, and steps all add loads or openings around the front end. Those features affect where stress collects. Check how a bumper tow hook should connect before attaching recovery gear to the face bar.
In the yard, look for one side sitting low, bolt heads that do not seat flat, or a hood gap that changes. Each sign means load is already traveling unevenly through the frame horns, creating a structural problem rather than a cosmetic one.
Choosing Brackets That Match Your Truck
Measure the truck before looking at a catalog photo. Record the frame horn spacing, the distance from grille to bumper face, and the tow hole position on each side. Those measurements decide whether the brackets sit square and the bumper lands where it should.
A bumper for a Peterbilt 389 won't fit a Freightliner with different frame horns. On a Kenworth W900, the wrong bracket stand-off can leave the face too close to the grille or too far forward. Check the exact make, model, and year, then compare the frame width, horn shape, bumper width, tow hole location, and light openings.
The Fitment Checks That Matter
- Make, model, and year: Confirm the exact truck and year range.
- Frame horn layout: Measure the spacing and hole pattern on both sides.
- Bracket stand-off: Check the distance from grille to bumper face.
- Cutouts: Match tow holes, fog holes, and light openings to the truck.
- Ride height: Account for tire size and front suspension setup.
A universal bracket can leave you forcing the bumper into position. If you need a come-along to pull one side in, the joint is under preload. It may look level on the lift, then shift after a rough yard run.
Watch the Lowest Point
NHTSA reported that modern truck tractor front bumpers average about 14 inches of ground clearance in its NHTSA truck underride and conspicuity response. A deeper drop bumper lowers the front end's lowest point, so check the routes and yards where the truck works.
Steep dock aprons, railroad crossings, fuel island humps, and rutted dirt lots can catch a low bumper. Repeated contact can loosen brackets, crack mounting holes, and damage the finish.
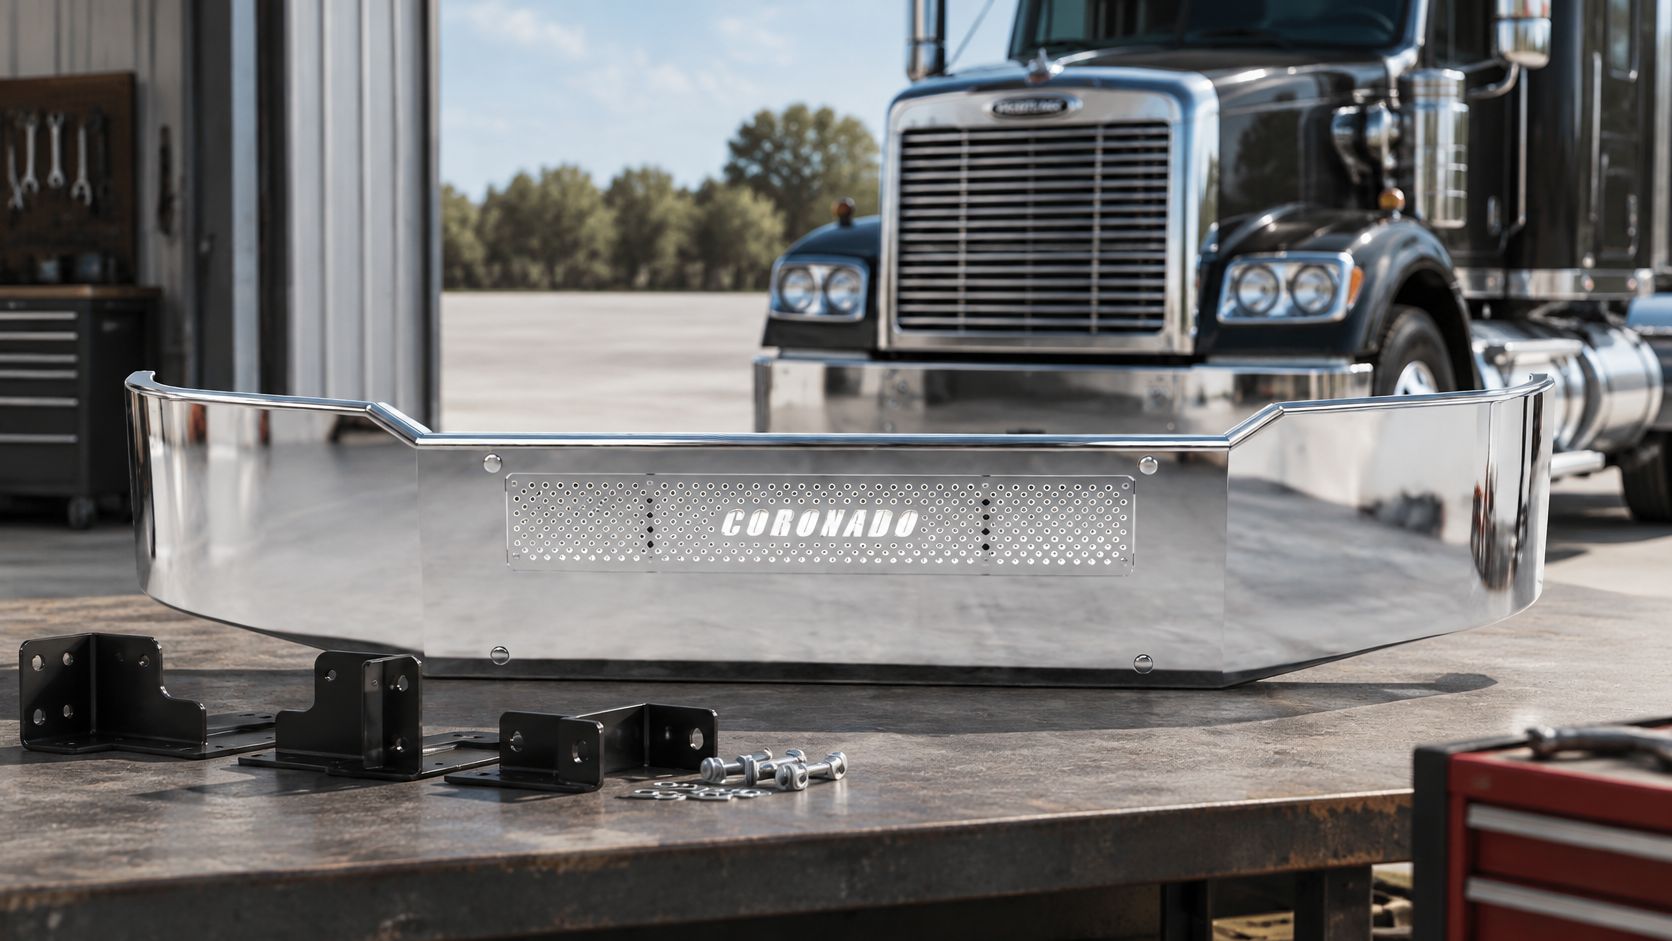
The Chrome bumper for Freightliner Coronado (2002–2009) is listed for the 2002 to 2009 Coronado range. Compare its bracket pattern with your frame horns before ordering. “Direct bolt-on” only tells you the holes line up, not whether the bumper clears your grille, tow points, and lights.
The listing shows a price of $899.99, current in-stock availability, and 16 variants across style, cutout, and finish options. Confirm the selected cutouts against your tow hole and light layout. The bracket pattern, not the shine on the bumper face, decides whether the assembly fits your truck.
Stainless 304, Stainless 430, or Chrome-Plated Carbon Steel
The bracket material is a fitment and upkeep decision, not just a finish choice. Match it to the roads you run, the washing you can keep up with, and the places salt and moisture collect around the mounts.
Technical data describes 304 stainless as an austenitic grade with excellent corrosion resistance in many environments. 430 stainless is a ferritic, straight chromium grade with good corrosion resistance and formability, according to the Stainlessinox technical data for stainless grades. Its resistance to pitting and crevice corrosion is lower than 304's, particularly in warm chloride conditions.
Chlorides include road salt and coastal spray. In a wet yard, brine can sit behind a bracket and stay there long after the bumper face looks clean.
Pick by Route, Not by Photo
Winter salt and coastal air call for 304. It gives you more corrosion resistance where the bracket interface stays wet for long stretches and crevice corrosion can start out of sight.
For mostly dry or mild routes, 430 is a practical choice if you want a polished look. Wash off salt when you encounter it, and avoid paying for corrosion margin your routes rarely need.
Chrome-plated carbon steel delivers the classic mirror finish. It suits an owner-operator who keeps up with cleaning. If plating chips at a tow hole and stays damaged, rust can start beneath the finish.
Bumper Material Options at a Glance
| Material | Corrosion Resistance | Best Fit | Galhor Ship Time |
|---|---|---|---|
| Chrome-plated stainless 304 | Excellent in many environments | Winter salt, coastal air, wet yards | In-stock flat bumpers ship within 48 hours |
| Chrome-plated stainless 430 | Good, lower pitting resistance than 304 | Polished look, normal weather exposure | In-stock flat bumpers ship within 48 hours |
| Chrome-plated carbon steel | Depends on intact plating and cleaning | Show finish, drivers who wash often | Made-to-order units typically ship in 4 to 6 weeks |
For chrome-plated carbon steel, ask the seller to confirm the gauge and plating build in writing. “Chrome” alone does not specify the steel thickness or nickel layer. Check those details before ordering, rather than relying on a parking-lot photo.
Shop rule: Buy the grade you can verify on the spec sheet, not the shine you see in a parking lot photo.
Every grade still needs cleaning. Clear winter grime from behind the brackets, then rinse the bolt holes and washer seats. Trapped moisture and contact between dissimilar metals can stain or damage any finish if left in place.
Inspecting Brackets and Frame Before You Install
The bumper face gets the attention, but the bracket and frame horn decide whether the assembly fits and stays secure. A bent horn from an old dock strike can leave a new bumper twisted before the first bolt is tightened. Check the truck before unboxing the bumper.
Clean the bracket-to-frame joint with a wash and wire brush. Dirt and packed road grit can hide cracks, rust scale, and fretting. Then use this visual as a bay checklist.
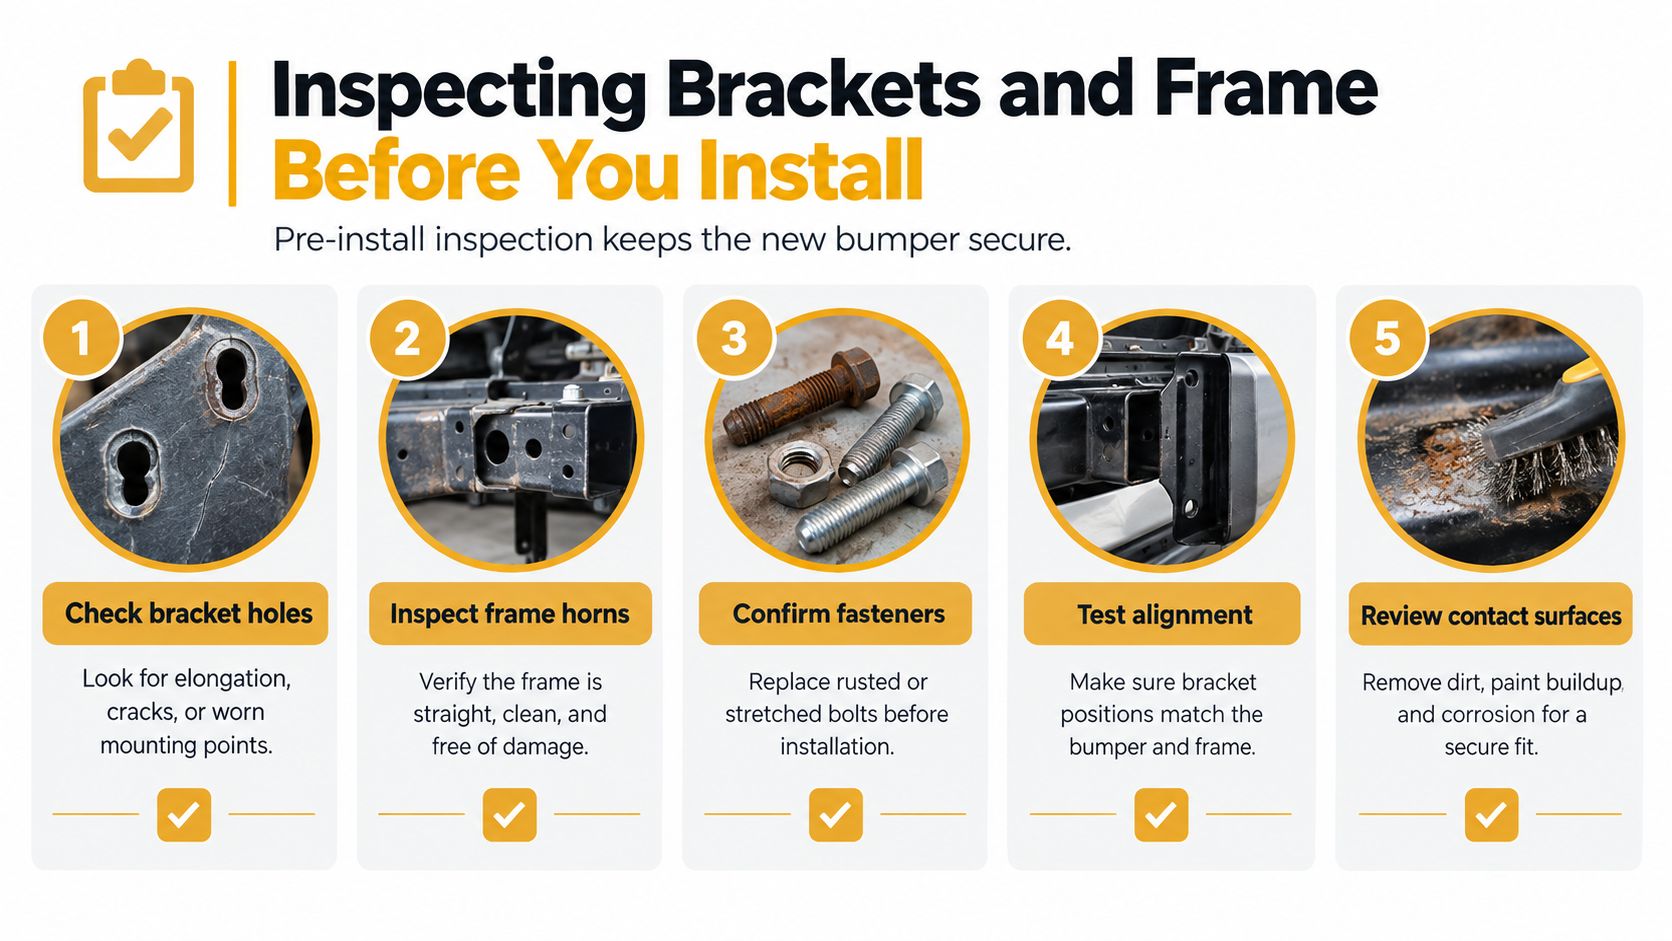
Compare the two sides rather than judging each bracket on its own. Look for elongated holes, torn or crushed edges, and damaged fasteners. Check that the bracket faces sit flat without a pry bar, and clear paint buildup and scale from contact surfaces.
Run a straightedge across the frame horn ends. Measure from the same fixed frame point to each bracket hole. A difference can leave the bumper sitting crooked, even if the brackets appear sound. For help identifying the rails and horns, see this guide to truck frame rails.
Pay close attention to washer seats, weld toes, and gusset ends. Probe corroded areas around washer seats with a pick. If the metal flakes or feels soft, the fastener cannot clamp against a solid surface. Use a bright light to spot hairline cracks around welds and gussets.
If a crack is suspected but not visible, have it checked with dye penetrant or magnetic-particle inspection. Don't cover a questionable bracket with a new bumper and hope it holds.
Maryland's commercial inspection rules call for checking bumpers for broken or missing parts, hazardous protrusions, secure mounting, and reasonable impact capability, under Maryland COMAR commercial vehicle bumper inspection rules. Requirements can vary by state, so check the rules that apply to your truck.
Replace brackets with permanent bends, cracked welds, elongated holes, or corrosion that has reduced the metal's thickness. Heating and hammering a bracket back into shape does not restore its strength. A bent, cracked, or torn frame horn needs assessment by a qualified heavy-truck frame technician before installation. A heavier bumper cannot make a damaged mount safe.
Installing Brackets and Bumper the Right Way
The bumper face can look straight while the brackets sit under stress. Support the bumper with a padded floor jack or a second person before loosening or tightening hardware. That keeps its weight off a single bolt while you line up the assembly.
Match the bracket geometry and fasteners to the truck-specific instructions. A kit with the wrong bolt diameter may look close, but forcing it into place can damage the joint.
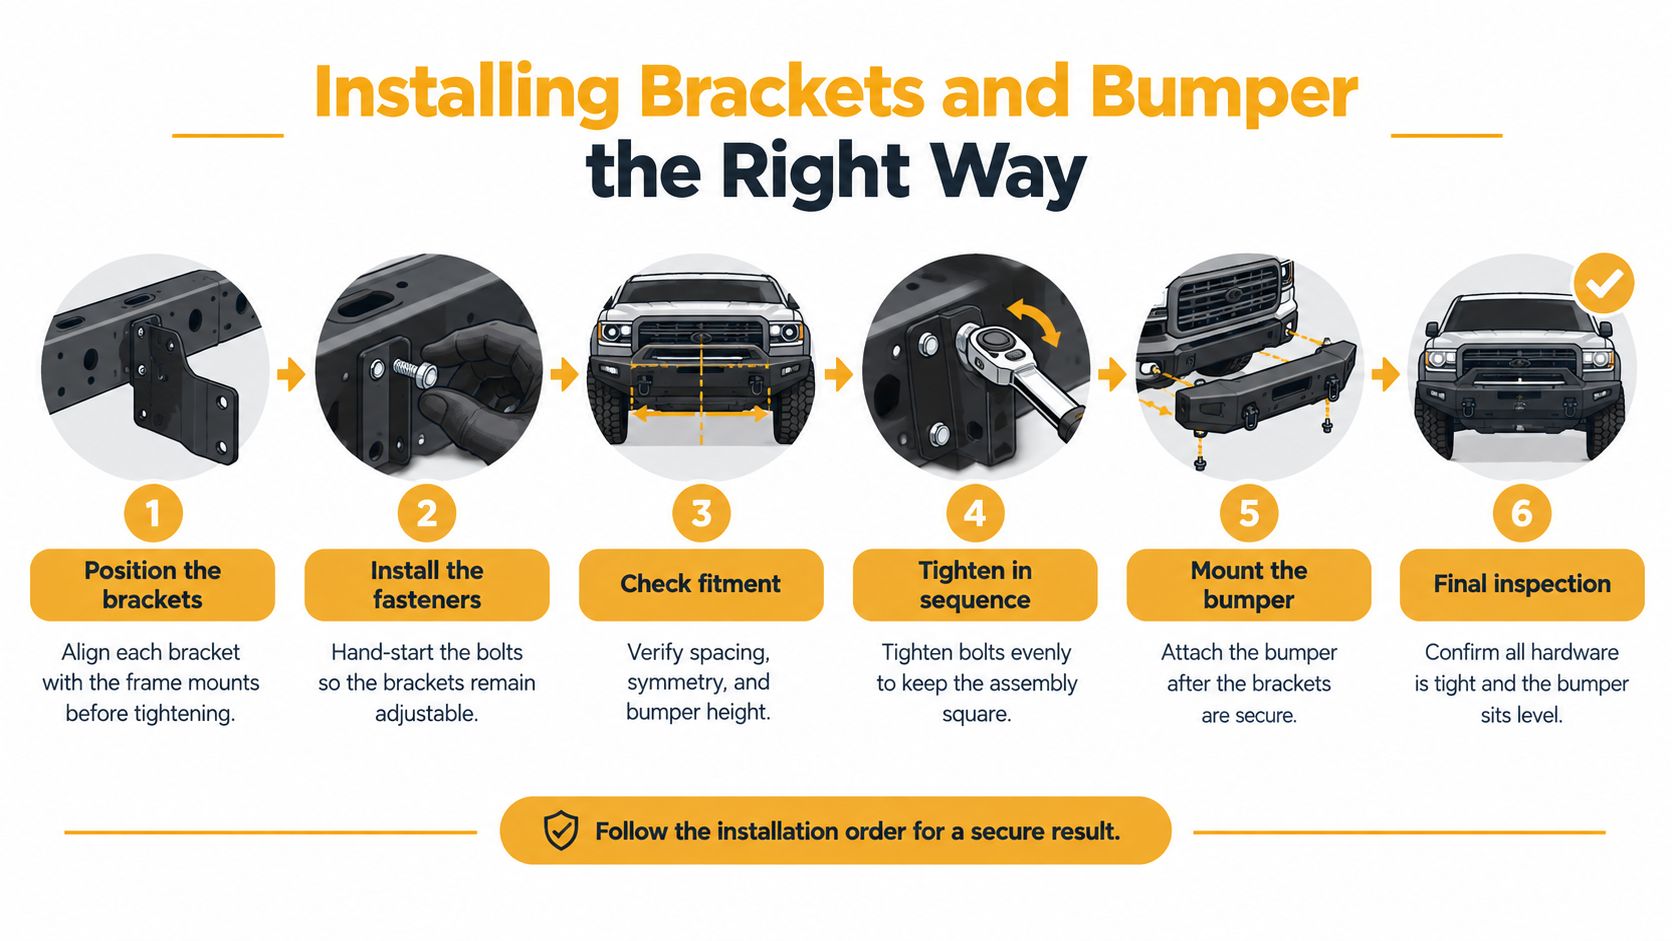
Set the brackets on clean, flat horn surfaces. Hand-start every bolt, then check spacing, symmetry, height, and hood and grille gaps while the assembly can still move. Tighten the bracket fasteners evenly in a cross pattern, then attach the bumper face once the brackets sit square.
A hole that will not line up is a warning. Find the cause instead of reaming the hole or pulling the parts together with an impact tool. Forced alignment leaves the bracket under stress, and road vibration works on that joint mile after mile.
Use the specified fastener diameter and strength class. Washers must sit fully on sound metal. Keep fasteners and coatings compatible, since a mismatched joint can affect both clamp load and corrosion.
Torque It Like You Mean It
Tighten in stages and follow the bracket or fastener maker's procedure. Federal rear impact guard testing assumes the guard is mounted exactly per its installation procedure, and the same discipline applies to front bumper brackets even though that federal standard does not govern them, as described in the Federal Register FMVSS rear impact guard guidance.
Use a calibrated torque wrench and the torque value from the bracket or fastener spec. Record the value on the PM sheet. If an impact tool was used, re-torque by hand in the same cross pattern before the truck goes back into service.
After tightening, inspect the witness marks, bracket contact, and clearance around steering parts, tow points, lights, and wiring. Open and close the hood. Where clearance is close, turn the wheels from lock to lock.
Recheck the joint after the first loaded route. A bracket can settle or slip once the truck has worked over real pavement. Log the torque check in the PM file so the next technician has a record to follow.
Compliance Limits and Costly Mistakes to Avoid
Treat the bolt pattern as the minimum check. Strength class, bracket thickness, frame condition, and load path must also suit the job before the mounting setup is sound. A bumper face can look level while a bracket takes loads it was not built to handle.
NHTSA says federal bumper standards do not apply to trucks, according to its guidance on truck bumper standards. State rules may still require a secure mount attached in a way that is equivalent to the original. Check local inspection requirements before changing the bumper's mounting height or structure.
Washington's bumper rules require the bumper to be horizontal, load-bearing, attached to the frame, and able to transfer impact energy; they also set height rules for trucks above 7,500 pounds GVWR. Review these bumper safety standards basics with your state inspection manual before altering the setup.
Mistakes That Cost Real Money
- Stacking spacers: Piling up washers to create stand-off can bend bolts and shift the load path.
- Field welding brackets: An improvised weld changes how the mount flexes and can crack at the weld toe.
- Reusing hit hardware: Stretched or corroded bolts lose clamp load. Holes can then grow, letting the bumper move.
- Towing off the bumper: The face bar is not a tow connection.
Under the FMCSA rear end protection guidance, a tow bar that depends on a heavy vehicle's bumper is not an acceptable tow connection when the towed vehicle exceeds 5,000 pounds. Use frame-mounted tow points suited to the towing load.
A level-looking bumper can still hide trouble. If one bracket is carrying preload it was not designed for, inspect the mount before that stress turns into a failure.
Do Not Confuse Tractor Bumpers With Trailer Guards
Keep tractor fitment separate from trailer requirements. FMCSA's rear-end protection rule covers trailers and semitrailers with a rear impact guard or similar device, and excludes tractors, pole trailers, and driveaway-towaway vehicles, according to its rear-end protection guidance.
Certain trailers built on or after January 26, 1998 must also carry a permanent mark or label and meet 49 CFR §§ 571.223 and 571.224. A Peterbilt 389 front bumper does not replace a regulated trailer underride guard, and a trailer guard bracket is not a tractor bumper mount.
For covered guards, the horizontal member needs at least 100 mm of projected vertical height. Its rearward surface must generally sit within 305 mm of the rear extremity, and the bottom edge cannot exceed 560 mm above the ground, as specified in the Federal Register FMVSS 223 and 224 guard requirements. Measure at several points. A guard that only looks close can fail inspection.
Ordering Your Bumper and Next Steps for Your Fleet
The bracket is the fitment decision. A bumper face can look right in a product photo and still leave you with a poor match at the frame. Before ordering, confirm the truck's make, model, year, and frame layout, then inspect the brackets, frame horns, mounting holes, and hardware.
Write the measurements down before opening a product page: bracket spacing, horn condition, desired bumper height and drop, and the cutouts you need. Keep the notes with the truck's service records. They help prevent wrong-part returns and give the installer a clear reference.
Build It to the Truck
Galhor's 3D configurator lets you select brand, model, year, style, cutouts, and finish to build a direct bolt-on bumper for Freightliner, Peterbilt, Kenworth, and Volvo trucks. Match the bracket pattern and bumper layout to the truck, rather than choosing by width alone.
Use the material table above to compare in-stock stainless 304 and 430 flat bumpers with made-to-order carbon steel. Delivery is by LTL freight across the United States. Check the warranty coverage for manufacturing defects and the returns policy before ordering.
Fleet teams should keep one fitment sheet per truck. Record bracket measurements, fastener specifications, torque date, and the initials from the first-route recheck. The next replacement is easier to set up, and the service record shows what was checked.
For an owner-operator, a correct install beats paying for a second one. A bumper that matches the brackets stays properly mounted, while forcing a mismatch by slotting holes can leave the truck sitting in the bay.
Once your bracket measurements are written down, use the configurator to match cutouts and finish, then check the stock status before you order so you know which ship time applies. Inspect the mount again after the first route, and record anything loose or out of line.
Ready to match the bumper to the brackets and frame horns you inspected? Visit Galhor Inc. to configure a direct bolt-on chrome or stainless bumper by brand, model, year, cutouts, and finish, with U.S. shipping options for in-stock units. Choose a bumper that fits the frame, not just the photo.