
Freightliner FLD120 Bumper: Fitment, Styles, and Materials
October 22, 2026 · Francisco Hornelas

You're standing in the yard before daylight, looking at a Freightliner FLD120 bumper that's cracked at a mount, peeling at the edge, or bent from a dock tap. The truck can still run, but you don't want the next inspection, customer, or vibration mile to turn a worn front end into downtime.
Table of Contents
- Finding the Right Freightliner FLD120 Bumper
- FLD120 Bumper Fitment Basics You Need to Know
- Bumper Styles, Heights, and Cutout Options
- Materials and Corrosion Resistance Compared
- Direct Bolt-On Installation and What to Inspect
- Shipping Weight and Freight Planning for FLD120 Bumpers
- How to Choose the Right FLD120 Bumper
Finding the Right Freightliner FLD120 Bumper
Most bad bumper orders start the same way. A driver or shop foreman searches by model name, sees a shiny chrome photo, clicks buy, and assumes Freightliner FLD120 bumper means one standard part. Then the freight truck arrives, the crate comes off, and the bolt pattern, brake in the wrap, or tow openings don't line up with the truck in the bay.
That mistake costs more than the return label. You've got a driver waiting, a bay tied up, and a large part that has to go back by freight. For a fleet, multiply that across units and locations. For an owner-operator, one wrong shipment can wipe out the time you set aside for the repair.
What actually decides the order
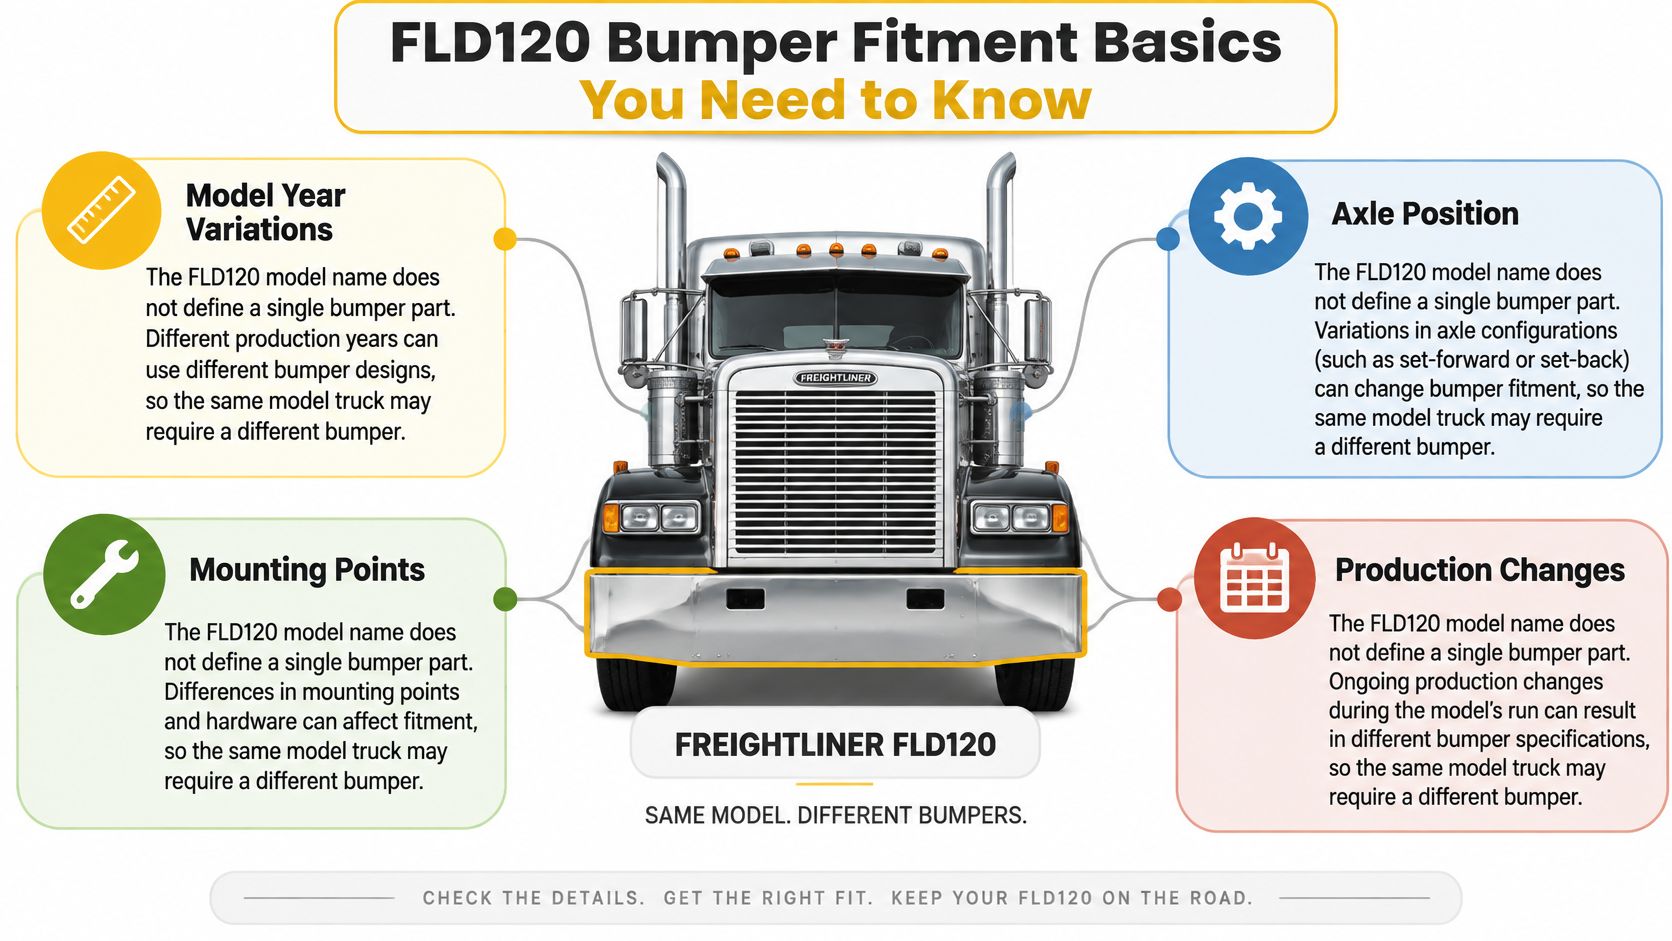
Four checks decide whether the bumper fits and lasts. You need the axle position, the bumper height, the cutout layout, and the material and finish. Skip one and you're guessing.
- Axle position: Setback and set-forward trucks don't share the same front-end geometry.
- Height and shape: Height, length, and break-back depth change how the ends wrap toward the tires.
- Cutouts: Tow holes, fog lights, step openings, and light holes must match your hardware and wiring.
- Material: Steel gauge and finish decide how the bumper handles salt, debris, and yard contact.
A direct bolt-on bumper is the right goal because it should mount without drilling or cutting. But direct bolt-on only works when the bumper was built for your exact configuration. Measure first, confirm the part number, then order. That order feels slower for ten minutes. It saves days later.
A tape measure and three clear photos of your current bumper will prevent more returns than any fitment chart that only lists a model name.
You'll also plan for freight before you buy. These are large, heavy parts, not parcel boxes. If you treat fitment, material, and shipping as one decision, you get a bumper that bolts on, looks right, and stays tight on long hauls.
FLD120 Bumper Fitment Basics You Need to Know
The FLD120 name covers a long production run and more than one front end. That's the root of the confusion. The FLD series began around 1987 with the FLD112 and FLD120 as aerodynamic, long-haul trucks, and the FLD120 continued through approximately model year 2009 or 2010 while the FLD112 ended after 2003, as outlined in Freightliner's model history for the FLD series.
That same history notes larger FLD120 engine options, including Detroit Diesel Series 60 and Cummins N14 powerplants, at the page linked above. More important for bumper fitment, the truck came in setback-axle and set-forward-axle configurations. Those layouts affected the hood, headlight arrangement, and bumper geometry. Axle position isn't trim. It's the starting point.
The visual below maps the four fitment inputs you should confirm before you talk about chrome or price.
Why catalogs split FLD120 applications
Good catalogs separate standard, setback-axle, set-forward-axle, and severe-duty bumpers because the mounting points and wrap can differ. Replacement listings commonly start FLD120 applications in 1989, while severe-duty versions are often listed for 1997 to 2009, according to the model history cited above. If a listing only says FLD120 and gives you no way to narrow year, axle, or duty type, treat it as incomplete, not universal.
Severe-duty status matters for the same reason. A truck spec'd for tougher service may need a different opening layout or mounting arrangement than a highway tractor. Model year alone won't tell you that. Look at the truck, the current bumper, and any OEM or replacement part number you can find.
A real configurable example
One concrete option is the Chrome bumper for Freightliner FLD 120, designed and manufactured by Estañadora, owner of Galhor, Inc. Its catalog snapshot lists 10-gauge chrome-plated steel, an 11-gauge 430 stainless steel premium option, and a gauge-7 mounting bracket for direct installation, per that product listing. It also lists cutout choices for tow holes, fog holes, and light openings based on configuration, plus a triple-layer chrome finish with 35 microns of nickel at the same listing.
That's the level of detail you want from any seller. If they can't state material, bracket inclusion, cutouts, and fitment limits in plain terms, don't trust a photo to fill the gaps.
Watch a front-end walkthrough before you measure, then compare what you see with your own brackets and openings.
Write down year, axle type, and severe-duty status before you shop. Those three facts narrow the field fast and keep you from comparing bumpers that were never built for your truck.
Bumper Styles, Heights, and Cutout Options
Height is where many buyers shop by looks first. A taller face gives a bolder drop and more coverage. A shorter bumper can suit trucks that need ground clearance or a closer to stock profile. The useful question isn't which height looks toughest in a photo. It's which height matches your axle layout, brackets, and current bumper.
Documented FLD120 configurations include 12, 14, 16, and 18 inch heights, with compatibility tied to set-back-axle layout, severe-duty variant, fog-lamp and tow-hook cutouts, and bolt pattern, as described for FLD112 and FLD120 replacement bumper geometry. You can't pick height in isolation.
Height, wrap, and break-back work together
Break-back is how far the bumper turns back toward the wheel at each end. Two bumpers can share a height and still fit differently because one wraps deeper than the other. That affects tire clearance, end alignment, and how the bumper lines up with the hood and fenders.
- Standard style: Best when you want a stock type replacement and your current dimensions are known.
- Partial-wrap style: Turns back partway at the ends and suits trucks whose original geometry uses that offset.
- Severe-duty style: Built for tougher service applications and may use different openings or mounting details.
- Taller drop style: Gives more face height, but you must confirm ground clearance, bracket alignment, and lamp visibility.
Don't assume taller is stronger or better. A tall bumper on the wrong brackets can sit wrong, crowd openings, or force you to modify a part that should have bolted on.
Cutouts must match the truck you own
Cutouts are functional, not decoration. Tow-hook openings must line up with your tow hardware. Fog-light holes must match lamp size and wiring location. Step cutouts need to land where a driver can use them. Marker or light openings have to leave lamps visible after install.
Later and severe-duty versions can use larger tow openings and a different bolt pattern, creating alignment problems even on a bumper sold for an FLD120, per the replacement geometry source linked above. That's why your check should include current height, centerline dimensions, cutout arrangement, and OEM or replacement numbers before ordering, as that same source recommends.
Practical rule: Photograph every opening on your old bumper with a tape measure in frame. A seller can match a measured photo. They can't match a memory.
If your old bumper is missing or too damaged to measure, use the VIN, OEM number, bracket photos, and frame measurements instead. Don't fill missing data with a guess. The cutout layout you order should reproduce the working layout on your truck unless you're also changing lamps or tow hardware on purpose.
Materials and Corrosion Resistance Compared
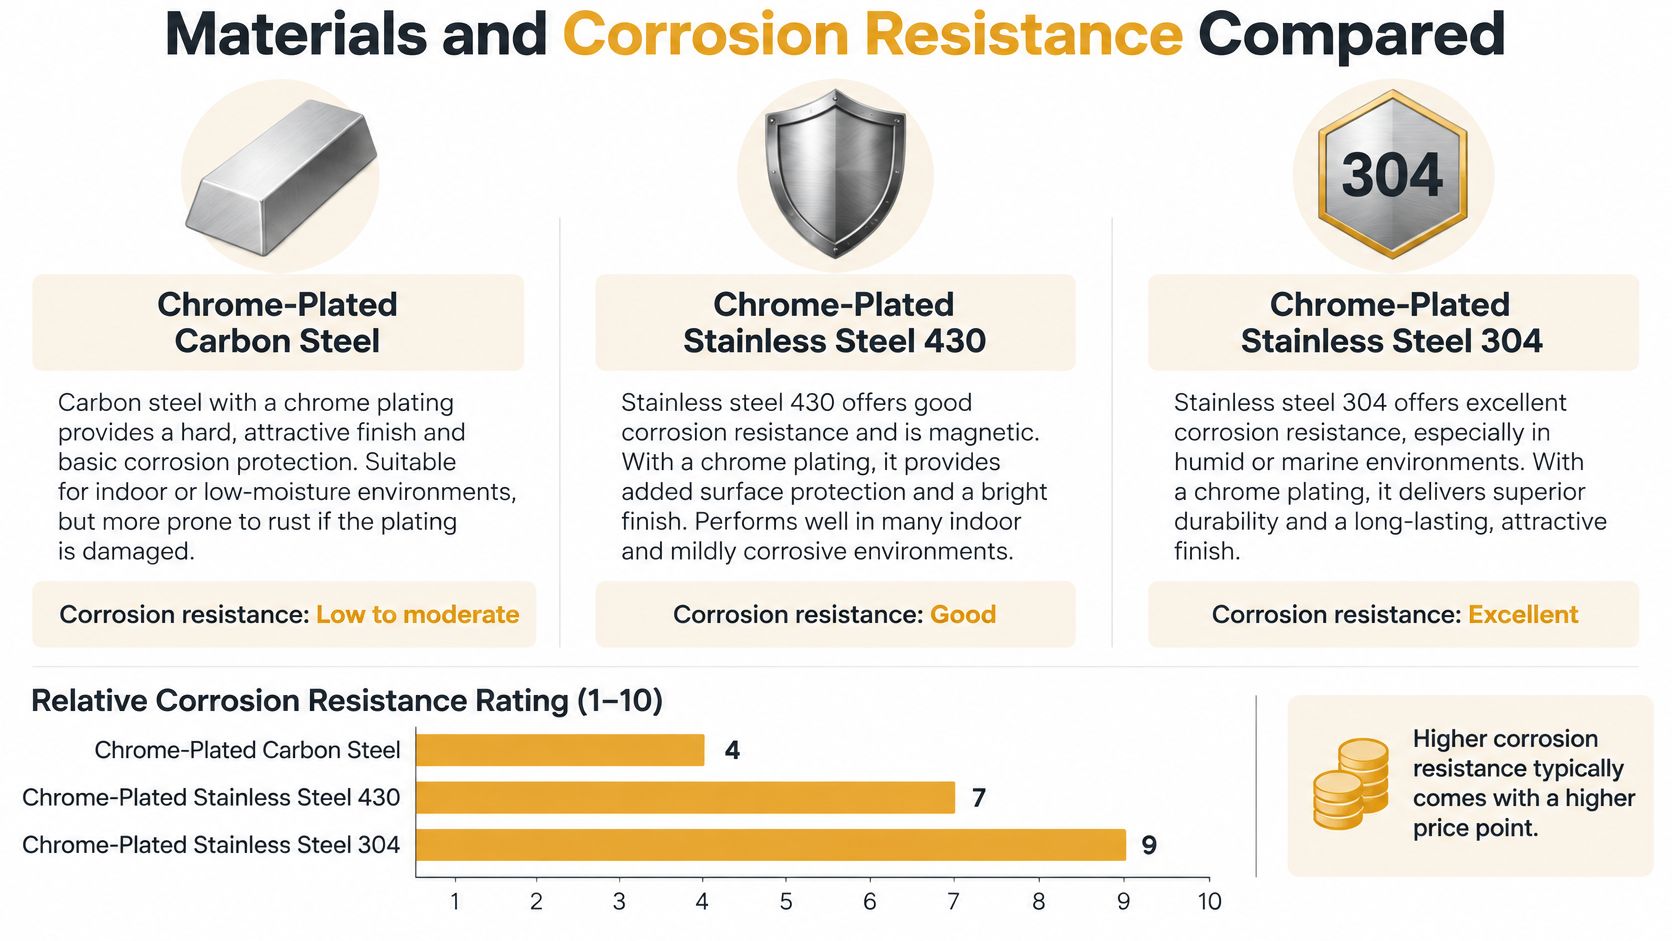
Chrome shine gets the attention. Base metal decides what happens after winter salt, pressure washers, stone chips, and yard contact. For an FLD120, your main choices are chrome-plated carbon steel, chrome-plated stainless steel 430, and chrome-plated stainless steel 304. They can look similar on day one and age very differently.
The chart below compares the three material paths before the detailed trade-offs.
Carbon steel, 430 stainless, and 304 stainless
Chrome-plated carbon steel is the value path when upfront cost matters and the truck runs in milder conditions or gets washed and inspected often. The chrome finish protects the surface, but once that finish is chipped through, the carbon steel underneath needs prompt attention. It can be a smart buy for a work truck if you maintain it.
Stainless steel 430 improves corrosion resistance over carbon steel because the base metal itself resists rust better. It's a strong middle choice for many U.S. routes, especially where rain and road treatment are common but the truck isn't living in constant salt spray. In the Galhor catalog example cited earlier, the premium option is 11-gauge 430 stainless steel at the product listing already linked above.
Stainless steel 304 is the choice when corrosion exposure is a constant cost. Think northern winter routes, coastal air, chemical splash, or a show quality truck you plan to keep. You pay more upfront to reduce finish failure risk and keep the front end presentable longer.
For a deeper breakdown of base metal behavior, read stainless steel versus carbon steel for truck bumpers before you decide by shine alone.
Gauge and finish process matter
Gauge tells you thickness, and thickness affects stiffness, dent resistance, and weight. One FLD120 specification identifies 10-gauge steel, approximately 0.1345 inch nominal thickness, with a partial-wrap design and 13-degree offset, as listed in the FLD partial-wrap bumper specification. That spec also includes tow-hook and step cutouts and mounting brackets at the same source.
Ask every seller four direct questions. What's the base material? What's the gauge or measured thickness? How is it reinforced? What's the finish process? A triple-layer chrome process with a stated nickel layer is a specific claim you can compare. The word premium by itself tells you nothing.
A thicker, better-supported bumper can resist bending better, but it can also add weight, as noted in the partial-wrap specification linked above. Match that trade-off to your brackets and use. A long-haul highway truck, a regional unit that sees docks daily, and a severe-duty truck don't need the same balance.
Direct Bolt-On Installation and What to Inspect
Direct bolt-on should mean the bumper mounts to the truck's intended points with no drilling, cutting, or bracket fabrication. It doesn't mean you skip inspection. The fastest install still fails early if you bolt a straight bumper to bent brackets or wallowed-out holes.
Start before the old bumper comes off. Take photos of both ends, every cutout, the brackets, and the hardware stack. Note which holes are used and whether shims or spacers are present. Those photos settle arguments during install and help if you need support from the seller.
Hardware and tightening
The owner's manual identifies 5/16-inch threaded fasteners, washers, and lockwashers for at least certain front-mounted brackets, and replacement guidance warns against impact-wrench installation in favor of hand-tightening, as documented in the FLD120 owner's manual reference. Hand-tightening lets you feel cross-threading, uneven seating, and bracket pull before you damage threads or distort the shell.
For a step-by-step overview of shop sequence, see how to install a bumper without forcing the fit. Work side to side, leave hardware snug until alignment is set, then finish tightening evenly. If you have to pull the bumper hard to reach a hole, stop. Something is bent, wrong, or mismatched.
Inspection checklist before final torque
During installation or collision repair, inspect these items closely because each one can cause vibration, fatigue, or misalignment after the truck returns to service, per the owner's manual reference linked above.
- Elongated holes: Frame or bracket holes that are oval instead of round.
- Cracked welds: Small cracks around bracket or reinforcement welds.
- Bent reinforcement: Members that no longer sit flat or parallel.
- Missing hardware: Missing washers, lockwashers, or fasteners in the stack.
- Plating failure: Peeling or bubbling that exposes base metal near mounts.
Don't reuse questionable brackets just because they came off the truck. A new shell on a twisted bracket will sit crooked and move under vibration. That movement can change lamp and tow-opening alignment over time.
Finish at normal ride height with the truck on level ground. Check projection at both ends, confirm lamps and reflectors are unobstructed, and verify tow openings are usable, as the manual reference linked above advises. A bumper can look perfect in chrome and still be wrong if a light is blocked or a bracket holds it at the wrong angle. Photograph the finished install for fleet records.
Shipping Weight and Freight Planning for FLD120 Bumpers
Freight planning isn't paperwork after the sale. It's part of fitment. An FLD120 bumper is long, awkward, and heavy enough that a wrong shipment creates a second freight bill and more downtime. Plan the delivery address, unloading help, and inspection process before the crate leaves the seller.
Published FLD120 examples show why specs vary. A 12-inch design with 92-inch full length and 6-inch break-back lists at approximately 130 pounds, while another setback-axle chrome bumper is 12 inches tall with a 23-inch break-back, packaged at 96 by 20 by 15 inches and 187 pounds, according to published FLD120 bumper shipping specifications. Same height family, very different package.
FLD120 bumper shipping specifications
| Bumper Height | Listed Weight | Shipping Dimensions | Application |
|---|---|---|---|
| 12 inch | 130 pounds | 92 inch length, 6 inch break-back | FLD120 design cited above |
| 12 inch | 187 pounds | 96 by 20 by 15 inches | FLD120 and FLD112 setback-axle |
| 16 inch | 150 pounds | 80 by 40 by 10 inches | Severe-duty, 1997 to 2009 |
| 18 inch | 150 pounds crated | 98 by 24 by 34 inches | FLD120 and FLD112, 3/16-inch steel |
The severe-duty and 18 inch figures in that table come from the same published specifications linked above. The spread from 130 to 187 pounds affects LTL classification, handling, storage, and installation planning, per that source.
If you're new to freight terms, read what LTL freight shipping means for large truck parts before you choose a delivery location. A shop with a dock or forklift is easier than a home address with no way to unload a long crate safely.
When the bumper arrives, inspect the crate before signing, open it promptly, and compare height, openings, and brackets against your order photos. Report visible damage with photos right away. The cheapest freight decision is confirming fitment so the bumper only ships once.
How to Choose the Right FLD120 Bumper
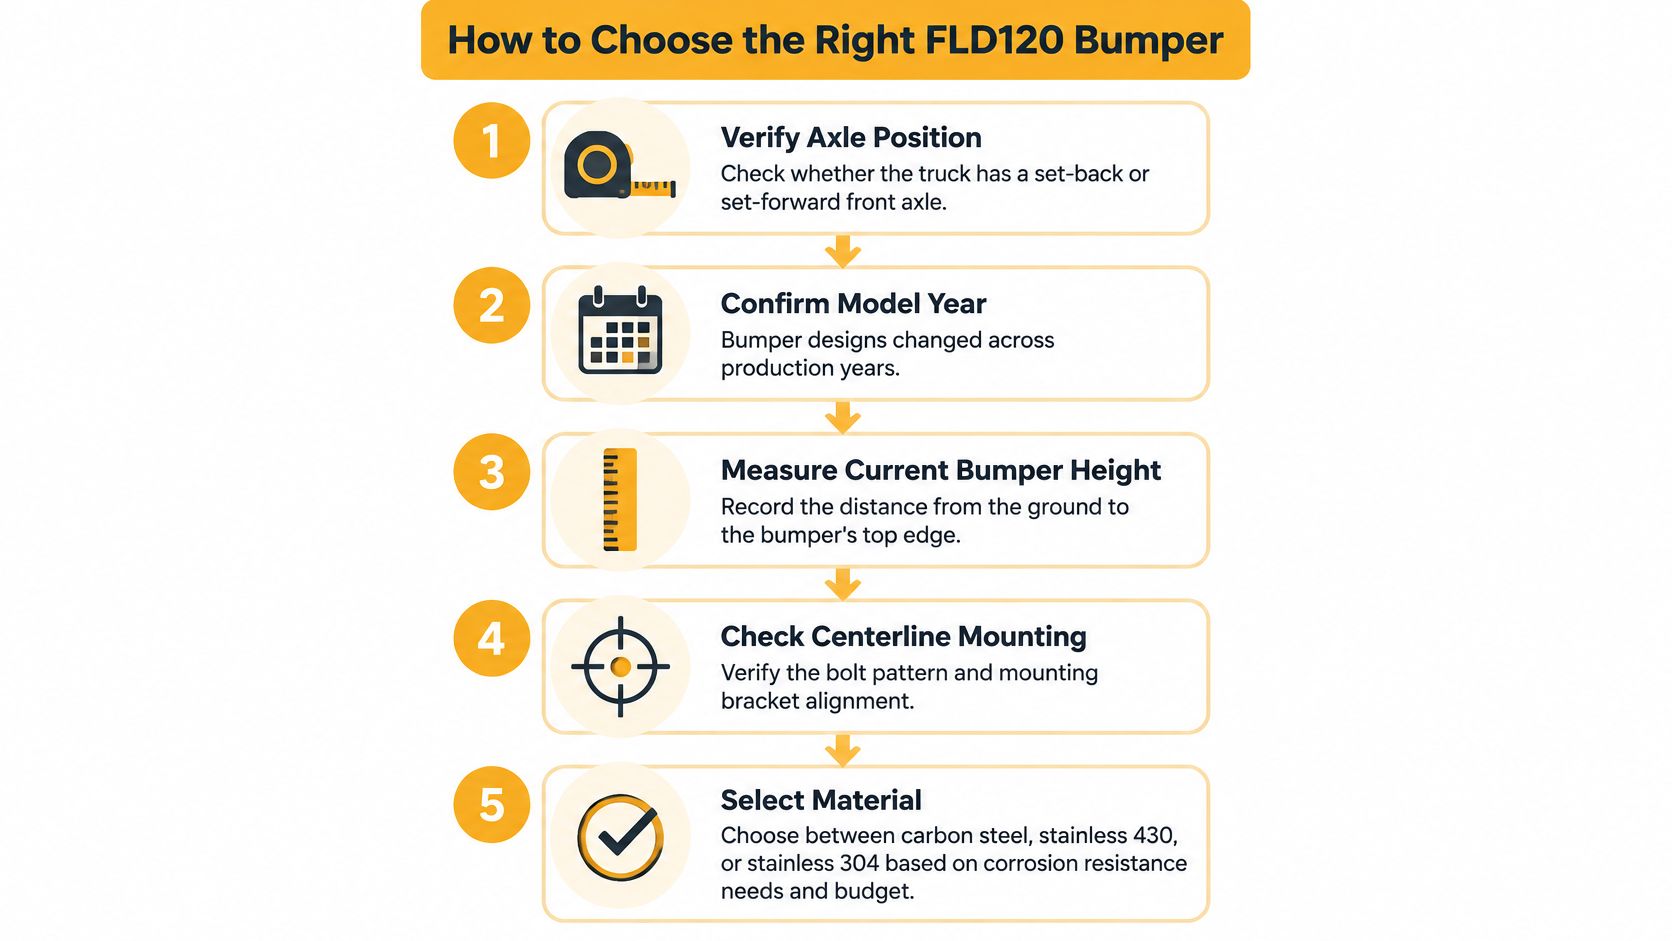
Put the decision in a fixed order and you'll stop sorting through bumpers that can't fit your truck. Axle first, measurements second, cutouts third, material fourth, freight last. If you reverse that order and start with finish or price, you'll waste time on parts you should eliminate in the first minute.
The five-step flow below turns the checks from the earlier sections into a printable shop routine.
Your measurement-first checklist
- Verify axle position: Confirm setback-axle or set-forward-axle from the truck itself, not from a prior owner's description.
- Confirm year and duty type: Record model year and whether the truck is a severe-duty application.
- Measure the current bumper: Record height, overall length, centerline dimensions, and break-back depth.
- Map every cutout: Measure tow holes, fog-light openings, step cutouts, and light holes from centerline.
- Confirm mounting: Photograph brackets, count holes, and record frame-to-frame spacing and bolt pattern.
- Cross-check numbers: Match VIN and OEM or replacement part numbers when available.
- State what's included: Confirm whether brackets, hardware, and factory plastic ends are included or excluded.
That last item causes avoidable anger. Listings can differ on brackets and end pieces, and one listing specifically limits an 18-inch bumper to set-back-axle use and advises verifying VIN, OEM part number, and centerline measurement before LTL shipment, as noted for FLD120 and FLD112 bumper fitment verification. Generic phrases like 1989 and newer don't replace that workflow, per the same listing.
Direct fit is a result you verify with measurements. It isn't a promise you should accept from a model name alone.
Which material fits your operation
Choose carbon steel if budget leads and you'll stay on top of chips and washing. Choose 430 stainless if you want better corrosion resistance for mixed U.S. weather without jumping to the top material tier. Choose 304 stainless if salt, coastal air, or long-term appearance makes corrosion your main cost. In every case, confirm gauge, bracket inclusion, cutouts, and finish process in writing.
Send the seller your checklist and photos before payment. A good parts counter will welcome that information because it protects both sides from return freight. If a seller pushes you to order without axle, centerline, or cutout confirmation, walk away. Order now only after the measurements match, then plan freight delivery and inspection so the truck goes back to work on schedule. Upgrade your truck today by buying the bumper your FLD120 actually needs, not the one with the broadest fitment claim.
Ready to order with your measurements in hand? Galhor Inc. builds configurable direct bolt-on Freightliner FLD120 bumpers in carbon steel and stainless options with your selected cutouts and finish, backed by support from Magnolia, Texas. Visit the site, configure your bumper by model, year, style, and openings, and get yours today with fast U.S. shipping options for in-stock units.