
Front Bumper Kit Guide: Fitment, Materials and Install
November 16, 2026 · Francisco Hornelas

Your truck is in the shop, the new front bumper kit has arrived, and the brackets in the box don't match the frame. The old bumper is already off. Now a chrome upgrade has turned into a parts return and a missed load.
Whether you're buying a Peterbilt 389 bumper, a Kenworth W900 chrome bumper, or a replacement for a Freightliner or International, start with what keeps the truck working. Fitment, base metal, sensor clearance, and installation matter more than a good catalog photo. Get those right, and you can have the professional look without paying for avoidable downtime.
Table of Contents
- What Comes in a Front Bumper Kit
- Material Choice, Corrosion and Lifetime Cost
- Confirm Model, Year and Mount Fit Before You Order
- Radar, Cameras and Calibration Before Dispatch
- How to Install a Front Bumper Kit Step by Step
- Quick Answers for Front Bumper Kit Buyers
- Confirm Your Kit and Order Today
What Comes in a Front Bumper Kit
A front bumper kit commonly includes a bumper shell, mounting brackets, fasteners, and openings for the truck's equipment. But kit doesn't always mean complete. Some sellers supply the bumper alone, while others include brackets or expect you to reuse serviceable factory hardware.
Before booking shop time, get an itemized packing list. Confirm which parts arrive in the box and which parts must come from the truck or a separate order.
Front bumper kit parts and what to verify
| Part | What It Does | What to Verify Before Ordering |
|---|---|---|
| Bumper shell | Takes impacts and carries the finish | Steel gauge, material grade and width |
| Mounting brackets | Carry the bumper load into the frame rails | Bracket shape and spacing match your frame and model year |
| Fasteners and hardware | Hold the assembly under vibration | Thread size, grade and count match the kit list |
| Headlight and fog light cutouts | Keep lamps visible and working | Hole positions match your lighting setup |
| Tow hole cutouts | Keep tow access open | Cutouts line up with your truck's tow points |
| Sensor brackets or openings | Keep radar and cameras in their field of view | Positions match your sensor locations; hold the order if not documented |
Check More Than the Shell
The shell takes road contact, but it isn't a promise of crash protection. Its shape, thickness, and mounting system all affect how the assembly handles loads. Lower gauge numbers mean thicker steel when comparing the same steel gauge system.
Brackets transfer those loads into the frame rails. Two bumpers can look identical from the front but use different bracket spacing, offsets, or mounting holes behind the face.
Fasteners must match the specified thread, strength grade, washers, and locking method. A bolt that slides through the hole isn't automatically the right bolt for highway vibration.
Inspect Before Removing Anything
Lay out the delivered parts on a clean bench. Compare the packing list with the order, then inspect the shell, mounting holes, brackets, and finish for shipping damage.
- Count the hardware. Identify missing nuts, washers, spacers, and brackets before the truck enters the bay.
- Check the openings. Compare lamp, tow, and sensor locations with the actual truck.
- Document damage. Photograph the packaging and affected parts, and report problems promptly under the seller's freight procedures.
Shop rule: Don't remove a usable bumper until you've checked the replacement and everything needed to mount it.
Material and exact application are the deciding checks. A complete box still isn't useful if the steel won't suit the route or the brackets won't fit the truck.
Material Choice, Corrosion and Lifetime Cost
Kit materials compared by corrosion, upkeep and route
| Material | Corrosion Resistance | Upkeep | Best Fit |
|---|---|---|---|
| Chrome-plated carbon steel | Good while the coating is intact; weak at chips and cut edges | Touch up chips quickly and wash regularly | Dry routes and budget builds |
| Chrome-plated 430 stainless | Moderate; handles everyday road grime well | Clean regularly and after salt exposure | Mixed routes in moderate weather |
| Chrome-plated 304 stainless | Strongest of the three in humid, salty or chemical-heavy air | Clean after salt exposure and keep the finish intact | Coastal, winter-salt and humid routes |
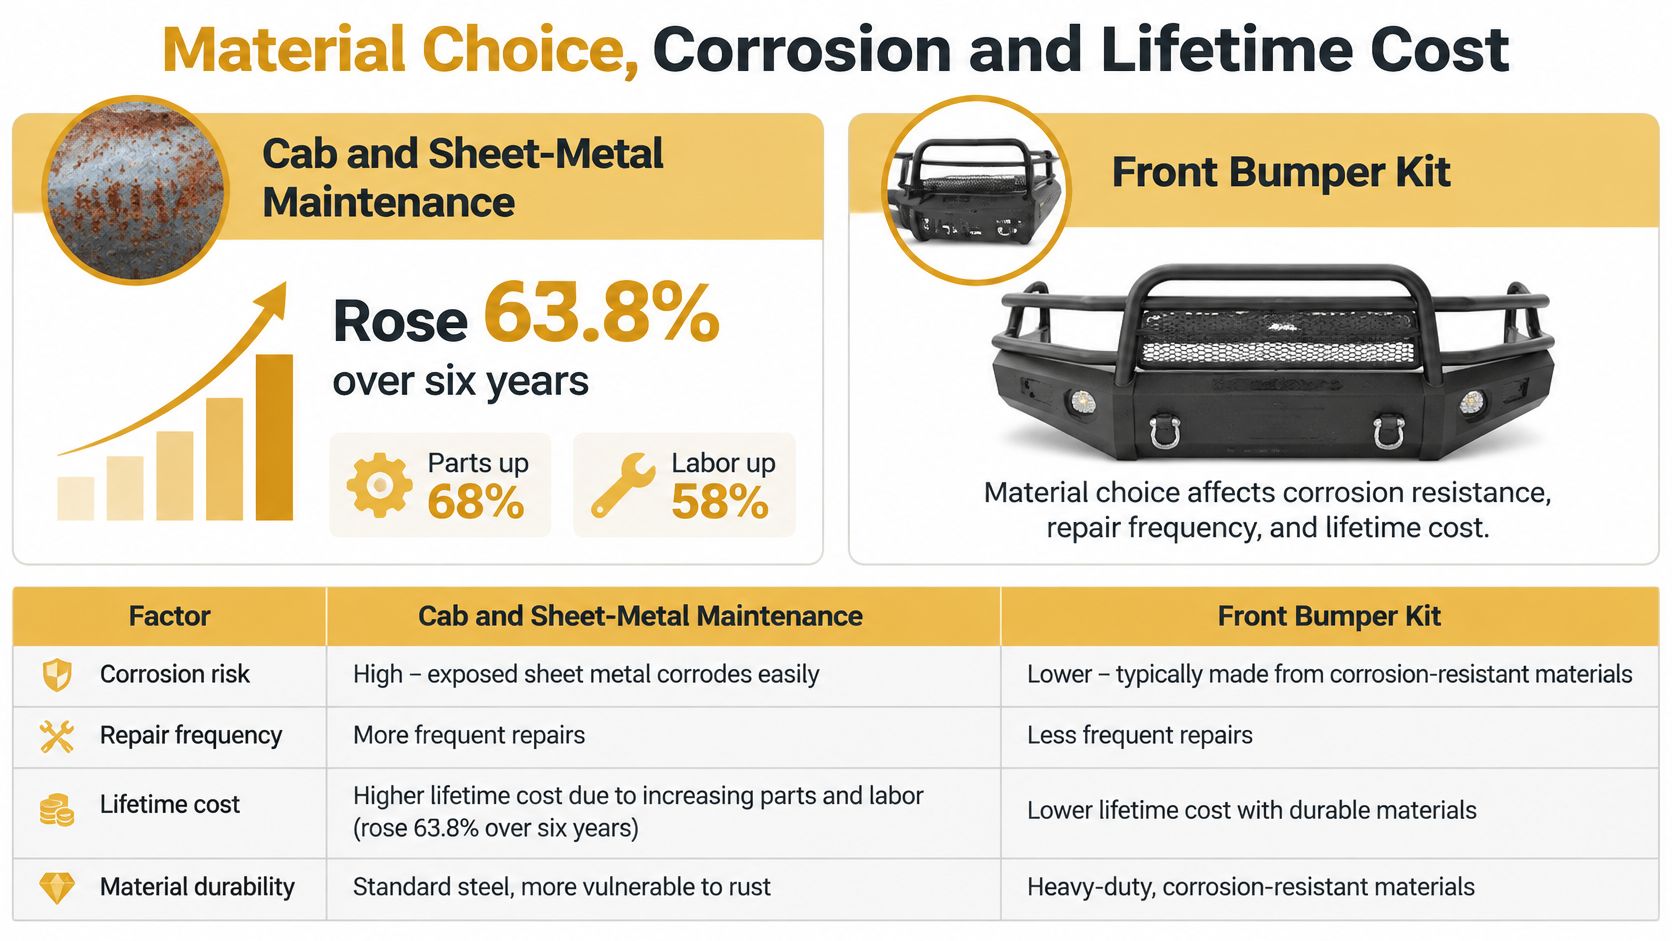
Body maintenance deserves attention in the buying decision. According to FreightWaves' maintenance cost report, the cab-and-sheet-metal maintenance category rose 63.8% over six years, with parts up 68% and labor up 58%. That category includes collision damage, rust, structural work, and body components, not bumper costs alone.
The practical lesson is to compare the installed bumper's working life, not just its purchase price. A cheaper shell doesn't save money if your crew spends more time cleaning corrosion, repairing damage, or arranging another replacement.
This comparison illustrates why material and maintenance belong in the same budget.
Chrome Is the Finish, Not the Base Metal
Chrome-plated carbon steel offers stiffness and a lower-cost starting point. Its weakness appears when damage exposes the steel at chips, cut edges, mounting holes, or weld zones. Repair exposed areas promptly using a method suitable for the coating.
Chrome-plated 430 stainless balances cost and moderate atmospheric corrosion resistance. It suits mixed routes where the truck receives regular washing and isn't constantly exposed to harsh salt conditions.
Chrome-plated 304 stainless offers stronger corrosion resistance in humid, chloride-contaminated, and chemically aggressive conditions. It still needs cleaning. Stainless isn't permission to leave winter brine behind the brackets.
For a concrete specification example, the Steel chrome bumper uses 10-gauge chrome-plated steel, a mirror-polished finish, and a triple-layer hexavalent chrome process with 35 microns of nickel. Its documented installation is direct bolt-on, with standard and blind mounts available. Those details describe construction and mounting, not a guarantee against every impact or corrosion condition.
Thickness matters, but don't compare thickness alone. A heavier shell on poorly aligned brackets can still stress mounting points. Ask for the base metal, thickness, finish system, and mounting arrangement together.
Match Maintenance to the Route
On salted highways, rinse the bumper after storms and winter runs, including its backside when accessible. Salt left in seams and behind brackets is harder to spot than grime on the polished face.
For coastal routes, inspect fasteners and metal-to-metal contact points at each scheduled service. Check for contamination, trapped moisture, and corrosion around dissimilar metals.
On dry routes, watch for stone chips and dust buildup. Avoid wiping abrasive dust across the chrome with a dry rag.
- Wash carefully. Use a compatible cleaner and soft wash tools, then rinse thoroughly.
- Inspect hidden areas. Check edges, cutouts, mounting holes, weld zones, and bracket pockets at each service.
- Keep drainage open. Remove packed debris that holds moisture against the metal.
Count the Costs You Can Control
Polishing time, coating repairs, freight, downtime waiting for parts, and early replacement all belong in your total cost of ownership calculation. Include installation labor and any sensor work rather than treating them as unrelated shop expenses.
Read warranty exclusions before ordering. Coverage for workmanship and material defects isn't the same as coverage for road strikes, neglected salt deposits, or installation damage.
Match the material to the worst exposure your truck sees regularly, not the easiest stretch of its route.
A dry-route owner-operator who cleans and repairs chips may get good value from carbon steel. A fleet running winter brine or coastal air has a stronger reason to budget for stainless. Neither choice removes the need for inspections.
Confirm Model, Year and Mount Fit Before You Order
Use this lookup as an application check, not universal approval for every bumper carrying the same brand name. The following year ranges come from the 4 State Trucks RoadWorks bumper application listing.
Documented heavy-truck bumper fitment by model and year
| Truck Model | Years Covered | Key Check |
|---|---|---|
| Freightliner Classic 120 | 1990-2003 | Cab configuration and mount pattern |
| Freightliner Classic XL 132 | 1990-2003 | Cab configuration and mount pattern |
| International 9900 I and 9900 IX | 2000-2018 | Confirm which version your truck is |
| Kenworth W900B | 1982-2010 | Standard versus Aerocab configuration |
| Kenworth W900L | 1990-2010 | Mount pattern and lighting cutouts |
| Kenworth W990 | 2019 onward | Exact production year |
| Peterbilt 567 | 2014 onward | Mount pattern and license-plate bracket |
| Peterbilt 589 | 2024 onward | Exact production year |
The same application listing distinguishes Aerocab versions from standard W900 models. A seller's description that says only Kenworth or Peterbilt doesn't establish a bolt-on fit.
Build a Truck-Specific Order Record
Collect the truck details before choosing a finish or drop style. Use the vehicle identification information and inspect the actual mounting arrangement, especially if a previous owner changed the front end.
- Exact identity. Record the model, production year, and cab configuration.
- Mounting pattern. Measure hole spacing center to center and note bracket offsets.
- Lighting layout. Photograph lamp locations and measure the openings.
- Plate mounting. Specify the bracket style and any recessed plate requirement.
- Existing changes. Note aftermarket tow equipment, altered brackets, and front-end repairs.
Compare the old bumper's holes and openings with a dimensioned drawing of the replacement. Photos help identify shape, but perspective can hide spacing differences. A tape measure and clear bracket photos are more useful than a front-quarter glamour shot.
Separate Appearance From Fit
Say an owner-operator orders a bumper listed only as a Kenworth W900. The shell follows the hood line, but the fog-light openings miss the truck's lamps. Cutting the bumper now risks finish damage, extra labor, and a return problem.
The same caution applies when shopping for an 18 inch drop bumper. Check what the seller's height description measures, then assess ground clearance at yard entrances, uneven approaches, and the truck's normal ride height.
Use a truck customizer to compare the look, but verify the physical details separately. A screen preview can't prove bracket alignment or loaded clearance.
If the listing doesn't state your truck's year range or document its mounting setup, pause the order. Written fitment confirmation costs less than making the wrong bumper work.
Radar, Cameras and Calibration Before Dispatch
A cheaper bumper can cost more once sensor work enters the job. Custom radar brackets, diagnostic scans, alignment, and a delayed dispatch can erase the savings on the shell before the truck leaves the yard.
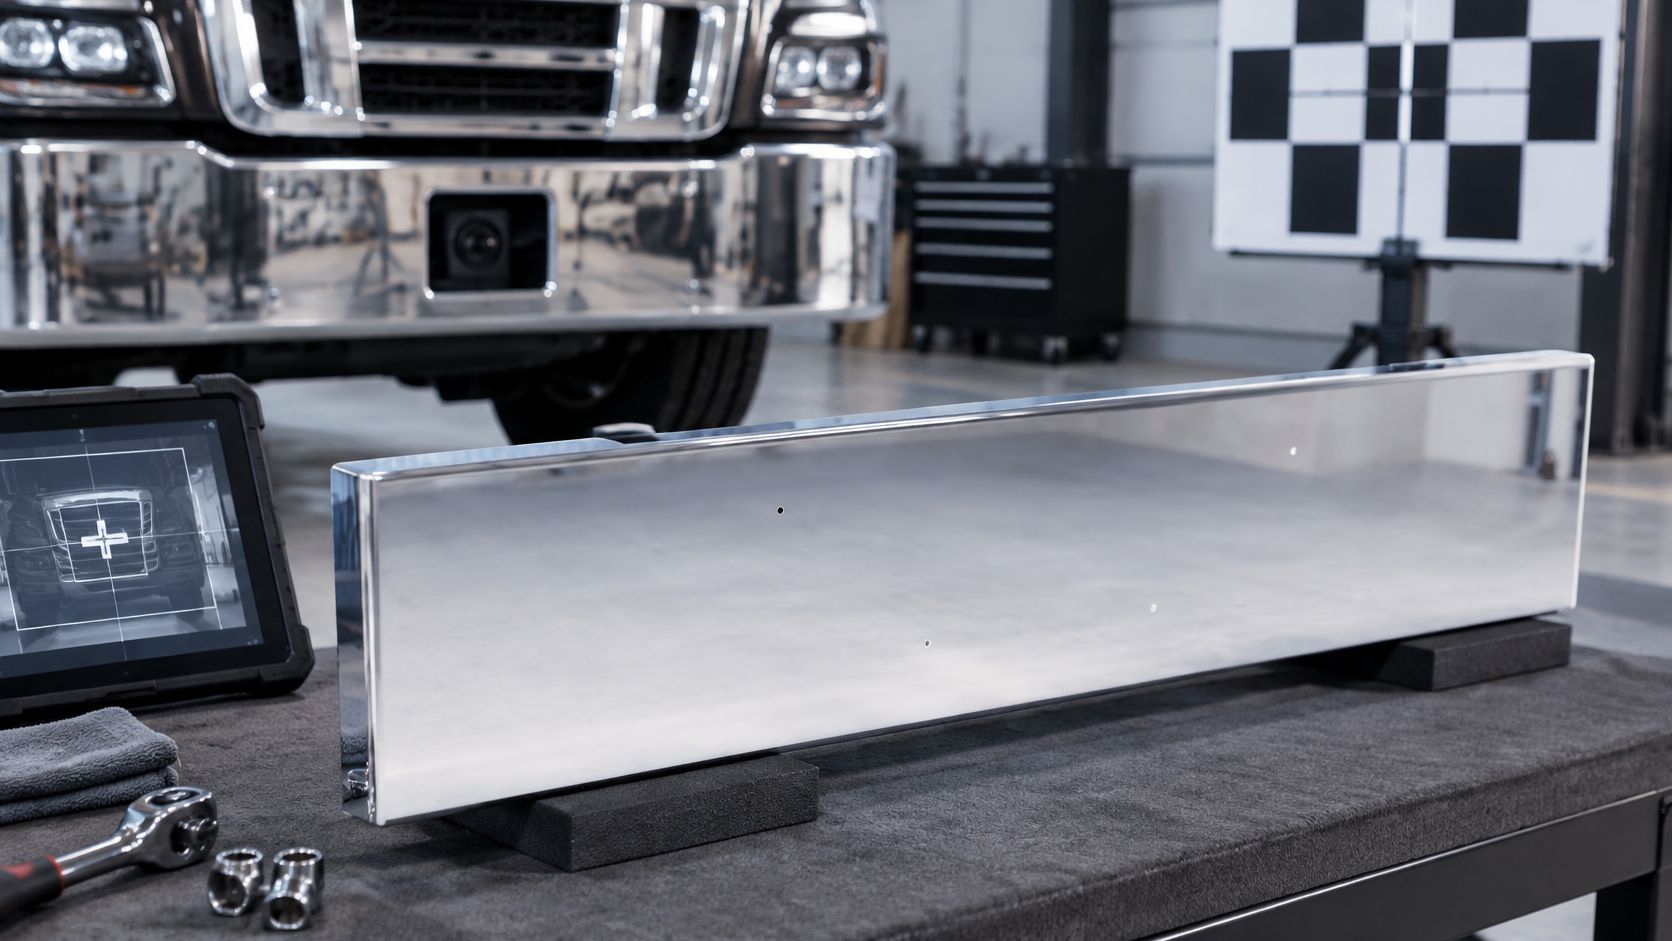
Depending on the platform, radar and cameras may sit in, behind, or near the bumper area. A visually similar replacement can change a mounting surface, sensor angle, or bracket position without looking wrong from outside.
As TruckNews explains in its ADAS repair and recalibration guide, even minor front-end damage, including a curb strike, can damage or misalign bumper-mounted radar. Technicians must follow manufacturer specifications and complete the required alignment before returning the truck to operation.
Take a radar unit whose bracket bolts through the bumper shell. Swap the shell and that bracket can sit slightly off its original position, which changes where the sensor points. Check the mounting area behind the face before assuming compatibility.
Get Sensor Answers Before Paying
Ask for documentation tied to the truck's model year and safety-system setup. A general direct-fit statement proves little if it only describes the frame mounting holes.
- Locate the equipment. Identify radar, cameras, wiring, connectors, and their brackets.
- Compare geometry. Confirm opening size, bracket position, mounting angle, and clearance against manufacturer requirements.
- Check material changes. Determine whether thickness or material near the sensor affects the approved installation.
- Assign calibration. Name the shop responsible for scans, alignment, and any required calibration.
- Price the complete job. Include diagnostics, bracket work, and the time needed to release the truck.
Federal maintenance obligations require carriers to keep parts and accessories in safe operating condition. A truck with an unresolved safety-system fault stays in the yard until the repair is done, even if the replacement bumper is bolted on tight.
Require a Documented Release
After installation, have the technician check the system using the truck manufacturer's process. When the manufacturer requires an alignment or calibration, run it even if no warning lamp is lit.
Keep the diagnostic results and completed calibration records with the repair paperwork. That gives the fleet a clear record of what was checked rather than a verbal assurance that everything looked fine.
Budget the scan and calibration the same way you budget the freight. A truck waiting on a release is still down, whatever the bumper cost.
How to Install a Front Bumper Kit Step by Step
Park on firm, level ground, set the brakes, and support the bumper with suitable lifting equipment before loosening a single fastener. A Class 8 bumper assembly is heavy enough to drop hard once the last bolt backs off, and it can take a wiring harness or a sensor bracket down with it.
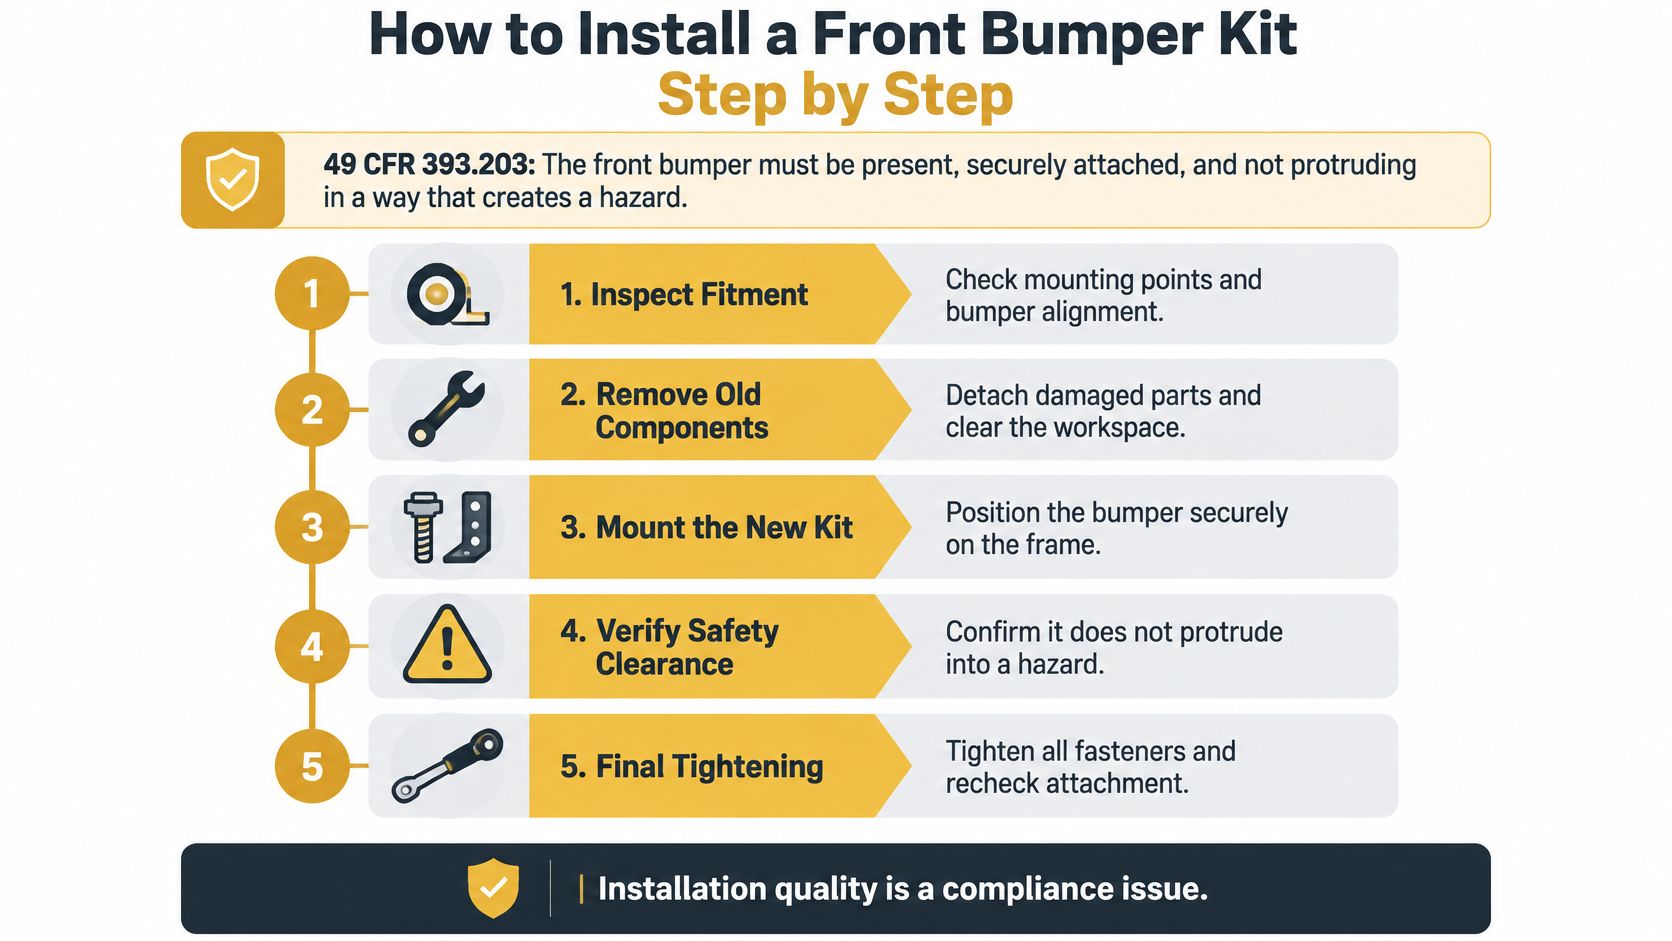
Two documents control the job: the kit instructions and the truck's service information. The legal minimum for the finished work comes from 49 CFR §393.203, which requires the front bumper to be present, securely attached, and free of hazardous protrusions beyond the vehicle's confines.
Follow the Installation Sequence
- Confirm the order before removal. Match the model, year, and cab configuration to the kit paperwork. Lay out the replacement parts so a missing bracket doesn't leave the truck disabled.
- Remove the old assembly and test-fit the brackets. Support the bumper, disconnect affected wiring as directed, and remove the mounting hardware safely. Set the new brackets against the frame without forcing them. Poor seating points to damage, incorrect parts, or the wrong mounting holes.
- Inspect all surrounding clearances. Check tow points, steering components, cooling airflow, sensors, lamps, and front underride or aerodynamic equipment where fitted. Make sure wiring won't rub on a cut edge or become pinched behind a bracket.
- Install and torque the specified hardware. Start fasteners by hand, align the assembly, and tighten in the manufacturer's sequence with a suitable torque wrench. Don't use an impact wrench as the final torque check, and don't add lubricant or threadlocker unless the procedure calls for it.
- Verify clearance in operating condition. Check bumper-to-frame and ground clearance with the truck at its correct operating ride height and under the loading conditions specified by the manufacturer. Never work beneath an unsupported truck or air suspension.
- Test lighting and visibility. Confirm that lamps, any applicable plate light, and required visibility remain correct. Check that the bumper doesn't block a lamp or leave its harness stretched.
- Inspect after the initial run-in. Follow the maker's reinspection instructions and check for movement, contact marks, or loose hardware. Investigate repeated loosening instead of repeatedly tightening the same joint.
Finish With a Release Check
The bumper installation guide walks through the same order of operations and can help organize the work, but torque values and tightening sequences come from the exact kit paperwork and the truck manufacturer's service instructions, not a generic reference. Record the hardware specification and final checks on the work order so the next shop can see what was installed and how it was verified.
Use the video alongside those written instructions, not in place of them.
The passenger-car bumper standard isn't the approval system for a heavy-truck replacement. Judge the completed job by what an inspector or technician can check on the truck: secure attachment, dimensional fit, lighting visibility, sensor operation, and the absence of safety-related defects.
Quick Answers for Front Bumper Kit Buyers
Most buying mistakes show up as downtime, not as a bad number on the invoice. These are the questions that decide whether a bumper order costs you once or twice.
What Does a Front Bumper Cost?
Bumpers on the bumper page are listed from $874.99 to $1,679.99 each, sold individually. The CLASSIC and W900 start at $874.99, the T800 at $884.99 and the CORONADO at $1,084.99, while the T600, T660 and T680 start at $1,599.99, the FLD120 at $1,659.99 and the CASCADIA at $1,669.99. Price the shell that fits your model rather than shopping the lowest listing on the page.
What if the New Bumper Gets Damaged on the Road?
Under the Comeback Program, a damaged bumper can be replaced at 15 to 25% off, applied automatically on every direct order. After a documented road incident, the discount runs 15% off carbon, 20% off 430 and 25% off 304. Keep the incident documentation; it is what sets the discount on the replacement.
What if I Find the Same Bumper Cheaper?
If a comparable chrome bumper is found at a lower price within 7 days of purchase, Galhor beats it by 5% on carbon and 304 bumpers and gives a free material upgrade on 430 bumpers. The window is short, so keep competing quotes from the week you order.
Does the Order Include the Mounting Bracket?
The bumpers are a direct bolt-on fit, and flat bumpers with the Blind Mount option include the mounting bracket. Confirm the bracket line at checkout so the truck is not sitting in a booked bay waiting on a second shipment.
Can I Send a Bumper Back?
A returned bumper must be uninstalled and returned in its original condition. Do the fit check with the bumper held at the mounts, not bolted down. Once hardware has gone through it, the return option is gone.
Confirm Your Kit and Order Today
The fitment checks are done. What remains is placing an order the shop can receive, inspect, and install without surprises.
Build the bumper in the online configurator: select brand, model, year, style, cutouts, and finish, then confirm the dispatch estimate before booking installation. Or skip the builder entirely and pick a build from the list at checkout, at the same price and under the same warranty, with shipping included. Bumpers arrive as a direct bolt-on fit, and stock flat bumpers are pre-chromed and laser-cut to your specification before dispatch.
Schedule Delivery Before Shop Time
In-stock stainless steel 430 and 304 flat bumpers can ship within 48 hours. Made-to-order carbon steel units typically ship in 4 to 6 weeks, so order ahead of the truck's shop window rather than after it. Delivery runs as LTL freight, which means someone needs to be on site to receive the bumper and inspect it for shipping damage before signing.
The warranty covers manufacturing defects, and a returned bumper must be uninstalled and in its original condition. Keep the order details and installation records so the specification stays clear throughout the truck's service life.
Galhor Inc. offers configurable, direct bolt-on chrome bumpers for Class 8 trucks, with material and cutout choices to match the job. Visit Galhor Inc. to configure your bumper today, confirm the fit and delivery plan, and get your truck back on the road.