
Kenworth W900 Front Bumper: Fitment and Material Guide
October 13, 2026 · Francisco Hornelas

Your W900 is sitting in the yard with a cracked, pitted bumper, and the dispatcher wants it back on the road. The wrong Kenworth W900 front bumper can turn a simple replacement into a fitment fight, extra shop time, and a return freight problem.
Buy by the truck's exact configuration, not by the W900 badge alone. You need to confirm the model year, hood style, bumper dimensions, mounting pattern, material, finish, cutouts, legal projection, and shipping window before you spend a dollar.
Table of Contents
- Why Your W900 Bumper Decision Matters
- W900 Fitment and Model Differences
- Material Options for a Chrome W900 Bumper
- OEM vs Aftermarket and Compliance Basics
- Using the Galhor 3D Configurator
- Installation, Inspection, and Maintenance
- Lead Times, Warranty, and How to Order
- W900 Bumper Questions Buyers Actually Ask
Why Your W900 Bumper Decision Matters
A W900 bumper can put a truck back on the road or create another shop job. The wrong part can cause grille, tow-pin, headlight, steering, or hood-clearance problems. It can also add weight to brackets that were not designed for it. Verify fitment, material, legal length, and construction before you pay for chrome.
Kenworth introduced the W900 in 1961, and the model remained in production for more than six decades. The company's historical materials state that production is scheduled to end in 2026, and report that more than 280,000 W900 trucks have been built since 1963. Kenworth's W900 history shows why this truck has such a large replacement and restoration market.
That long production run creates a direct parts-counter problem. Early W900 trucks, W900A, W900B, W900L, and W900S models can use different hood proportions, grille relationships, headlight layouts, brackets, and cutouts. A bumper that looks right in a product photo may still be wrong for the truck in your bay.
Shop rule: Confirm the truck first. Choose the shine second.
Set the order around five decisions:
- Identify the exact year and configuration.
- Choose the substrate, such as chrome-plated carbon steel, stainless steel 430, or stainless steel 304.
- Inspect finish and construction, including welds, edges, brackets, and cutouts.
- Match the lead time to the truck's downtime.
- Use Galhor's 3D configurator to confirm the bumper's shape, options, and mounting details before production.
Material grade affects how the bumper handles winter salt, coastal moisture, impacts, and neglected maintenance. Stainless steel options can suit different operating conditions, while chrome-plated carbon steel delivers the traditional appearance. Weight also matters. A heavier bumper increases demand on brackets, fasteners, and frame support.
Federal length rules belong in the same decision. Measure the truck's current projection and confirm the finished bumper will remain legal for its application. Then use the 3D configuration workflow to tie those measurements to the selected material, finish, cutouts, and mounting pattern.
Verify the truck before fabrication. That sequence reduces downtime, limits return problems, and gives you a bumper that fits the W900 instead of merely resembling one.
W900 Fitment and Model Differences
A W900 bumper can look correct and still fit the wrong truck. The name covers several generations, so identify the exact model before comparing chrome, height, or price. Kenworth introduced the original W900 in 1961. The W900A replaced the original version in 1965, adding a longer hood and larger radiator. The W900B arrived in 1982 with a higher hood and larger radiator. The W900L appeared around 1990 with a hood 10 inches longer than the W900B. Introduced in 1987, the W900S brought a severe-duty configuration that should not be treated as interchangeable. The W900 model overview records these model changes.
Hood length changes the front-end fit
Kenworth lists 130 inches from bumper to back of cab for the W900L, compared with 120 inches for the W900B. That 10-inch difference accommodates larger, higher-output diesel engines and changes the relationship between the bumper, hood, grille, fenders, and front axle.
A W900L bumper is not automatically correct for a W900B. Hood profile, grille clearance, end shape, headlight treatment, and mounting geometry can differ. A rectangular Texas-style chromed-steel bumper may suit the W900L appearance, but style does not confirm fitment.
Measure before ordering
Replacement catalogs separate W900A, W900B, and W900L applications and show differences in bumper height, end treatment, tow-pin provisions, step openings, fog-light cutouts, and mounting style. W900 bumper fitment listings show common 18-inch bumper heights and assembly lengths of approximately 92 to 98 inches, including one 18-inch assembly listed in 7-gauge steel. Use those figures as catalog references, then measure the truck in your bay before fabrication or checkout.
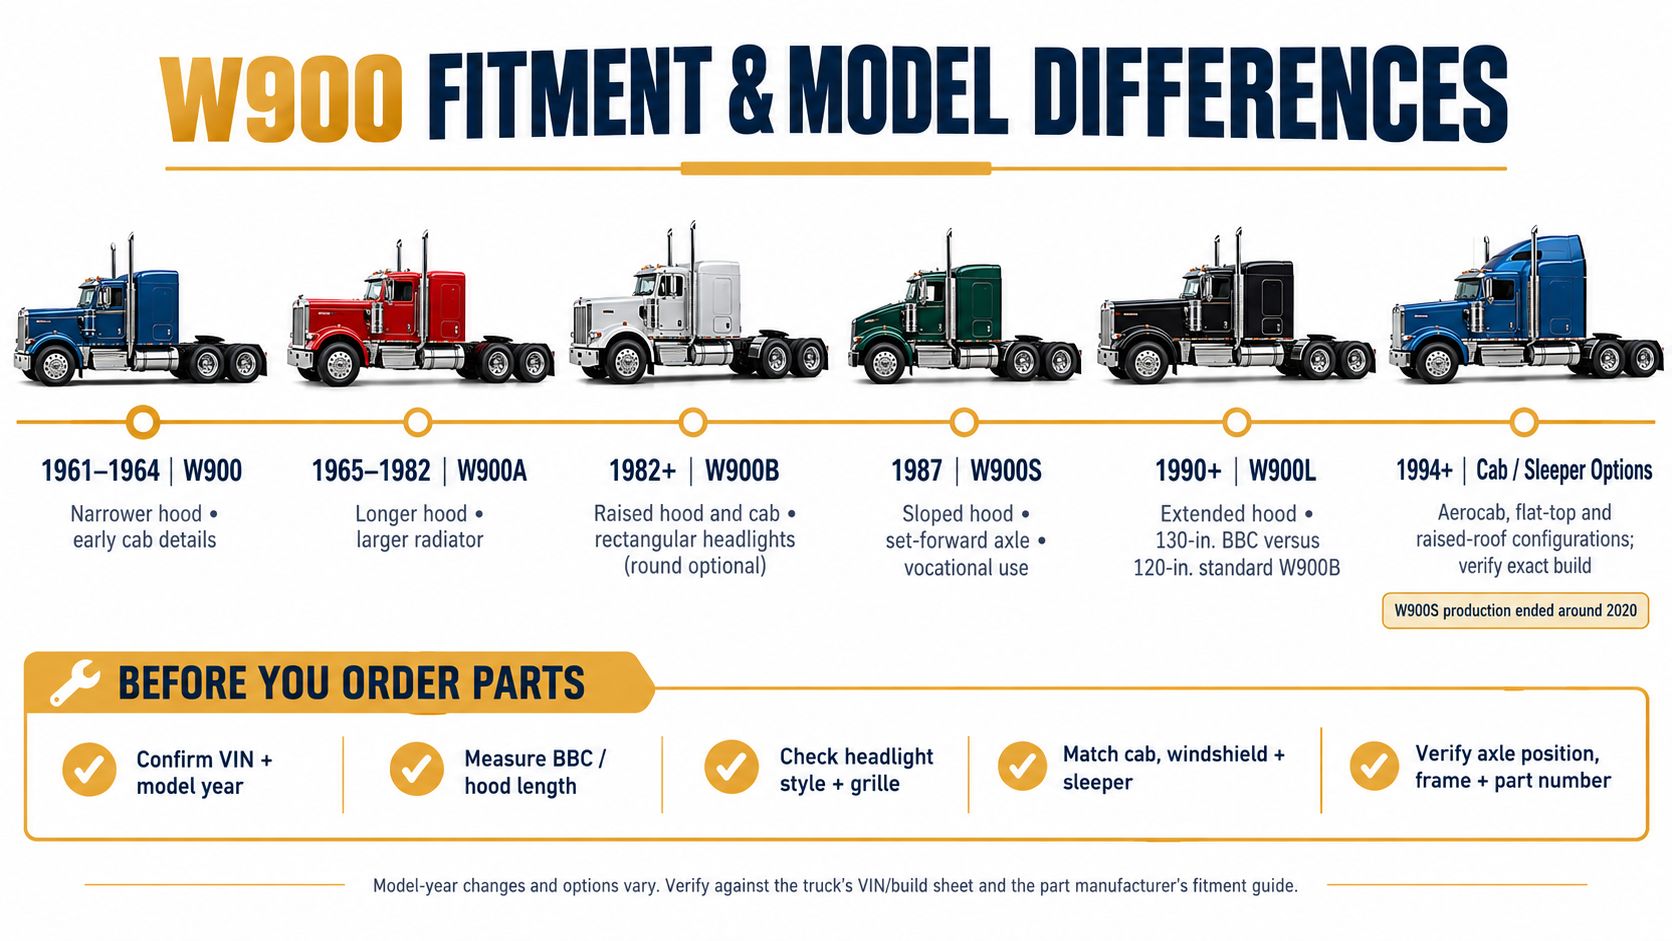
Run this checklist before adding a Kenworth W900 chrome bumper to your cart:
- Model and year: Is it an original W900, W900A, W900B, W900L, or W900S?
- Measured width: What is the truck's actual bumper width?
- Height: Does the replacement match current height and road clearance?
- Mounting pattern: Do the holes match the factory brackets and frame arrangement?
- End treatment: Are the ends boxed, tapered, or shaped for the fenders?
- Cutouts: Will tow pins, fog lamps, headlights, steps, and license-plate mounts clear?
- Front-end clearance: Does the bumper clear the grille, radiator, steering, and hood movement?
Give the supplier the VIN, exact model year, photographs, measured width, and mounting-hole pattern. If those details are not confirmed, do not order based on appearance alone.
Material Options for a Chrome W900 Bumper
The three common choices are chrome-plated carbon steel, chrome-plated stainless steel 430, and chrome-plated stainless steel 304. They can all produce a bright front end, but they don't age the same way on a truck that runs long hauls, winter corridors, coastal lanes, or frequent wash cycles.
Galhor describes its shared finish as a hexavalent triple-layer chrome process over 35 microns of nickel, designed for mirror polish and service life. That finish matters, but the base metal still matters more than many buyers realize. Chrome alone doesn't tell you whether the bumper underneath is carbon steel, 430 stainless, or 304 stainless.
Match the substrate to the route
| Substrate | Corrosion resistance | Weight | Best for |
|---|---|---|---|
| Chrome-plated carbon steel | Good while the plating stays intact and damage is repaired quickly | Higher than some stainless designs, depending on construction | Budget-focused working trucks and replacement jobs |
| Chrome-plated stainless steel 430 | Moderate to good corrosion resistance | Depends on thickness and section design | Mixed regional work and drivers seeking a balance of cost and appearance |
| Chrome-plated stainless steel 304 | Strongest corrosion-resistance margin of these options | Depends on thickness and section design | Salted winter routes, coastal lanes, and long-term ownership |
Chrome-plated carbon steel is the value workhorse. It gives you the traditional bright look and can serve a working truck well when the owner washes it and repairs chips early. Once the plating is breached, exposed carbon steel can begin corroding under the finish.
430 is a ferritic stainless steel with moderate-to-good corrosion resistance. It's a practical middle choice for mixed regional work, especially when you want stainless substrate benefits without moving to the highest corrosion-resistance option.
304 is an austenitic grade commonly containing about 18% chromium and 8% nickel. It generally gives a stronger corrosion-resistance margin than 430 in road salt, wash chemicals, and wet winter service. The stainless steel selection guide explains why grade and chromium content matter.
For a deeper material comparison, see chrome-plated steel versus chrome-plated stainless steel.
My working rule is straightforward:
- Salted winter routes: Choose 304.
- Mixed regional work: Choose 430.
- Budget-driven replacement: Choose chrome-plated carbon steel, then maintain it closely.
Don't buy the finish without confirming the substrate on the specification sheet. Choose the material based on how long you expect to keep the truck and how hard the route is on the front end.
OEM vs Aftermarket and Compliance Basics
A W900 owner can order a factory-style replacement or specify an aftermarket bumper around the truck's actual work. OEM parts usually follow the original bracket layout and documentation. Aftermarket parts give you control over material, finish, cutouts, end treatment, and styling, including an 18-inch drop bumper profile. Choose based on fitment, load path, and legal clearance, not appearance alone.
The bumper and brackets must transfer loads into the truck structure. Before spending money, inspect the frame provisions, bracket condition, hole shape, and support around the mounting points. A polished face will not correct cracked brackets, elongated holes, weak frame support, or a layout that leaves the installer drilling wherever space allows.
Projection and state rules matter
Federal Highway Administration guidance excludes resilient bumpers that extend no more than 6 inches beyond the front or rear from commercial-vehicle length measurements. A deeper bumper can affect measured overall length, so check the FHWA commercial vehicle size guidance before ordering a deep or drop design.
State requirements can change the answer. Maryland, for example, limits the distance between the closest points of multiple bumper devices to 24 inches, as shown in Maryland's bumper standard. Review the route jurisdiction when the design includes tow-hook openings, license-plate cutouts, or unusual projection. For a full walkthrough, read our guide to key regulations for semi-truck bumpers.
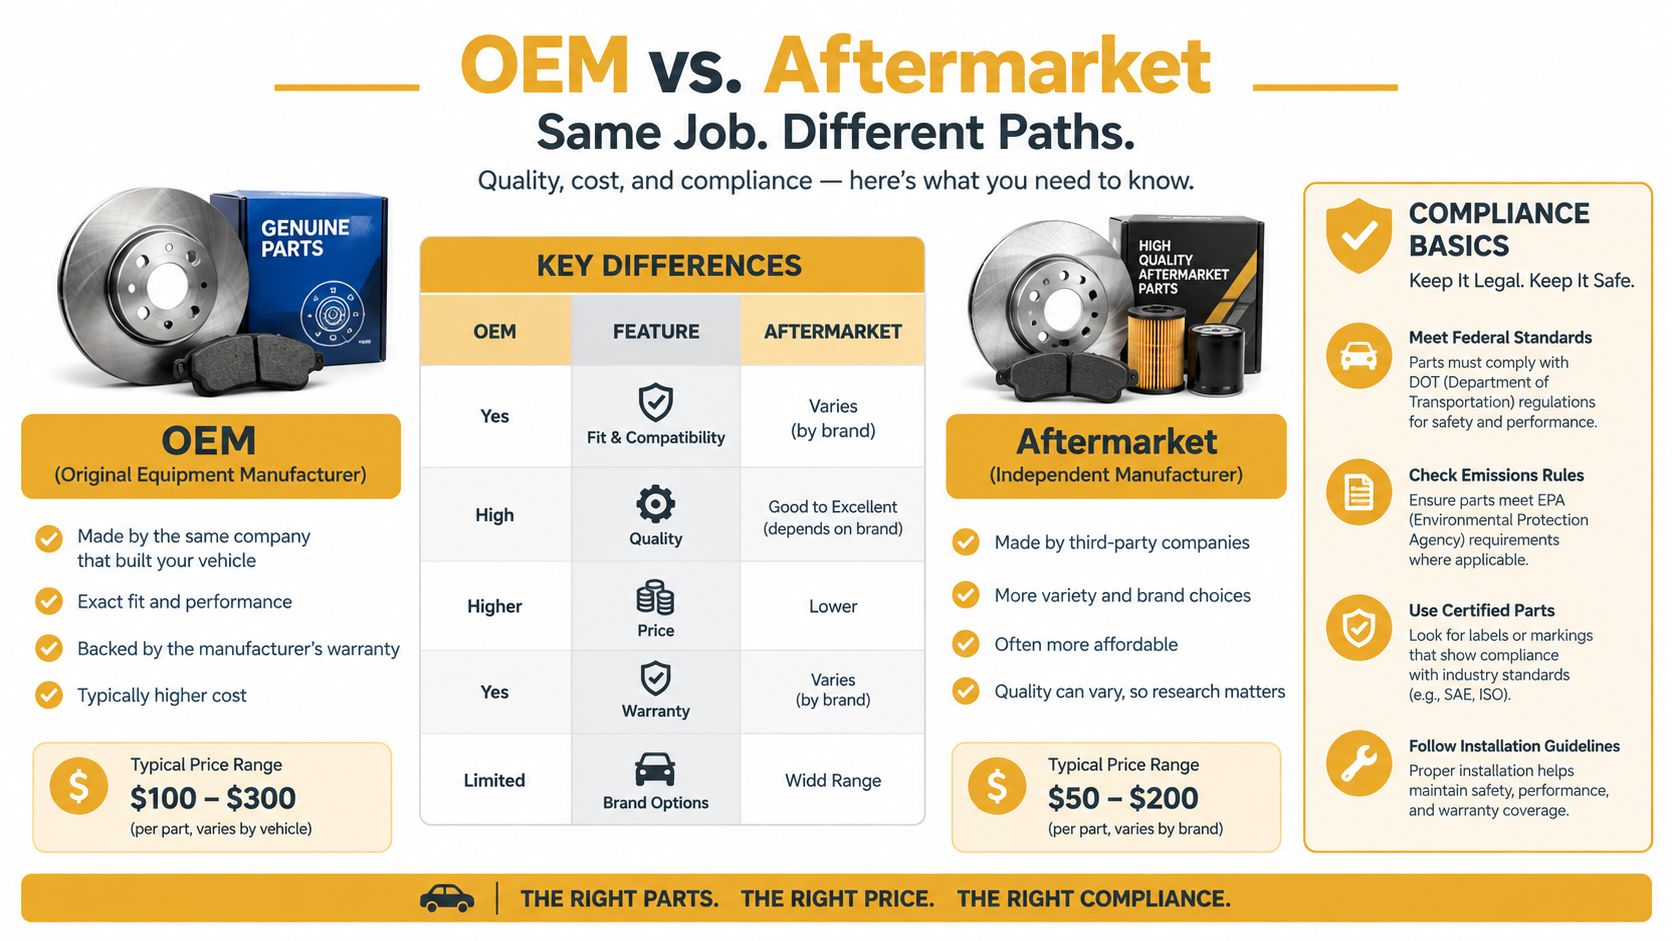
Check the load path, not just the legal label
For cargo-tank operations, federal rules require the bumper to conform to 49 CFR 393.86 and require the bumper and chassis attachments to transmit collision force directly to the chassis. They also place the bumper at least 6 inches behind components used for loading or unloading, or components that may contain cargo while the vehicle is moving. Check the cargo-tank bumper requirements when that rule applies.
Before production, confirm three points:
- State rules: Does the route limit projection, spacing, or overall length?
- Clearance: Will the flat or 18-inch drop style clear tow hooks, lamps, headlights, steering, and cooling parts?
- Attachment: Do the brackets, holes, and frame provisions suit the bumper's weight and design?
Use the answers to set the configuration in Galhor's 3D workflow. Match the W900 fitment, material, projection, and mounting layout before approving the order. Style belongs in the decision, but it follows fitment and compliance.
Using the Galhor 3D Configurator
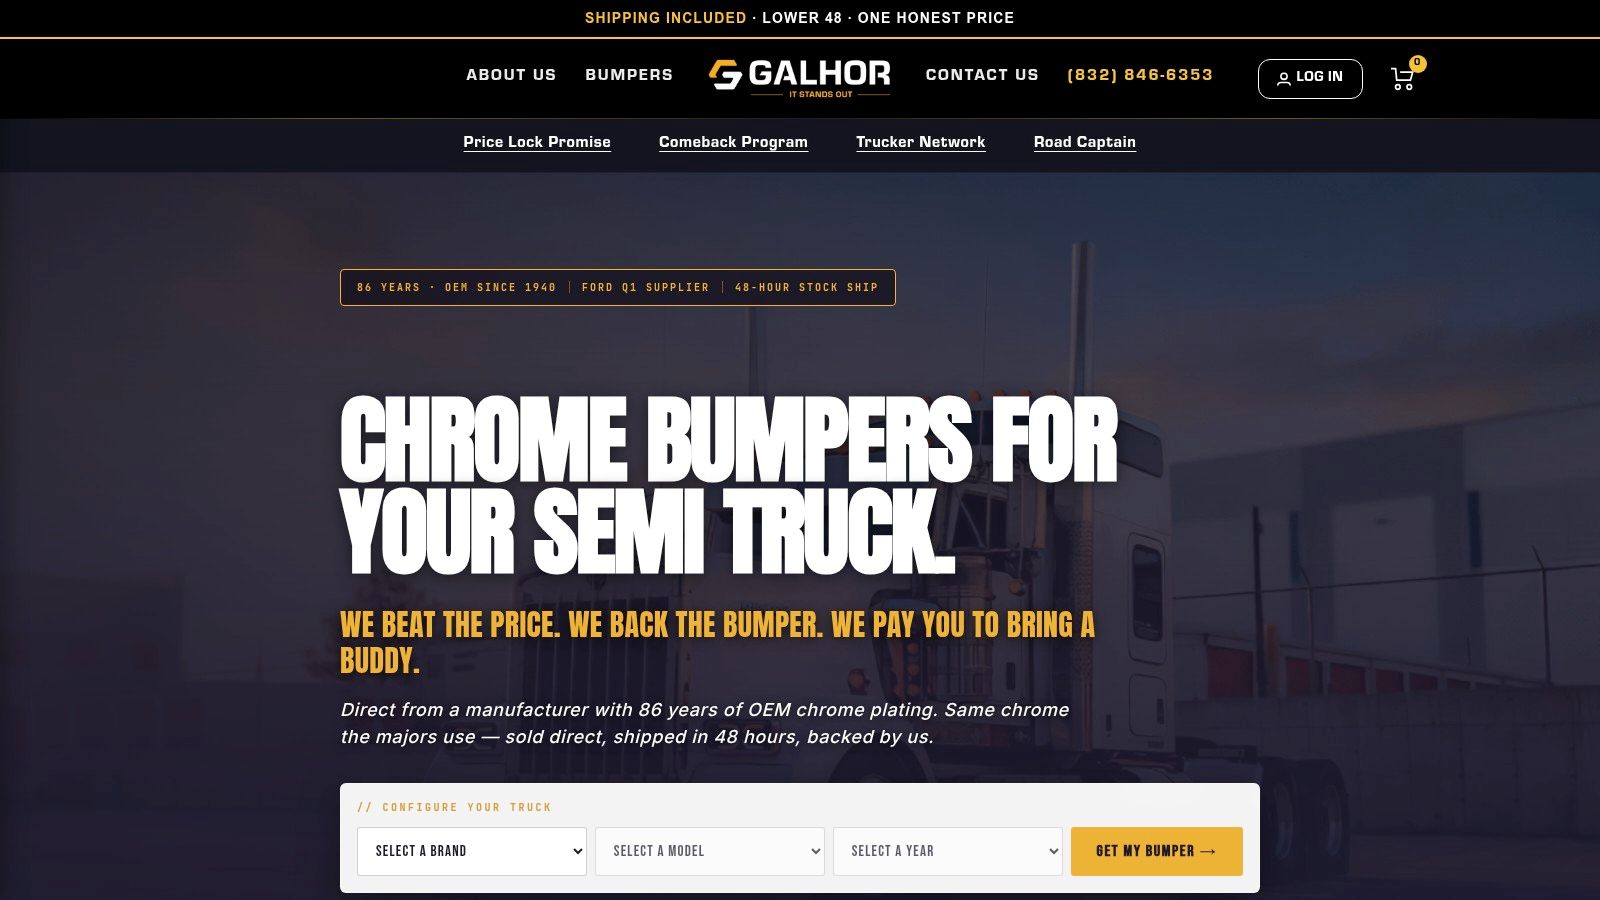
Ordering a Kenworth W900 front bumper should feel like walking through a parts counter with someone who knows the truck. A 3D configurator can make that process more precise by forcing the buyer to define the brand, model, year, body style, cutouts, material, and finish before the part enters production.
Start with the truck identity
Select Kenworth, then choose the W900 and the correct year. Pay close attention to the W900B and W900L split. That distinction changes the hood relationship and can affect bumper width, grille clearance, end treatment, and bracket location.
Next, choose the body style and openings. Depending on the configuration, review options for:
- Tow-pin openings
- Fog-light holes
- License-plate mounting
- Step openings
- Blind mounting
- End treatment and bumper profile
Don't select a cutout because it looks good in a product image. Match each opening to equipment already installed on the truck. An unused fog-light cutout can look unfinished, while a missing tow-pin opening can create an avoidable installation problem.
Choose the material and shipping window
The configurator should show the available finish and substrate choices together. For this workflow, the three Galhor options are chrome-plated carbon steel, chrome-plated stainless steel 430, and chrome-plated stainless steel 304.
The shipping choice is important for a truck that earns by the mile. In-stock SS 430 and SS 304 flat bumpers can ship within 48 hours, while made-to-order carbon steel units typically ship in 4 to 6 weeks. Choose the material first, then confirm that the lead time works with the truck's repair schedule.
For more context on why this workflow can reduce ordering mistakes, read why buying with a 3D configurator is better than traditional online shopping.
The final screen should show the selected configuration and direct bolt-on bracket layout. Review the model, year, cutouts, finish, and mounting design before submitting the order.
Spec once, build once, install once.
The configurator doesn't replace measurements or VIN verification. It gives those details a clear place in the order, so the production team isn't guessing from a broad W900 label.
Here's a practical walkthrough of the selection flow:
- Select Kenworth W900 and exact year.
- Confirm W900B, W900L, or another configuration.
- Choose bumper style and body treatment.
- Add only the cutouts your truck needs.
- Select carbon steel, 430 stainless, or 304 stainless.
- Review bracket layout, finish, and shipping window.
- Confirm measurements and submit the build.
Start the build on Galhor's site before ordering a generic bumper. A few minutes spent on the configuration can save a truck from sitting in the shop while a replacement part is corrected.
Installation, Inspection, and Maintenance

A new W900 bumper can look right on the floor and still fit badly on the truck. Before tightening anything, expose the frame and inspect the existing brackets for cracks, elongated holes, bent sections, and corrosion. Reuse sound mounting provisions where they match the new bumper. Do not drill the frame rails unless the manufacturer provides a documented reason and attachment method. Kenworth body-builder guidance treats frame holes and drilled attachments as controlled structural work.
Install it square and protect the finish
Set the bumper in place before final tightening. Check grille and hood clearance, headlights, tow pins, fog lamps, steering components, radiator area, wiring, and front-axle movement. The bumper should sit square without forced alignment, twisted brackets, or excessive hardware tension. If it needs to be pulled into position, stop and resolve the fitment problem before applying torque.
Use sound fasteners and protect chrome contact points with suitable soft isolators. A heavy steel section may resist dents better, but it also increases the load on the mounting system. Torque each fastener to the manufacturer's specification, then inspect the joint again after the truck has seen initial road use. Frame flex and vibration can settle the hardware or expose contact between the brackets and finish.
Keep salt away from cut edges
Chrome damage starts at exposed or stressed areas. Inspect the lower flange, rolled or boxed ends, tow-pin openings, fastener holes, and every cut edge for lifting, cracking, or exposed base metal. Wash away road salt and chemical residue, then dry the openings and crevices where water collects. Pay close attention to custom cutouts, because a poorly finished edge can start corrosion even when the main face still looks clean.
Use this service-bay routine:
- Mounts: Look for movement, cracked brackets, and stretched holes.
- Fasteners: Check for looseness, corrosion, and damaged threads.
- Finish edges: Watch for chrome lifting or exposed steel.
- Cutouts: Clear dirt and inspect around tow-pin and lamp openings.
- Clearance: Confirm that steering, cooling, wiring, and lighting remain unobstructed.
Treat the cargo-tank bumper requirements covered in the compliance section above as a separate fitment check for applicable vehicles. The brackets still need to carry the bumper load correctly and remain secure through frame movement.
Inspect the bumper during washing or scheduled service. Finding a loose fastener, cracked bracket, or chipped edge early costs less than correcting a failure after a long-haul trip.
Lead Times, Warranty, and How to Order
A W900 bumper order fails when fitment, material, and delivery timing are handled separately. Choose the truck's exact model and year first, then match the substrate and finish to the required lead time. Stainless steel suits a quick return to service, while made-to-order carbon steel allows a more specific configuration when downtime is planned.
Galhor lists flat bumpers in stainless steel 430 and 304 for shipment within 48 hours. Made-to-order carbon steel units typically ship in 4 to 6 weeks. Larger assemblies move by LTL freight, so arrange a receiving area with enough space to inspect the crate before signing for delivery.
Orders ship from Magnolia, Texas, with support from a U.S. team. Galhor states that its products are engineered in-house, use U.S.-sourced steel, and are manufactured in Mexico under strict quality control. Its warranty covers manufacturing defects, and the company draws on more than 80 years of industrial expertise from Estañadora.
Send the supplier the information needed to lock the configuration:
- Exact W900 model and year
- VIN or configuration details
- Photos of the existing bumper and mounts
- Measured width and hole pattern
- Required cutouts
- Preferred substrate and finish
- Delivery address and shop receiving hours
Use the Galhor 3D configurator at galhor.com to set the bumper's fitment, material, finish, and cutouts before production. Review the displayed shipping details and warranty terms with the supplier. The correct order is a defined W900 configuration with confirmed measurements and a delivery window, not a generic bumper request.
W900 Bumper Questions Buyers Actually Ask
Is a heavier bumper safer?
Weight alone does not make a bumper safer. A heavier unit may resist dents, but it also puts more demand on brackets, fasteners, and frame support. Check bumper depth, clearance, measured overall length, steering access, and the load carried by each mounting point. Safety comes from a sound bumper, engineered brackets, secure attachment, and proper clearance.
Does chrome or stainless handle winter salt better?
Material choice sets the corrosion margin. 304 stainless steel offers the strongest resistance among these options, while 430 provides moderate-to-good protection. Chrome-plated carbon steel works well when chips and exposed base metal receive prompt repairs. Rinse away salt, dry the cutouts, and treat edge lifting before corrosion spreads.
How do I verify the bumper is road-legal after installation?
Review state rules for projection, spacing, and overall length, using the FHWA size guidance linked in the compliance section above as a federal reference. Then inspect the finished installation. Confirm that brackets are sound, fasteners are torqued, lamps and wiring are protected, and steering, cooling, and other components have clearance. State requirements still control the final inspection.
How long should a quality chrome W900 front bumper last?
Route conditions and maintenance decide service life. On a salted route with prompt chip repair, a triple-layer chrome bumper can hold its finish for many years. The same bumper on a gravel-heavy route with deferred washing can pit within a couple of seasons. The variable is maintenance, not the calendar. Rinse corrosive residue, inspect mounts, and replace corroding hardware.
Galhor Inc. offers configurable direct bolt-on bumpers for Kenworth W900 trucks in chrome-plated carbon steel, 430 stainless, and 304 stainless. Use the Galhor 3D configurator to set the W900 year, fitment, cutouts, material, and finish, then confirm shipping details before ordering. A defined configuration beats a generic bumper request.