
Volvo Front Bumper Fit and Steel Guide
November 3, 2026 · Francisco Hornelas

It's Monday morning, dispatch has a load ready, and your bent Volvo front bumper is holding up the truck. The replacement looks right in the photo, but that won't help if the brackets sit wrong or the light holes don't line up. Before you pay for steel and freight, confirm what bolts to your truck.
A straight-looking face isn't proof of a sound front end, either. A bent bracket, stretched mounting hole, or shifted sensor can hide behind good chrome. Fit, structure, and material come first. Finish comes after those are settled.
Table of Contents
- Volvo Front Bumper Fit by Year and Frame
- What the Bumper Must Keep
- Steel and Chrome Choices That Survive Salt
- OEM or Aftermarket Bumper for Your Volvo
- How to Bolt On a Replacement Bumper
- After a Hit or a Salty Winter
- Order the Bumper That Matches the Truck
Volvo Front Bumper Fit by Year and Frame
A Volvo front bumper isn't one size. Before ordering, record the model year and cab generation, frame profile, front-axle position, and mounting-hole and cutout layout. Give the parts counter that information in writing, not just a front-view photo.
Volvo Front Bumper Fit Checks
| Truck | Years or setup | Dimension to verify | What must match | Buying note |
|---|---|---|---|---|
| Volvo FH | Launched in 1993, according to Volvo's FH history; check cab generation | Mount spacing for the cab generation | Chassis, lighting, and model year | An early FH bumper isn't a later FH part |
| Volvo VNL low-profile frame | Body-builder frame specification | 266 mm rail height, listed in Volvo's body-builder documentation | Bolt pattern and axle position | Use approved bolted interfaces, not welded rail brackets |
| Volvo VNL high-profile frame | Body-builder frame specification | 300 mm rail height, in the same Volvo frame specification | Bracket height and hood line | A mismatch can load the mounts off center |
| Current Volvo VNL | Configurations on Volvo Trucks Canada's specifications page | 53.7 inches bumper to front axle, as listed by Volvo Trucks Canada | Grille, fender, and airflow parts | Confirm the actual truck's axle position before ordering |
| Volvo VNL chrome replacement | 2004–2017 application | Tow, fog, and light-cutout locations | Factory holes and hood gap | Direct bolt-on target, with no drilling when the configuration matches |
| Peterbilt, Kenworth, Freightliner, International | Exact model year and configuration | Factory-hole spacing and lamp locations | Surrounding body panels | Looking right isn't the same as bolting up |
The FH row matters mainly for imported trucks and mixed international parts searches. For a U.S. VNL, use the VIN and chassis records to identify the application. Don't let a broad Volvo listing substitute for a VNL fitment record.
Measure the Mounts, Not Just the Face
Brackets carry road vibration and impact loads into the frame. The wrong bracket height can tilt the bumper, open the hood gap, and put bolts under uneven load. Measuring overall bumper width alone won't catch that problem.
Use a tape measure, straightedge, and clear photos of both mounting faces. Record hole-center spacing, bracket offsets, and the location of tow and lamp openings. If previous repairs added spacers or nonfactory hardware, identify those changes before copying the old installation.
- Identify the truck: Record the VIN, model year, cab, and current bumper arrangement.
- Confirm the frame: Match the bracket drawing to the actual rail profile.
- Check the openings: Include tow access, fog lamps, auxiliary lights, and nearby sensors.
- Keep approved mounts: Volvo generally forbids welded frame attachments. Don't weld on a tab to rescue a wrong order.
The same discipline applies when buying a Peterbilt 389 bumper, Kenworth W900 chrome bumper, or Freightliner or International replacement. A photo match can still leave you drilling holes or changing fairings.
Parts-counter rule: If the seller can't identify the mounting arrangement, the bumper isn't ready to order.
What the Bumper Must Keep
A replacement needs to preserve the approved load path and the intended airflow layout. The outer face is only part of the assembly. Beams, brackets, fasteners, and neighboring panels decide whether the new part belongs on the truck.
The diagram shows why the mounting structure deserves attention before the finish.
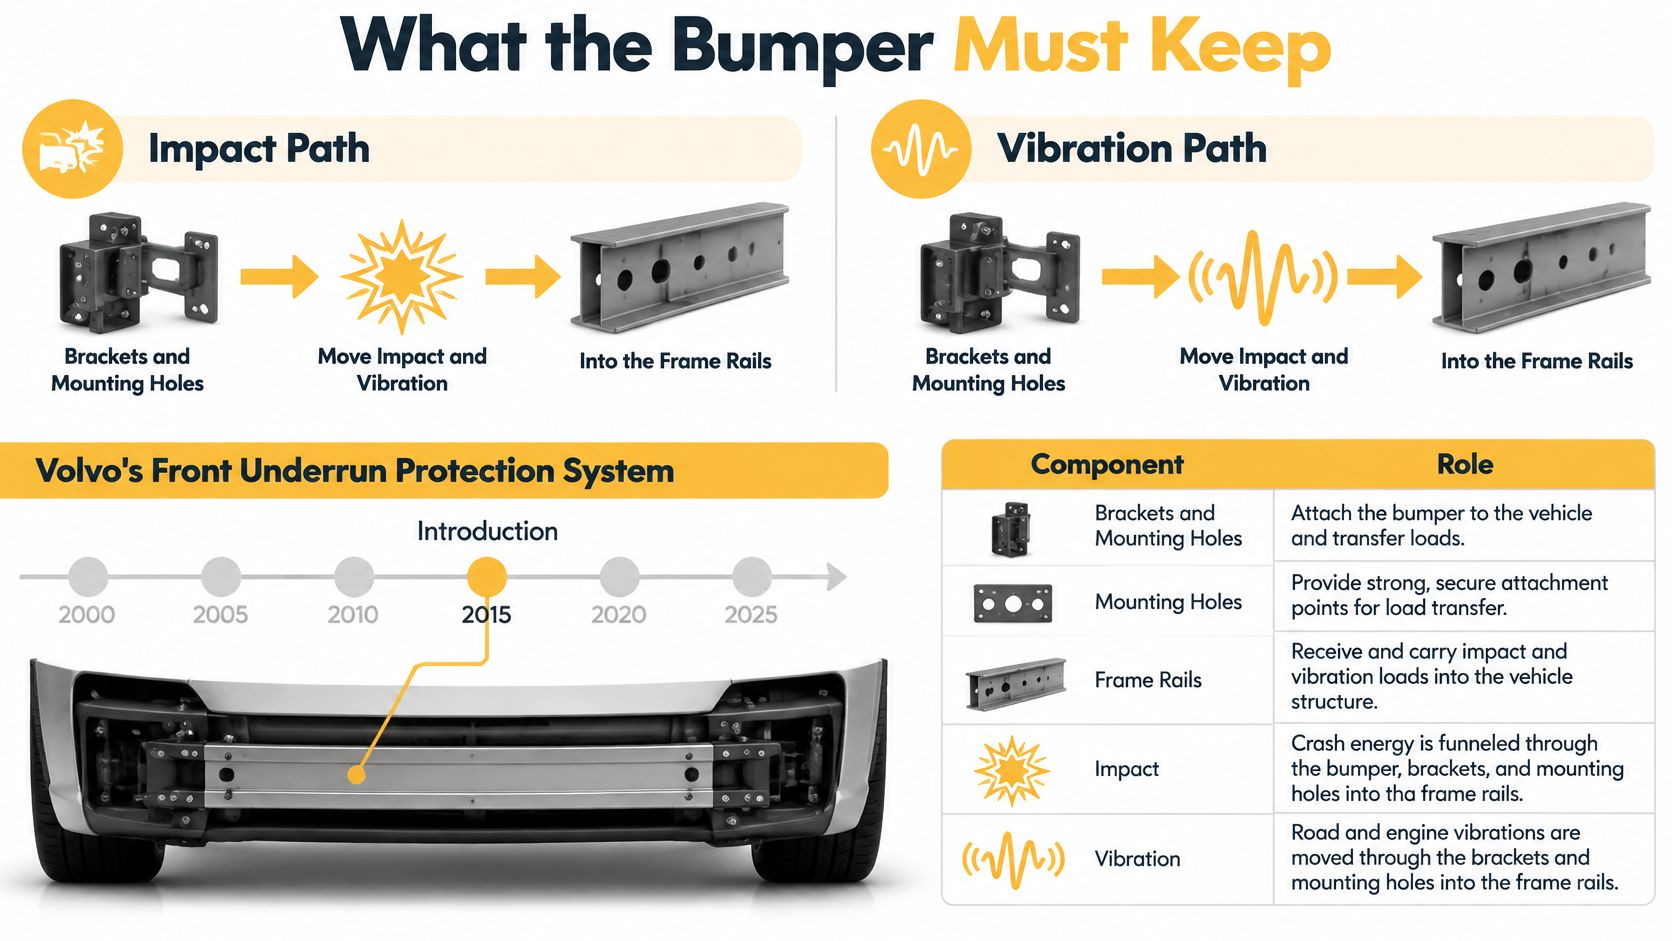
Keep the Impact and Vibration Paths
Volvo introduced its Front Underrun Protection System in 1996, according to Volvo's FH safety history. The system was designed to reduce the risk of a passenger car sliding beneath the truck's front during a head-on collision and help the front structure absorb and redirect forces.
That history doesn't make every chrome replacement a crash-rated safety device. It shows why changing a front assembly requires more care than choosing a shape. Don't remove, relocate, or substitute crash-related hardware without confirming the truck's approved repair requirements.
| Component | Role |
|---|---|
| Bumper face | Provides the outer shape and interfaces with nearby parts |
| Brackets and mounting holes | Transfer loads through the approved attachment points |
| Frame rails | Receive loads through the chassis structure |
| Protection beams and related hardware | Perform their model-specific structural function |
Chrome is the face. Mounts and beams do the work. A thicker plate doesn't correct a poor attachment design, and an aftermarket appearance change isn't proof of equivalent crash performance. Keep the distinction clear when reviewing bumper safety standards.
Keep Cooling and Airflow Parts Working Together
The Volvo VNL product guide describes a lower-profile bumper, hood, and lower airflow deflector working with wheel closeouts and ground effects to manage airflow. The lower edge and adjoining panels aren't just styling details.
Change a grille opening, wheel transition, or deflector joint and you may create turbulence or let cooling air escape its intended path. Accessories shouldn't cover cooling inlets or interfere with lighting.
Consider curb rash on an end cap after a tight dock turn. If the mounts and surrounding pieces remain sound, a matching corner component may be the sensible repair. Replacing an undamaged center section adds cost without fixing anything else.
A center section pushed back by a yard post is different. Bent mounts and a crushed lower edge require a full assessment of the bumper assembly and adjoining airflow pieces. A fresh corner cap won't restore their alignment.
For a visual reference while reviewing the truck's front-end layout, use the video below alongside the model-specific parts and service information.
Steel and Chrome Choices That Survive Salt
| Option | Steel facts | Build to ask for | Best duty | Watch-out |
|---|---|---|---|---|
| Chrome-plated carbon steel | Mirror shine comes from the chrome plate | 10-gauge steel, with the plating specification in writing | Milder routes with strict wash habits | A chip lets salt reach the steel beneath the plate |
| 430 stainless, polished | Ferritic stainless | Gauge and finish confirmed for the exact bumper | Normal road salt at a lower stainless cost | Stainless doesn't mean salt-proof |
| 304 stainless, polished | Austenitic stainless | Gauge and edge finish confirmed for the exact bumper | Coastal air, heavy brine, and demanding corrosion exposure | Thickness, edges, and cleaning still matter |
| Plating and finish | Not an impact-strength test | Base metal, coating system, and finish warranty | Mirror appearance after the steel is chosen | Polish doesn't prove impact strength |
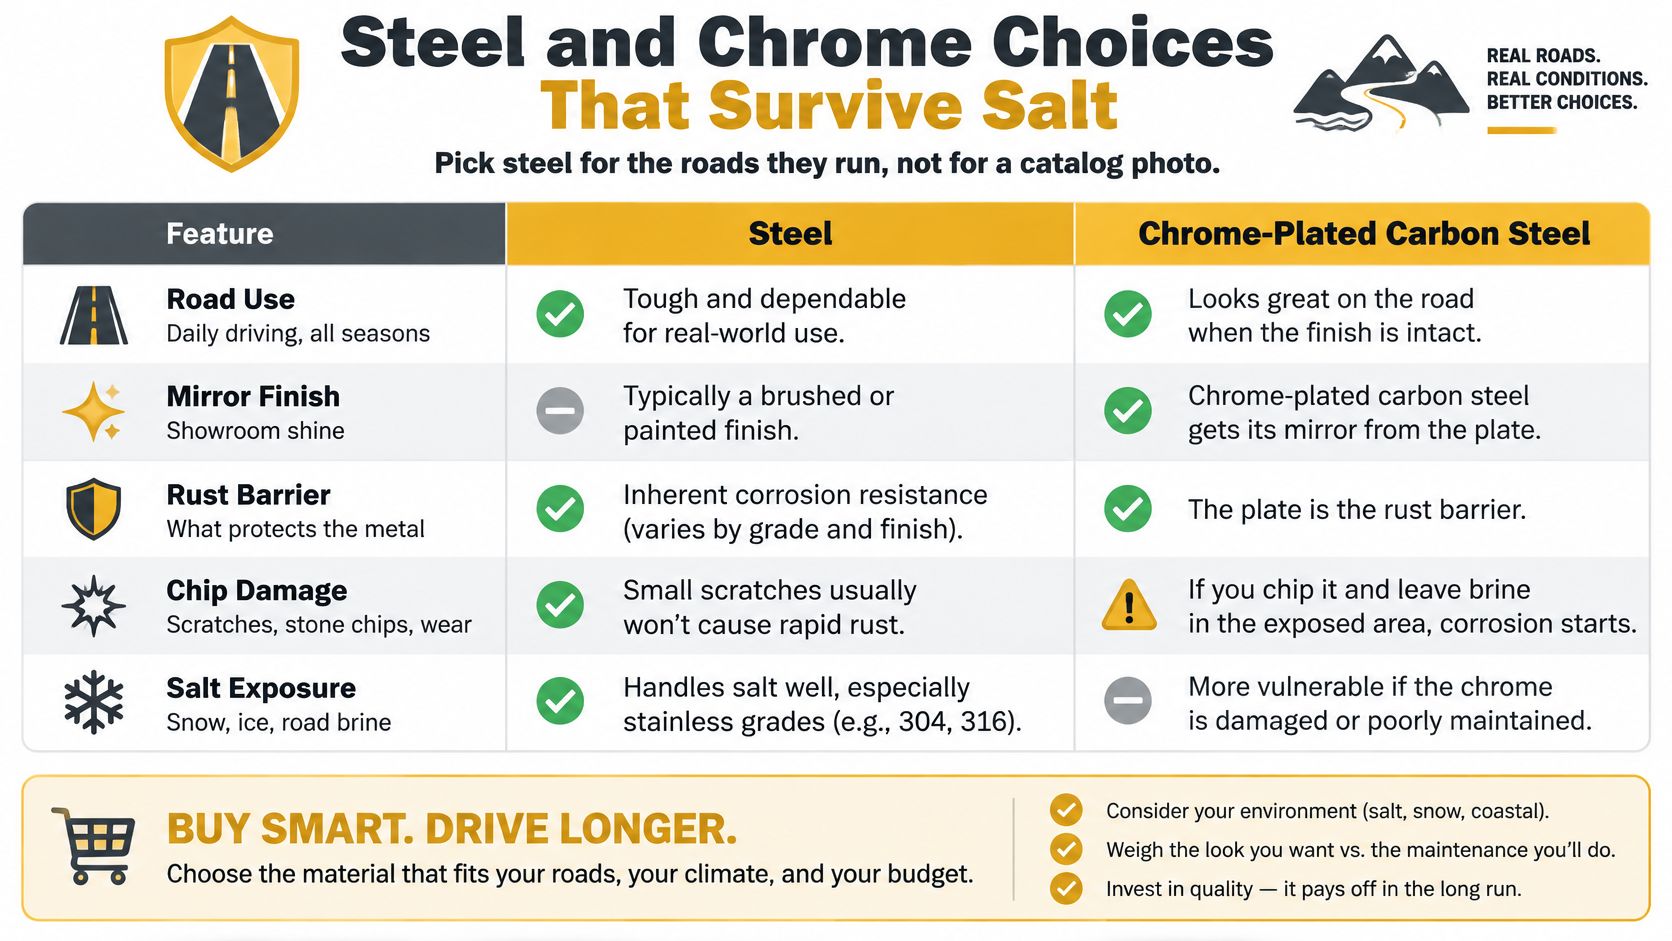
Pick steel for the roads you run, not for a catalog photo. Chrome-plated carbon steel can make sense for inland routes when you'll keep it clean and repair coating damage. Its plating protects the underlying steel, but trapped brine at a chip or damaged edge gives corrosion a place to start.
Choose the Grade for the Exposure
The British Stainless Steel Association's selection guide identifies 430 as ferritic stainless with about 17% chromium, and 304 as austenitic stainless, commonly designated 1.4301, with about 8% nickel. Chromium supports corrosion resistance; nickel affects structure, toughness, and corrosion behavior.
For a truck running ordinary inland winter routes, 430 is a practical stainless option when purchase cost matters. For coastal work or frequent heavy brine exposure, I'd lean toward 304, provided the thickness and mounting design also suit the job. Neither choice excuses leaving salt packed behind the bumper.
The 430 versus 304 stainless comparison helps separate the material decision from the finish decision. Polished stainless and chrome-plated stainless aren't the same finish, so get the exact construction stated on the order.
This comparison highlights where surface damage becomes a maintenance problem.
Thickness Needs a Mounting Plan
Gauge tells you something about the sheet, not the strength of the complete assembly. Ask for the material type and actual thickness specification, especially when comparing different metals. Reinforcement shape, bracket support, and unsupported spans matter too.
- Check edges: Look for clean finishing around tow holes, lamp openings, and bends.
- Check the back: Inspect bracket contact areas and places that can hold road dirt.
- Check the specification: Get steel grade, gauge, finish, and mounting hardware in writing.
A deep mirror finish can hide a weak buying decision. Choose the metal and mounts before paying for the shine.
Long-term value comes from fewer corrosion repairs and fewer replacement jobs. The cheapest face isn't always the cheapest bumper to keep on a long-haul truck.
OEM or Aftermarket Bumper for Your Volvo
Match the bumper source to the job in front of you. A Volvo that took a corner hit on one end has different parts needs than a truck getting a full chrome conversion.
The Volvo VNL parts and accessories catalog identifies model-specific pieces, including a left-hand bumper end cap and mold-in-color bumper and chassis fairings. That modular layout means a localized repair can replace the damaged component while the rest of the system stays in service.
When OEM Makes Sense
OEM is a strong choice when you need an exact match to factory fairings and airflow pieces. It also simplifies ordering for a fleet that keeps a standard configuration and wants consistent replacement part numbers.
If the truck still carries warranty coverage, check the repair requirements before changing the assembly. The scenario that costs owners money: a bumper welded to a frame rail instead of bolted to the factory mounts gives a warranty examiner grounds to deny a later chassis claim. Keep the mounting reversible and the claim stays about the part that failed.
When Aftermarket Makes Sense
Aftermarket opens up steel grade, finish, and style choices. A Volvo VNL (2004–2017) chrome bumper starts at $1,519.99, so weigh that figure against the installed total: freight per bumper, brackets, lamps, and shop hours for the hang. A bumper built as a direct bolt-on fit needs no drilling or cutting, which keeps labor out of the total.
Use these questions to judge either option:
- Does it fit the factory mounts? Require confirmation for the truck's exact configuration, without drilling to force alignment.
- Does it meet adjoining parts? Check the lower edge against the hood, grille, fenders, and deflector.
- Is the construction documented? Get the base metal, gauge, coating, and included hardware in writing.
- What does the warranty cover? Separate manufacturing defects from road-incident damage and installation damage.
Price and paperwork settle nothing if the structure is wrong. A bumper can arrive straight and still carry a bent bracket, a stretched bolt hole, or a misaimed sensor mount behind the chrome. For fast shipping, ask whether the configured bumper is ready, since a blank face on the shelf still needs the correct openings before it becomes your order.
How to Bolt On a Replacement Bumper
This sequence applies after the replacement and mounting arrangement are confirmed. If crash damage is suspected, complete the structural inspection before starting a cosmetic swap.
Set out a rated lifting aid or bumper stand, wheel chocks, sockets, a torque wrench, and eye protection. Don't depend on a helper holding a heavy bumper while you search for a bolt.
The installation overview shows the basic order of work.
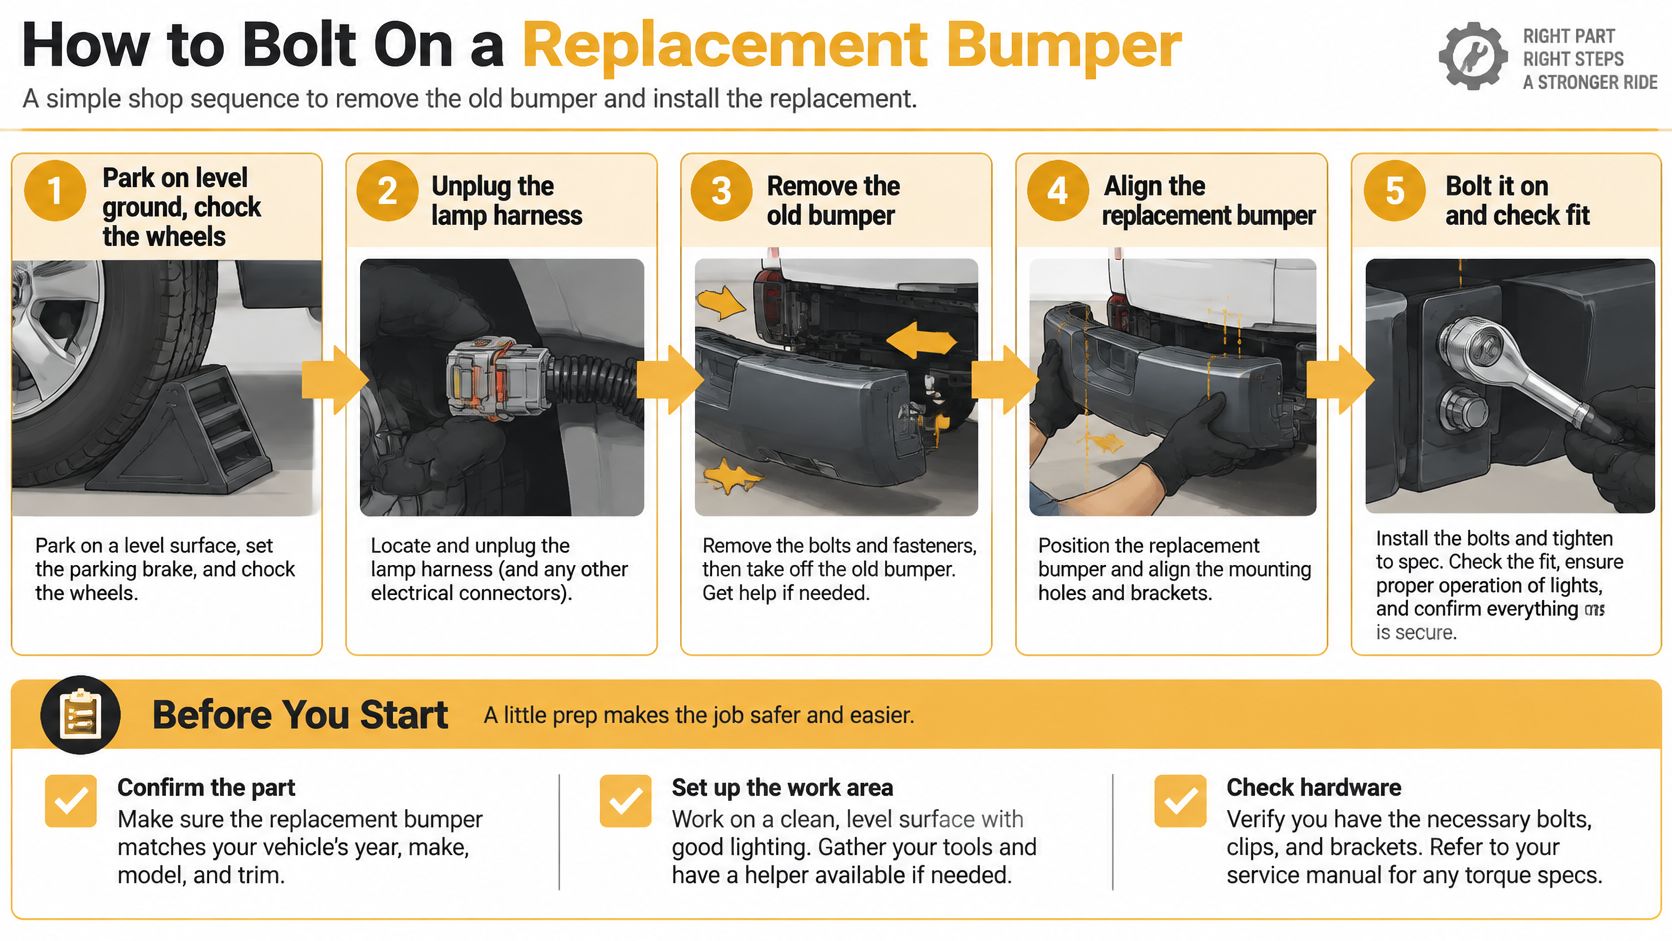
Remove Without Adding Damage
- Secure the truck and disconnect lamps. Park level, set the brakes, and chock the wheels. Switch off the electrical supply as directed by the service procedure, then unplug the bumper lamp harness. This prevents movement and keeps wiring from supporting the bumper.
- Photograph the installation. Capture brackets, hardware positions, harness routing, and all openings. This prevents guesswork about which spacer or connector belongs where.
- Support the bumper before loosening it. With the weight supported, loosen fasteners progressively across the mounts. Don't leave an unsupported end hanging from the remaining bracket.
- Inspect exposed mounting points. Clean dirt away and check brackets, fasteners, and holes. Stop for cracks, bent mounting faces, or egg-shaped holes. New chrome won't repair a damaged attachment.
Align Before Final Tightening
- Hang the replacement on approved holes. Confirm that the supplied mount style matches the order and truck. Don't drill because the year was wrong, stack washers to fake bracket height, or weld a tab onto the rail.
- Snug, align, then torque. Check the hood gap, fender line, and clearance to nearby parts before final tightening. Use the truck maker's service data and the applicable bracket instructions for fastener grade, replacement requirements, sequence, and torque. Don't guess.
- Reconnect and test. Secure the harness away from sharp edges and moving parts. Check lamps, reflective markings, tow access, and cooling openings; arrange any required sensor checks before release.
- Complete the post-installation check. Check clearance through normal hood operation and vehicle movement in a safe area. Reinspect after the first loaded day, following the specified fastener-check procedure rather than blindly adding torque.
Use the bumper mounting bracket guide to identify bracket issues before treating alignment as a hardware-tightening problem.
Stop-work sign: A bolt that only enters after you pry the bumper hard against the frame calls for a fit check, not a longer wrench.
After a Hit or a Salty Winter
No, a bumper that looks straight isn't automatically ready for the road after a hit. Check the structure and nearby equipment before approving the truck for dispatch.
The FMCSA progress report lists 156,052 large-truck crashes, 4,602 fatalities, and 74,078 injuries in 2024. Those figures cover large-truck crash reporting, not bumper failures. They put the repair decision in its proper setting: safe operation and uptime, not just appearance.
Inspect Behind the Straight Face
Say the truck contacts a dock fixture at low speed. The outer face springs back enough to look acceptable, but a bracket stays bent. A nearby radar mount may also move without leaving an obvious mark on the chrome.
Check the truck in good light, with the damaged area clean enough to see:
- Frame brackets and tow points: Look for displaced parts, cracks, or changed gaps.
- Mounting hardware: Inspect for bent fasteners, loose joints, damaged threads, and stretched holes.
- Hood and grille alignment: Check for fresh interference or uneven clearance.
- Lamps and markings: Confirm secure mounting, operation, visibility, and condition.
- Radar, cameras, and sensors: Inspect mounts, covers, connectors, and wiring near the impact.
If structural or driver-assistance equipment may have moved, stop the cosmetic repair. Use OEM service information or a qualified heavy-truck technician to determine repair and calibration requirements. A dashboard without a warning light doesn't prove sensor alignment.
Wash What the Driver Can't See
After salted interstate runs, clean the back side, lower edge, brackets, and bolt heads, not only the mirror face. Rinse away packed dirt and brine with fresh water and a coating-safe cleaner. Keep pressure-washer spray away from electrical connectors and damaged coating edges.
Dry the assembly where practical and inspect chips before applying a compatible protective product. Don't polish over rust stains and call the job complete.
One legal distinction matters: 49 CFR 393.86 addresses rear-impact protection for trailers and semitrailers. Don't use trailer rear-guard dimensions or performance requirements as proof that a tractor's front bumper is suitable.
Order the Bumper That Matches the Truck
Order only after the truck identification, frame, mounts, and openings agree. Then choose the steel for the route: carbon steel for a disciplined wash routine on milder lanes, 430 stainless for greater corrosion exposure, and 304 stainless when coastal air and winter brine are regular work.
Put the Configuration on the Order
Our Chrome bumper for Volvo VNL (2004–2017) starts at $919.99 and is sold individually. The standard-mount application is a direct bolt-on fit, with no drilling or cutting when the truck and selected configuration match.
Engineered in-house and manufactured in Mexico under Galhor's quality control, the assembly uses U.S.-sourced steel and carries configurable tow, fog, and light openings. Its mirror finish comes from a triple-layer chrome process with 35 microns of nickel, backed by Estañadora's 80+ years of industrial expertise.
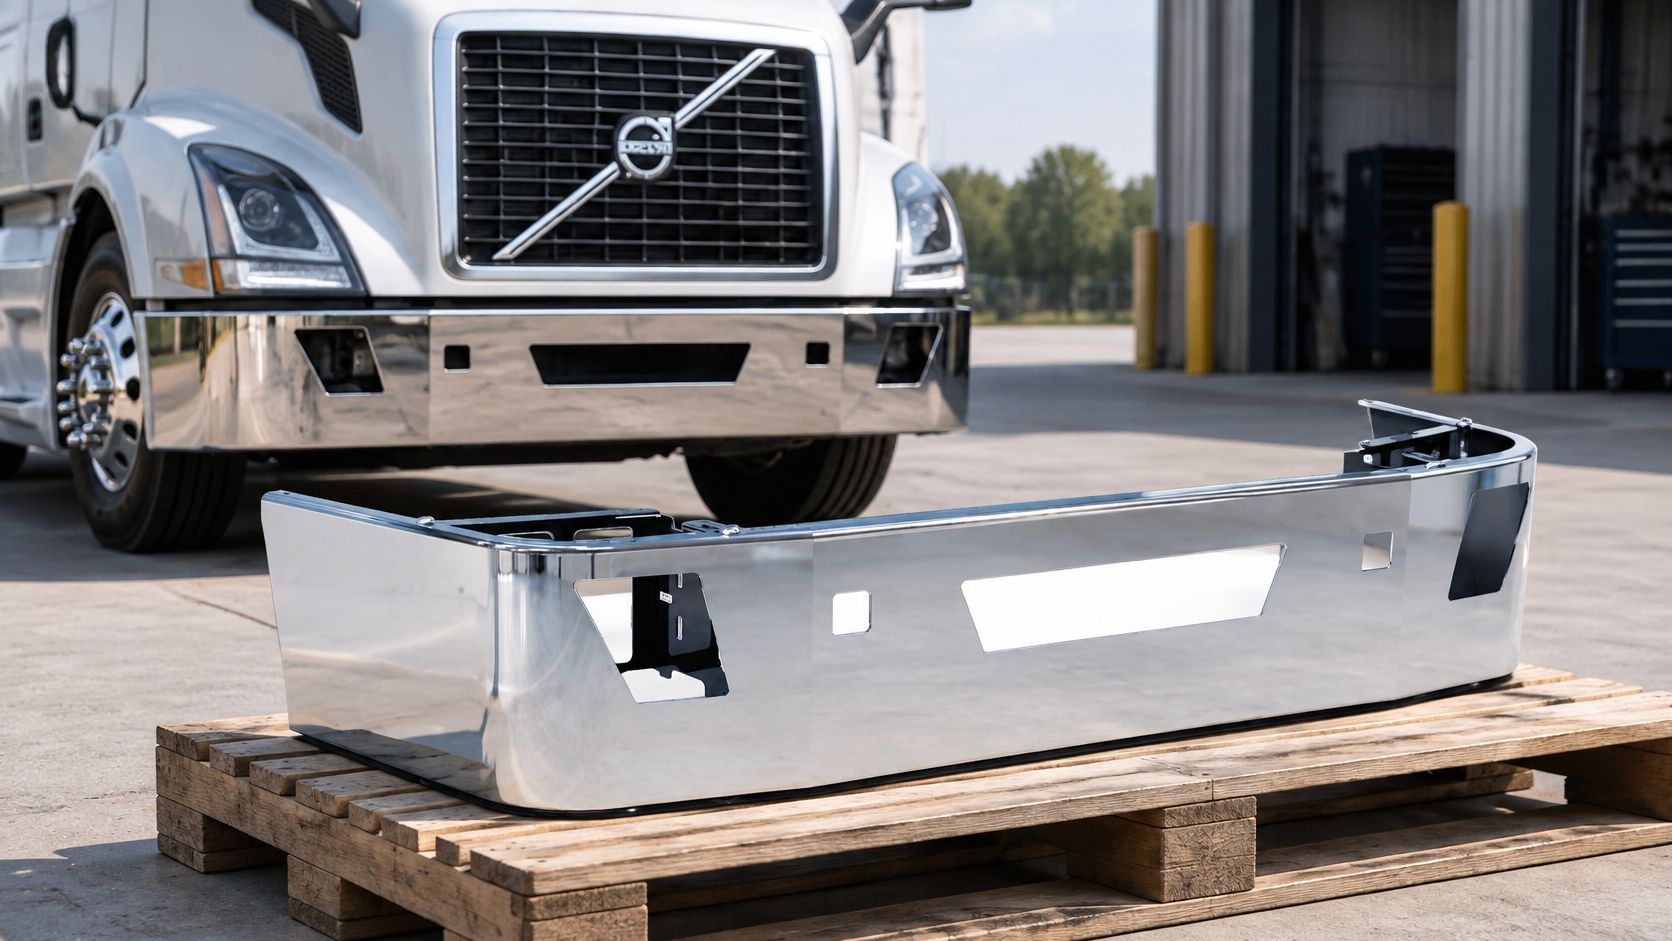
Every order is processed and supported from Magnolia, Texas. The configurator lets you select brand, model, year, style, cutouts, and finish before checkout, so the bumper that arrives is the one your frame expects.
- Shipping window: In-stock 430 and 304 flat bumpers can ship within 48 hours. Made-to-order carbon steel typically ships in 4–6 weeks, moving by LTL freight across the United States. Plan for transit time after the ship date.
- Defect coverage: Our warranty covers manufacturing defects. Check the delivered assembly and report freight damage before installation.
- Road-incident replacement: After a documented incident, replacement discounts are 15% for carbon, 20% for 430, and 25% for 304.
Customer Ulises gave the VNL bumper 5 stars: "The bumper is very well made and it looks awesome on my truck." A bumper earns that kind of review when it bolts on clean, and a clean bolt-on starts with the right configuration.
Make Uptime the Final Test
Choose the bumper that arrives with the right mounts and openings. Every hour spent on shop-floor correction is an hour the truck isn't earning. A straight-looking bumper can still hide a bent bracket or a stretched bolt hole, so fit and structure decide uptime before chrome ever does.
Galhor Inc. offers configurable, direct bolt-on chrome bumpers for Volvo, Freightliner, Peterbilt, and Kenworth trucks, with material choices suited to different routes. Visit Galhor Inc., confirm your model year, mount style, and light openings, and order the bumper that matches your truck.