

Peterbilt 359 Bumper Fitment and Material Guide
You're standing in the yard with a 359 that still looks right from ten feet away, but the bumper is bent, rusted, or wrong for the brackets on the truck. That's where a lot of Peterbilt owners get burned, because a Peterbilt 359 bumper can look simple until you try to match a part that was built across a 1967 through 1987 production run 4 State Trucks. The truck's age, previous repairs, and frame work all matter, and the bumper is more than trim, it's a fitment part that has to land on the right holes, brackets, and hardware.
Table of Contents
- Sourcing the Right Peterbilt 359 Bumper
- Navigating 359 Fitment and Year Variations
- Choosing Between Steel and Stainless Materials
- Installation Hardware and Alignment Checks
- Evaluating Chrome Finishes and Build Quality
- Ordering Logistics and Final Fitment Verification
Sourcing the Right Peterbilt 359 Bumper
A 359 bumper is not a part I would buy from a photo and trust blindly. These trucks stayed in service long after production ended in 1987, so replacement demand kept going in working fleets and restoration shops 4 State Trucks. The catch is that a listing that says “fits 1967 to 1987” can still miss the mark on a real truck.
A bumper can be the right shape and still be wrong for the truck in front of you. Early and late 359s can use different mounting brackets, and plenty of trucks have already had bracket repairs, frame horn work, or custom front-end changes that throw off the factory pattern 4 State Trucks.
Practical rule: if the truck has been apart, measure first and order second.
That is the actual job here. Before you buy, verify the year range, bracket style, and hardware notes, then compare those details against the truck itself. If the seller cannot answer those questions clearly, keep looking.
The fitment check matters because a bumper on a 359 is not just trim. If the brackets do not line up, the install starts with stress already built in, and that shows up later as loose hardware, crooked mounting, or extra work at the frame horns. For an owner-operator, that means downtime. For a fleet, it means another heavy part going back and forth.
If you want a second point of reference while comparing bumper styles, the layout notes in Galhor's Peterbilt bumper guide are useful for sorting through design and fit details without getting distracted by chrome first.
Navigating 359 Fitment and Year Variations
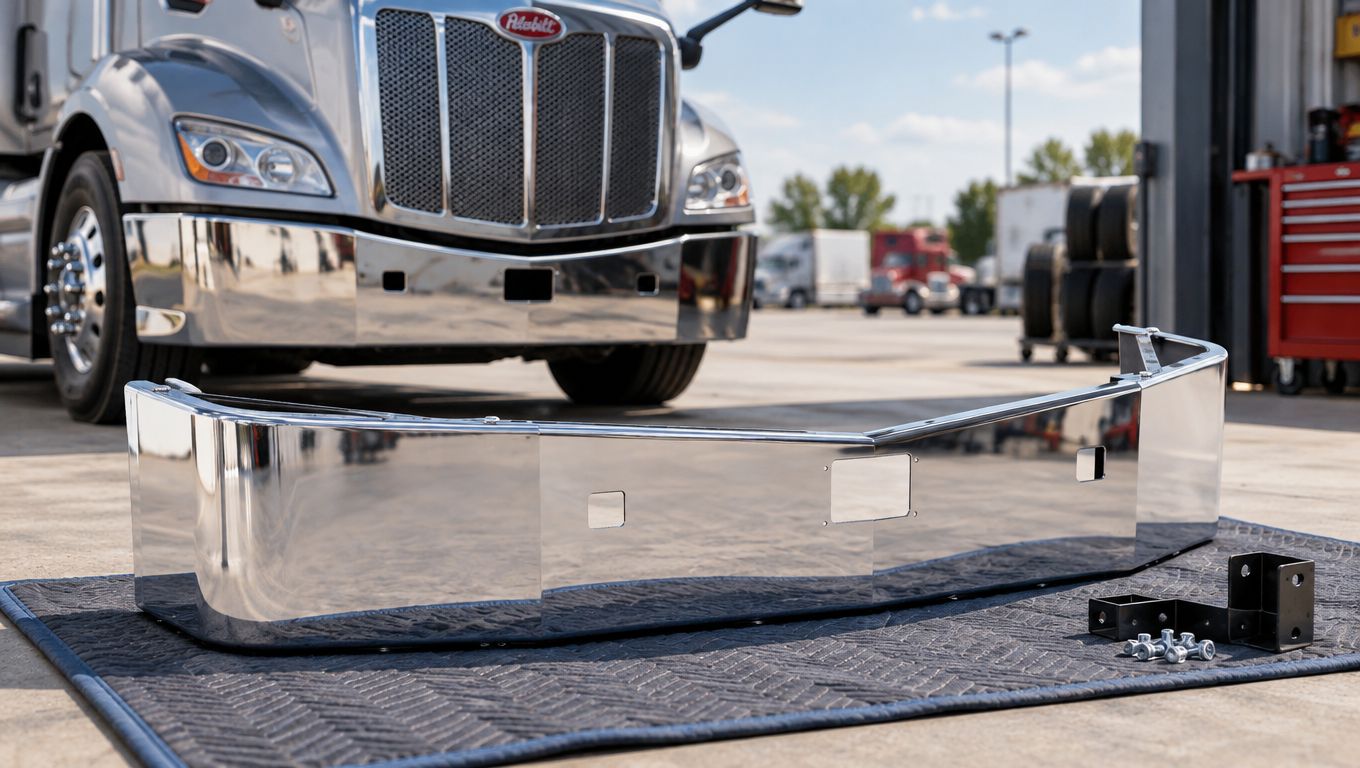
A bumper can look right on a 359 and still miss the truck's mounting points. The model's 1967 through 1987 production span created several fitment variations, and years of bracket repairs, frame-horn work, or custom front-end changes can make a catalog description only a starting point. Treat “direct fit” as a specification to verify, not a guarantee.
Early and late trucks don't always match
Parts listings commonly separate early trucks from 1967 through 1979 and later trucks from 1980 through 1987, because bracket details can differ between those groups 4 State Trucks. Check the mounting-bracket shape, hole spacing, and hardware before ordering. A small difference in bracket angle can leave the bumper sitting under stress or force poor alignment at the frame horns.
A bumper that matches the factory mounting pattern usually saves you work. A close-enough bumper usually adds it.
Bumper height also varies in aftermarket listings, with examples ranging from 12 to 22 inches 4 State Trucks. That choice affects approach angle, front-end coverage, and clearance for tow-pin holes or light openings. For a working truck, those details matter as much as the chrome finish.
Before placing the order, give the seller the truck's year, bracket style, and any front-end modifications. Measure the frame horns and existing mounting points if the bumper or brackets have been replaced. An OEM part-number comparison can help when the nose has been altered. These checks prevent a heavy bumper from arriving with the correct general shape but the wrong actual fit.
Modern direct-fit programs, such as Galhor's Chrome bumper for Peterbilt 579 (2012+), show how much easier ordering becomes when year, brackets, and cutouts are configured upfront. The 359 needs the same discipline, with the final measurements verified by hand.
Choosing Between Steel and Stainless Materials
A Texas truck that rarely sees road salt can justify a different bumper than a 359 running Midwest winter routes. Material selection affects impact stiffness, corrosion, front-end weight, and how much cleanup the bumper needs after years of road spray. The 359's long production run also means the available construction may vary, so confirm the actual specification rather than relying on the model name alone.
Carbon steel and stainless do different jobs
Independent 359 bumper listings show 7-gauge steel assemblies, chrome finishes, and openings for bolts, lights, and tow pins. Other versions use stainless steel or aluminum, with certain straight models listed at roughly 280 to 315 lb Aliarc. Heavy steel provides useful impact stiffness for rough docks and tight yards, but the added front-end mass places more load on brackets and can increase steering effort over time.
Stainless resists rust around fasteners, cutouts, and exposed edges after the finish is damaged. That advantage matters on salt-heavy routes, where corrosion often starts at small chips and mounting points. Carbon steel remains a practical choice for a salt-free Texas rig, especially when impact resistance and repairability matter more than keeping the surface free of edge rust.
| Material Type | Corrosion Resistance | Weight Impact | Best Use Case |
|---|---|---|---|
| Heavy carbon steel | Coating protects it, but chips can rust | Higher front-end mass | Working trucks, rough use, collision-prone yards |
| Stainless steel 304 | Strong corrosion resistance | Lower than heavy steel, depending on build | Salt country and long service life |
| Stainless steel 430 | Good corrosion resistance for many fleets | Lower than heavy steel, depending on build | Mixed-use trucks needing rust control |
A winter-route truck may repay the higher stainless cost through less corrosion cleanup around the fasteners and openings. A dry-climate truck that regularly contacts docks may benefit more from heavy steel's stiffness. The correct decision depends on duty cycle, not appearance alone.
Industry listings identify 10-gauge chrome-plated steel and 3 mm stainless steel 304/430, with direct bolt-on construction and a triple-layer chrome finish containing 35 microns of nickel Galhor bumper collection. Use those specifications to compare actual construction, then review this guide to chrome plated steel vs chrome plated stainless steel before choosing the material for the truck's route and workload.
Installation Hardware and Alignment Checks
A bumper that fits on paper can still install badly if the hardware is weak or the brackets are tired. On a 359, I always look at the mounting ears, frame horn face, and fastener condition before I hang anything heavy. If the bumper is fighting the truck during install, it's telling you something is already wrong.
What to check before the final pull-down
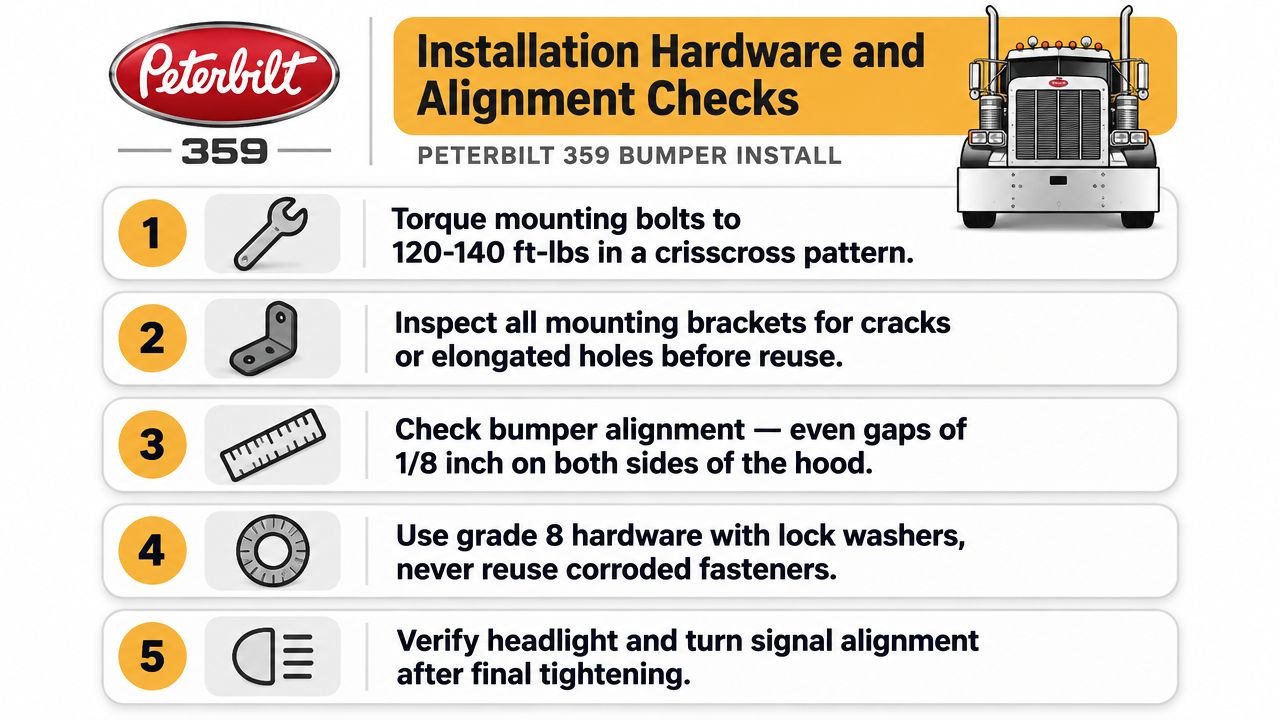
Use Grade 8, 1/2-inch bolts where the fitment calls for them, and replace worn rubber isolators instead of reusing dried-out pieces Arrow Truck Parts. Rubber matters because it helps stop metal-on-metal vibration. If you leave old isolators in place, the bumper can chatter and the mounts can keep working loose.
Check the bracket holes too. Elongated holes, cracks, or evidence of previous impacts can shift load paths during a low-speed hit and push stress into the frame horns. That's how a simple bumper job turns into alignment work you didn't budget for.
Don't force the bumper into place with the bolts. If it only fits when you pull hard on one corner, the bracket pattern is wrong or the truck needs repair.
A good install should sit square with even gaps from side to side. If you're seeing a twist in the bumper face, stop and check the brackets again before you tighten everything down. Small alignment errors usually get worse after the first hard bump or cold-weather shrink.
For a shop-facing note on fit checks and run-out control, the run-out gauge guide is a practical reference when you're checking whether a part is staying true under load.
Evaluating Chrome Finishes and Build Quality
Chrome is where a lot of buyers get fooled. A bumper can look clean on a pallet and still fail once winter salt, road grit, and wash chemicals start working on it. The finish has to be backed by real construction, not just a bright face.
What a solid finish looks like
A good chrome bumper starts with the base metal and the plating stack underneath. The finish should be even across flat faces, with no thin spots at the corners, no cloudy patches, and no visible pitting around welded areas. On a truck that sees long-haul miles, those weak points are where corrosion starts first.
Check the cutouts and edge work by hand. Run a finger around a tow-hole opening, light cutout, or any trimmed edge. If the edge feels sharp, rough, or thinly covered, the plating is already telling you where it will fail. Look closely for copper under-flash or other color changes at the edge, because that usually means the coating was not built evenly.
The 16-to-22-inch heights mentioned earlier also change plating surface area, which is why edge quality matters more on taller bumpers. More exposed surface means more chances for the finish to show flaws once the truck is in service.
Height and geometry matter too
Aftermarket Peterbilt 359 bumpers are sold in heights like 16, 18, 20, and 22 inches, which gives buyers a real choice between a lower profile and more front-end coverage Berube's. That choice changes how the truck presents itself, but it also changes clearance and approach angle. If you run rough yards or tight docks, bumper geometry can be the difference between a clean entry and dragging the nose.
A premium bumper should answer three questions clearly, what's the base metal, what's under the chrome, and how clean are the cutouts and edges. If the listing stays vague, the bumper probably is too.
Ordering Logistics and Final Fitment Verification
Before you hit buy, slow down and verify the truck one more time. With a 359, the biggest freight losses come from ordering the wrong year break, wrong bracket pattern, or wrong cutout layout. That's especially true on older trucks that have been modified, repaired, or rebuilt over the years.
Pre-purchase checklist
- Confirm the exact year: Match the bumper to the truck's actual build year, not just the title or the cab tag if the truck has mixed parts.
- Check bracket style: Early and late 359 mounting brackets can differ, so inspect the frame horns and mounting face before ordering.
- Measure cutouts and clearance: Tow holes, light openings, and fog cutouts need to line up with the truck's setup.
- Inspect for prior repairs: Damaged brackets or custom front-end work can change the fit even when the bumper is marketed as direct fit.
- Plan freight handling: Heavy bumpers arrive by LTL freight, so have a way to unload and inspect the part as soon as it lands.
Galhor's order process is built around direct-fit bumper selection for Class 8 trucks, with in-stock stainless options shipping within 48 hours and made-to-order carbon steel units typically shipping in 4 to 6 weeks. That split gives you a practical way to choose between speed and custom build timing when uptime matters.
If you want a bumper that fits the truck, holds its finish, and shows up with less guesswork, Galhor Inc. builds direct-fit bumper options for Peterbilt, Kenworth, Freightliner, and Volvo trucks. Visit Galhor Inc. to check the fitment details, compare material options, and get the right bumper for your 359 before the truck sits any longer than it has to.