

Rectangle LED Headlights for Class 8 Trucks Compared
A driver pulls into the yard after a night run and says the same thing every fleet eventually hears: the headlights are on, but the road still looks dark. One truck has yellowed halogen sealed beams. Another has a dim online LED kit with a poor cutoff. The chrome bumper looks sharp, yet the lighting package is costing confidence, uptime, and possibly an inspection headache.
That's why rectangle LED headlights deserve a fleet-level decision, not a quick parts-counter swap. For Peterbilt, Kenworth, Freightliner, International, Volvo, and Mack trucks, the right assembly must balance beam control, legal markings, wiring, fitment, housing strength, and the finish around the grille. The same rule applies when you're choosing a Peterbilt 389 bumper, a Kenworth W900 chrome bumper, or an 18 inch drop bumper. The lighting and the front-end hardware need to work as one system.
Table of Contents
- Why Rectangle LED Headlights Matter for Class 8 Trucks
- How Rectangular Headlights Became the Standard
- Comparing Rectangle LED Headlights Side by Side
- Beam Pattern and Real-World Visibility
- Fleet and Owner-Operator Use Cases
- Electrical and Installation Considerations
- Picking the Right Setup and Upgrading Today
Why Rectangle LED Headlights Matter for Class 8 Trucks
A rectangle housing uses the space already built into many Class 8 grilles and bumper assemblies. That matters because a properly designed 4x6 or 5x7 lamp can spread usable light across the lane and shoulder without forcing a custom round-pod conversion. It also keeps the truck's factory character intact, especially on chrome-heavy Peterbilt and Kenworth builds.
The practical comparison starts with the light source. A halogen lamp turns more electrical energy into heat, while LED assemblies use compact emitters and dedicated optics. Technical guidance from HELLA's LED headlight overview places modern LED emitters around 50 to 70 lm/W at the source level, compared with about 25 lm/W for a halogen H7. That doesn't guarantee better road light by itself. The reflector, cutoff, lens, and aiming still decide what reaches the pavement.
Start with the duty cycle
A fleet manager should compare these points before approving a retrofit:
- Route exposure: Unlit interstate work calls for controlled forward reach and clean high-beam performance.
- Weather: Snow, salt, rain, and road spray punish weak seals, poor connectors, and soft mounting hardware.
- Truck fitment: Freightliner Cascadia, Peterbilt 579, Kenworth T680, International LT, Volvo VNL, and Mack Anthem applications can use different brackets, connectors, and lamp envelopes.
- Inspection risk: A lamp needs the correct certification and beam pattern for the market where the truck operates.
- Front-end appearance: A bright LED behind a dull, damaged bezel still makes the truck look unfinished.
Some sellers promote extremely long LED service life, but that number should be treated as a product claim unless the complete assembly supports it under truck vibration and heat. The useful question is simpler: does the lamp maintain its output, seal, and aim through long hauls and routine washing?
A clean chrome bezel can also help the truck's resale presentation, but appearance comes after beam control. Don't buy a bright lamp that creates glare or fails to fit the bucket. A good rectangle LED headlight should bolt into the truck, connect without guesswork, and produce a controlled pattern that a technician can aim and document.
Fleet rule: Buy the complete certified assembly, not just the brightest bulb advertised for a factory housing.
How Rectangular Headlights Became the Standard
Rectangular headlamps became a major turning point in automotive lighting because European cars, including the German Ford Taunus P3 and Citroën Ami 6, used them in 1960. U.S. rules kept the sealed-beam format much tighter for decades, with round lamps remaining standard until regulatory changes in 1974 and 1975 allowed rectangular lamps to enter the American market. The history is documented in the headlamp background reference.
That split shaped the parts market truck owners know today. ECE markets generally allowed more lamp shapes as long as the unit met performance rules. The U.S. SAE system historically imposed stricter form limits, so the 4x6 and 5x7 envelopes became familiar service formats for heavy-duty applications.
From sealed beam to integrated LED
The basic progression is easy to follow:
- Round sealed beams set the older U.S. standard.
- Rectangular sealed beams and halogen capsules used the available 4x6 and 5x7 footprints.
- Projector-style halogen and HID systems added more control through lenses and reflectors.
- LED assemblies placed compact emitters behind optics designed for low beam, high beam, or both.
Truck builders kept the rectangular look because it fits the grille and reads as part of the truck's identity. Peterbilt and Kenworth owners often want the visible chrome-bezel style, while Freightliner and Volvo applications may use more integrated module designs inside a similar front-end envelope.
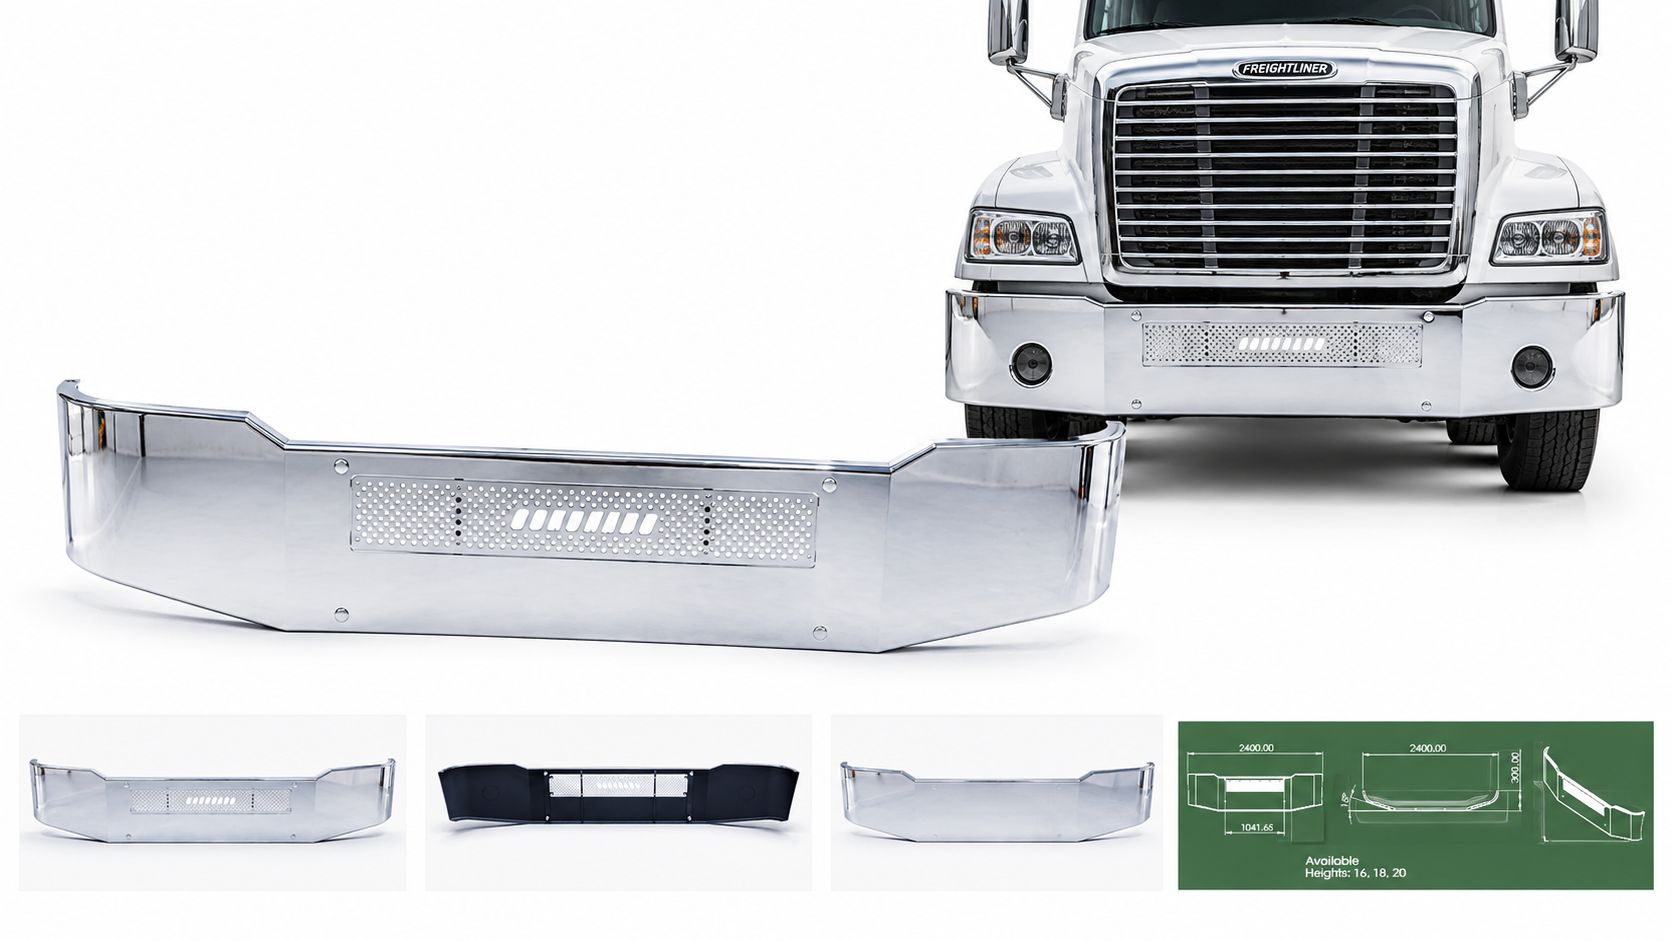
A product such as the Chrome bumper for Freightliner Coronado (2002–2009) shows how the lamp opening and bumper finish belong in the same fitment discussion. It uses 10-gauge chrome-plated steel with a mirror-polished finish, offers 11-gauge 430 stainless steel as an option, and uses direct bolt-on installation without modifications.
What the markings tell you
For U.S. road use, look for the required DOT and SAE markings on the lens or assembly. Don't assume a replacement bulb becomes legal just because it fits a factory socket. A complete headlamp assembly must meet the applicable photometric rules, and the FMVSS 108 and regional legality discussion explains why a certified assembly matters more than the LED label alone.
Comparing Rectangle LED Headlights Side by Side
The market has three broad choices: low-cost kits, established mid-tier lamps, and premium assemblies built around stronger optics, sealing, and documentation. The table below is a buying framework, not a claim that every product in a category shares the same specification.
| Spec / Feature | Budget LED Set | Mid-Tier (Truck-Lite / Vision X) | Premium (JW Speaker / Grote) |
|---|---|---|---|
| High-beam output | Verify the product data. Do not buy on marketing language alone. | Usually documented by the manufacturer | Usually documented with stronger photometric information |
| Beam pattern | May be broad, uneven, or poorly controlled | More likely to offer a defined dual-beam pattern | Designed for tighter cutoff and repeatable distribution |
| DOT / SAE status | Must be confirmed on the exact assembly | Confirm the lens marking and application | Confirm the lens marking and application |
| Housing material | Often plastic or mixed construction | Commonly polycarbonate or aluminum-backed | Often uses robust aluminum, sealed optics, and stronger hardware |
| Sealing | Product-specific | Product-specific | Product-specific, with more attention to environmental protection |
| Connector | May need an adapter | Usually clearer application support | Usually application-specific |
| 4x6 and 5x7 fitment | Measure the bucket and depth | Match the catalog application | Match the catalog application and bracket |
| Chrome compatibility | May need a separate bezel | Better choice for truck-specific trim | Best suited to custom or premium front-end builds |
| Warranty | Varies by seller | Confirm written coverage | Confirm written coverage and service process |
| Price | Lower initial spend | Middle purchase cost | Higher purchase cost |
What the categories mean in the shop
A budget Amazon set can make sense for a truck that needs a fast replacement, but only if the seller provides the correct markings, connector information, and beam data. The low price doesn't help if the lamp flickers, throws glare, or requires repeated removal.
Truck-Lite and Vision X units occupy the sensible middle for many working trucks. They're worth considering when a fleet wants a known application, a cleaner installation process, and better support than a generic kit. Still, verify the exact model instead of relying on the brand name.
JW Speaker and Grote assemblies make more sense when the truck runs demanding routes, the fleet needs consistent parts, or the owner cares about repeatable optics and a finished front-end appearance. Premium pricing should buy better documentation and execution, not just a brighter claim.
One published 4x6 product specification lists 3,600 lm on high beam and 2,800 lm on low beam, with 60 W input and a 6,500 K color temperature. Those figures come from the Classic Industries rectangle LED sealed-beam listing, and they're useful as a comparison point. They don't replace an on-road beam check.
Beam Pattern and Real-World Visibility
Raw lumens tell you how much light leaves the lamp. They don't tell you where that light lands. A rectangular LED assembly can have excellent output and still perform poorly if the chip position, reflector, or projector lens creates hot spots above the cutoff.
The housing shape gives designers useful horizontal space for side fill. That can help illuminate lane edges, signs, and shoulders on regional roads. The trade-off is that a broad pattern may deliver less concentrated distance than a narrow driving lamp. On an interstate, you want a defined low-beam cutoff and strong forward reach. On dark two-lane routes, useful shoulder coverage can matter just as much as distance.
Read the beam, not the advertisement
Check these features in a wall test or approved aiming bay:
- Low beam cutoff: The top edge should be clear and controlled, not scattered into oncoming traffic.
- High beam reach: The center of the pattern should extend down the road without a bright spot that hides the surrounding area.
- Side fill: Look for even coverage near the lane and shoulder rather than isolated patches.
- Left and right consistency: Both lamps should produce matching shapes after installation.
- Aiming stability: Vibration or a weak bracket can turn a good pattern into glare after a few trips.
A rectangular LED chip layout can create a wider distribution, but that doesn't automatically make it safer. Independent lighting guidance also points to glare and poorly controlled forward intensity as continuing concerns. The beam-pattern explanation for LED headlight bulbs is useful when comparing a wide beam with a focused one.
Efficiency matters because the assembly must manage heat while maintaining output. Source-level LED figures around 50 to 70 lm/W can look impressive, but usable road illumination depends on optical losses, thermal control, and aim. A lamp with fewer advertised lumens can give a driver a better view if it puts more light in the correct zones.
For truck-specific fitment and front-end design context, review the Volvo VNL headlight design reference. Use beam shots as a screening tool, then rely on the lamp's certification, installation instructions, and a proper aim check before releasing the truck.
Fleet and Owner-Operator Use Cases
An owner-operator running long-haul lanes across I-80 doesn't need a showpiece that looks bright in a parking lot. That driver needs a steady low beam, useful reach on unlit stretches, and hardware that stays aimed after vibration, wash cycles, and winter road spray.
The right move is a complete rectangle LED assembly matched to the truck's bucket and wiring. The owner should compare the lamp's low-beam cutoff first, then high-beam reach, then the connector and mounting depth. A chrome bezel can improve the front-end appearance, but it shouldn't hide a poor seal or a lamp that points into the cab of every oncoming vehicle.
Long-haul owner-operator priorities
For a Peterbilt, Kenworth, Freightliner, International, or Volvo working interstate routes, prioritize:
- Documented beam performance: Choose a lamp with clear low and high beam functions.
- Secure mounting: Use vibration-resistant fasteners and confirm the bracket cannot flex.
- Weather protection: Inspect the rear housing, grommets, and connector before installation.
- Service simplicity: Keep a matched spare or a documented replacement source in the maintenance plan.
A regional fleet faces a different problem. Trucks running through Great Lakes weather deal with snow, salt, moisture, and repeated temperature changes. A lamp that works in a dry yard can fail when ice builds around the housing or water reaches a weak connector.
Regional fleet priorities
A fleet manager should standardize the lamp across the same truck configuration whenever possible. That keeps aiming procedures, spare parts, wiring adapters, and technician training consistent. If the application supports a heated housing, confirm that the feature is part of the certified assembly and that the truck's electrical system can support it.
The maintenance payoff comes from fewer repeat repairs and less time in the shop, not from a dramatic lumen number. Keep inspection records, photograph the installed markings, and document the final aim. That gives the fleet a defensible maintenance trail when a driver reports glare, flicker, or poor visibility.
Electrical and Installation Considerations
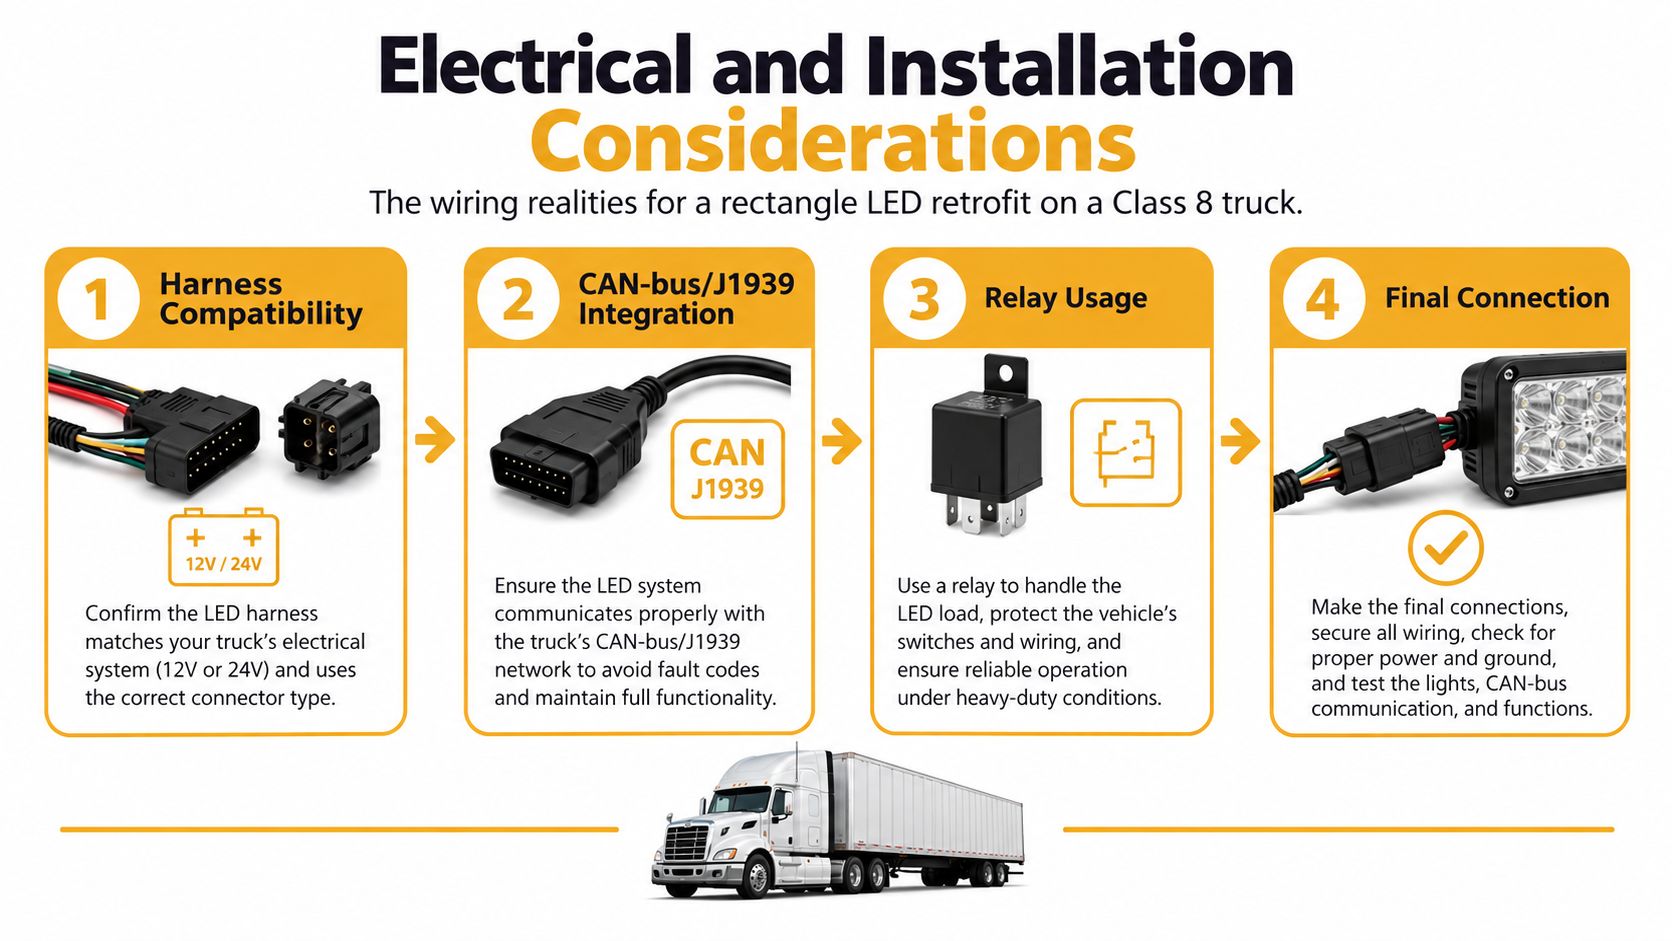
A rectangle LED retrofit fails in the wiring bay more often than it fails in the product catalog. The truck may have a 12V system, a 24V system, pulse-width modulation, multiplexed controls, or a J1939 network that reacts badly to an unexpected load. Confirm the truck voltage and lamp compatibility before connecting anything.
Build the installation around the truck
Use this sequence:
- Confirm voltage and polarity. A lamp made for one electrical environment may not be suitable for another.
- Check the connector. An adapter should lock securely and protect the terminals from moisture.
- Test the control system. CAN-bus or J1939-equipped trucks may need an anti-flicker harness or decoder.
- Use a relay harness when appropriate. The relay should carry the lamp load, while the factory circuit controls the signal.
- Protect every connection. Apply suitable dielectric grease where the manufacturer allows it, route wiring away from heat and sharp edges, and seal the grommets.
- Aim the lamps after tightening the hardware. Aiming before final torque wastes shop time.
The included installation guide below highlights the four areas technicians should check before releasing the truck.
Heat and vibration decide service life
LED drivers and heat sinks need airflow and correct orientation. Don't bury the rear of the lamp against wiring, insulation, or a bracket that blocks heat transfer. Check the available depth in both 4x6 and 5x7 buckets, then verify that the rear driver and connector won't contact the grille or bumper during cab movement.
Pinched grommets, undersized wire, loose grounds, and missing strain relief can turn a good lamp into a shop-loop warranty claim. If a diagnostic trouble code appears, don't solve it by guessing at resistor size. Follow the lamp and truck manufacturer's load guidance, because excessive resistance can create unnecessary heat.
For the legal side of the installation, the DOT-approved headlight guidance is a useful checkpoint. The marking on the lens, the complete assembly, the wiring, and the final aim all matter.
Picking the Right Setup and Upgrading Today
Buy the headlight for the truck's work, not for the product photo. A long-haul owner-operator, a regional fleet, and a show truck may all use rectangle LED headlights, but they shouldn't make the same buying decision.
Match the lamp to the route
Long-haul interstate trucks need a controlled dual-beam pattern, dependable sealing, and a connector that won't loosen after repeated vibration. A 5x7 assembly can make sense where the truck has the correct bucket and bracket, but verify the complete application before ordering.
Regional trucks often benefit from balanced width and cutoff control. A projector-style rectangle LED headlight can help keep the low beam organized around urban traffic, interchanges, and two-lane roads. Don't chase maximum output if the lamp creates glare complaints or fails the aim check.
Budget-focused trucks can still gain from a mid-tier 4x6 replacement over a tired halogen sealed beam. Put part of the budget into a relay harness, proper connectors, and technician time. A cheap lamp installed badly is not a cheap repair.
Use this buying checklist
- Truck model match: Confirm year, grille, bucket, connector, mounting bracket, and lamp depth for the Peterbilt, Kenworth, Freightliner, International, Volvo, or Mack application.
- Legal marking: Look for the required DOT and SAE identification on the exact assembly. Don't accept a generic “street legal” claim without visible documentation.
- Beam type: Decide whether you need a high/low dual beam, fog function, or driving pattern.
- Housing protection: Choose a sealed housing suited to road salt, wash water, and winter exposure.
- Chrome coordination: Match the bezel, bumper cutout, and trim finish. A polished lamp surround should look intentional beside a chrome bumper.
- Installation plan: Schedule the work with routine preventive maintenance and include final aiming.
- Fleet consistency: Use the same lamp and harness across matching truck configurations so technicians don't maintain several incompatible setups.
Installation time depends on the truck and the condition of the existing hardware. Don't promise a fixed shop duration until the technician has checked corrosion, access, brackets, and wiring. If the truck has a damaged bumper or misaligned lamp opening, repair that before judging the LED's performance.
Material choice matters around the lamps, too. 430 stainless steel offers good atmospheric and road-spray corrosion resistance, and Carpenter's 430 stainless data sheet notes its strong resistance to chloride stress-corrosion cracking compared with austenitic grades at high temperatures. 304 stainless steel is widely used for corrosion resistance in moisture and low-salt environments, as described in Ryerson's stainless steel guidance. For a polished finish, Penn Stainless' 430 reference identifies highly polished or buffed surfaces as the condition that provides maximum corrosion resistance for that grade.
That's where the bumper and lighting decision meet. A chrome-plated steel bumper gives a strong traditional look, while polished 430 or 304 stainless can make sense for buyers who want corrosion resistance built into the material. Choose the bumper gauge, cutouts, and finish around the actual truck and lamp configuration. A direct-bolt solution is valuable because it avoids unnecessary drilling and reduces installation variables.
For trucks that need more front-end lighting, review the light bar bumper design reference, then confirm that auxiliary lighting won't interfere with the headlamp beam or violate the truck's operating requirements.
Finish the purchase with shipping and handling in mind. Heavy bumpers commonly move by LTL freight, and carriers may require that method for individual packages over 150 pounds. Delivery is typically curbside or to the nearest safe point, while customers without a dock or forklift may need liftgate service, as explained in TruckSpring's freight shipping policy. Plan the receiving location before ordering so the replacement doesn't sit exposed at a yard entrance.
Galhor Inc. offers configurable chrome bumpers for Class 8 trucks, including Peterbilt, Kenworth, Freightliner, and Volvo applications, with chrome-plated carbon steel, 430 stainless steel, and 304 stainless steel options. Visit Galhor Inc. to match your bumper cutouts and finish with your rectangle LED headlight setup, then order the front-end parts your truck can use for long hauls and harsh weather.