

Volvo VNL Parts Reference Guide for Every Model Year
You're standing at the parts counter with a damaged front bumper, a truck that needs to roll, and a supplier asking for the model year, cutouts, and OEM number. Ordering by “Volvo VNL bumper” alone is how a repair turns into a return, a second freight charge, and lost uptime. Volvo VNL parts are configuration-driven, so the VIN, generation, front-end layout, and subsystem revision should guide every purchase.
This reference is built for U.S. owner-operators, fleet managers, maintenance teams, truck enthusiasts, and shops that also work on Peterbilt, Kenworth, Freightliner, and International equipment. It focuses on the parts that affect fitment, durability, professional appearance, and long-haul reliability, with special attention to bumper materials, cutout patterns, and direct bolt-on installation.
Table of Contents
- Introduction to Volvo VNL Parts and Why Fitment Matters
- Volvo VNL Generations and Model Year Breakdown
- Main Categories of Volvo VNL Parts You Will Replace Most
- How to Verify Exact Fitment Before You Order
- Volvo VNL Bumper Systems and Replacement Options
- Material Choices and Corrosion Resistance for Long Haul Durability
- Configurable Bumpers Cutouts and Installation Notes
- Quick Reference Cross References and Related Parts to Check
Introduction to Volvo VNL Parts and Why Fitment Matters
A VNL arrives after a roadside impact, and the replacement bumper looks right in the supplier's photo. On the truck, the mounting holes miss, the end profile sits incorrectly, and the fog-light openings do not match the option layout. A well-built part still becomes a return, added freight, and lost uptime when it was matched by appearance instead of truck identity.
The VNL is a long-running Class 8 tractor family with changing body and front-end configurations. Volvo introduced it in 1996, renamed it VNL for the 2000 model year, and unveiled an all-new second-generation VNL in 2024, as documented in the Volvo VN history reference. Those milestones matter here only because parts catalogs group applications by design changes. Detailed generation history belongs in the next reference section.
Start with the truck's identity
“Volvo VNL chrome bumper” is a search term, not a fitment decision. Before requesting a quote or placing an order, collect:
- VIN: Provide the full VIN when the supplier offers VIN lookup.
- Model year: A broad year range can cover different bumper families.
- Generation: Older bodywork may not interchange with newer front-end designs.
- Cab and front-end layout: Check the lamps, fog openings, tow holes, vents, and mounting arrangement.
- OEM identifier: A part number gives a stronger match than shape or finish alone.
The same rule applies beyond exterior panels. Filters, sensors, mirrors, harnesses, cooling parts, and wheel-end components can vary by application. A repair may require a bumper center, end cap, lamp kit, and electrical connector together, yet each item can have a separate fitment requirement.
Use the reference in order
Identify the truck's generation before comparing listings. Then review the related part category, verify the VIN and OEM relationship, and assess the bumper material and cutout configuration against the truck's operating conditions. This sequence catches mismatches before installation, when correcting the order is cheaper than correcting the repair.
A supplier who cannot confirm the model year, configuration, and part-number relationship has not confirmed fitment.
Practical rule: Do not approve a VNL part on appearance alone. Get the VIN-based match and verify the mounting and option layout first.
Volvo VNL Generations and Model Year Breakdown
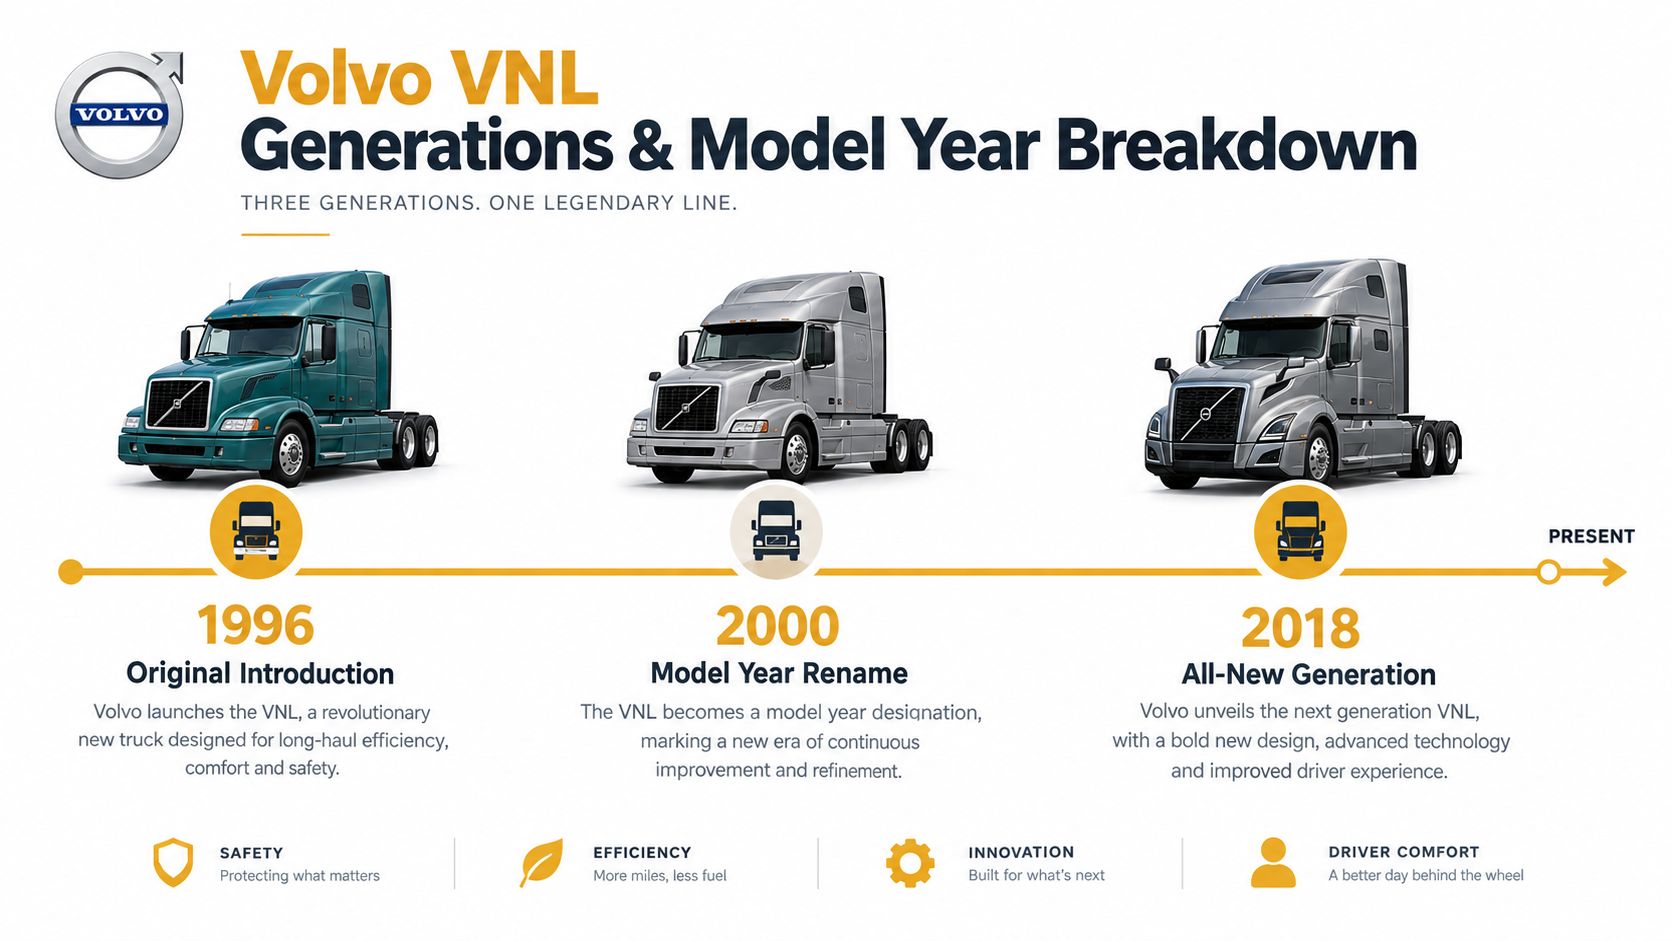
A bumper order can fail before the truck enters the shop if its generation is wrong. The VNL began in 1996 as Volvo's second-generation North American Class 8 tractor and adopted the VNL name for the 2000 model year, according to the Volvo VN model history. Volvo introduced an all-new second-generation VNL in 2024, so the model name alone does not establish interchangeability.
The main reference points
| Reference point | What it means for parts |
|---|---|
| 1996 introduction | Established the North American VNL family and its long parts-support history |
| 2000 model year rename | The VN naming structure changed to VNL |
| 2004–2017 applications | A defined bumper fitment range exists for replacement shopping |
| 2018 and newer designs | Front-end changes require careful year and configuration checks |
| 2024 all-new second-generation VNL | New body, electrical, service, and accessory relationships need current catalog verification |
The 2004–2017 Volvo VNL bumper belongs to a defined application range. It should not be installed on a 2018 or newer truck without confirming the mounting pattern and front-end options. Fitment listings for 2018–2024 Volvo VNL Gen III bumpers separate variations by bolt holes, tow holes, vent holes, fog-light openings, and other cutouts, as shown in the VNL bumper fitment listing. A separate Volvo semi-truck bumper guide also identifies configuration-specific requirements for 2018 and newer VNL models.
Cab and trim changes add more variables
The current VNL platform includes six cab configurations, while the newest generation has four trim levels, Core, Edge, Edge Black, and Ultimate. Those choices can change the related parts families a fleet must track. Similar-looking trucks may still use different mounting points, lamp openings, end caps, or surrounding trim.
For a 2004–2017 truck, the Chrome bumper for Volvo VNL (2004–2017) is listed as a direct bolt-on unit made from 10-gauge chrome-plated steel, with an 11-gauge 430 stainless steel option, a Gauge-7 mounting bracket, and configuration-based tow, fog, and light openings. The Chrome bumper for Volvo VNL (2004–2017) details apply to that product, not every VNL bumper. Use the VIN, model year, generation, and cutout layout to confirm the match before ordering.
Main Categories of Volvo VNL Parts You Will Replace Most
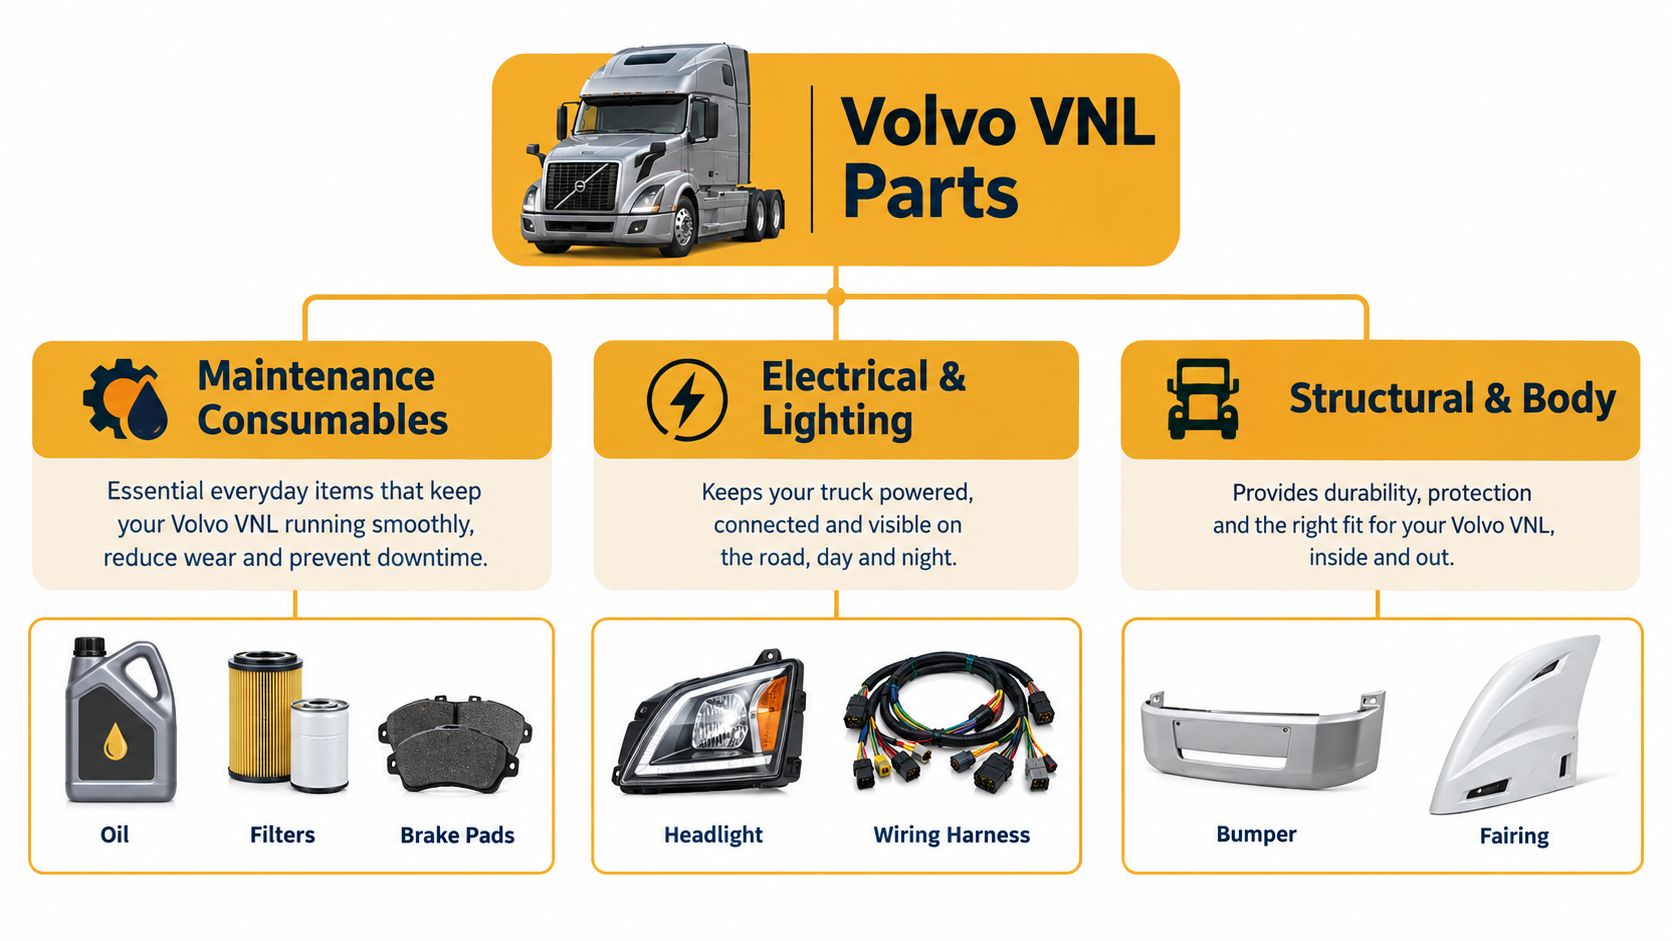
A reliable VNL parts program starts with the VIN, then separates routine service items from collision and body repairs. The official Volvo VNL maintenance and collision parts list covers batteries, chemicals, cooling parts, exhaust kits, filters, lighting, mirrors, sensors, suspension, and wheel-end components. Use that range as a reference system, not as a generic shopping list. Generation, cab configuration, and bumper cutouts still determine the actual fit.
Maintenance consumables
These parts support scheduled service and emissions-system upkeep:
- Filters: Match fuel, oil, air, and air-dryer filters to the truck application and service specification. A filter that fits the housing can still be wrong for the engine or service interval.
- Fluids and oils: The catalog references VDS 4.5 and VDS 5 oils, rear axle oil API GL-5 SAE 75W-90, and transmission fluid SAE 75W-90 to Volvo specification 97319. Confirm the required specification before substituting a fluid.
- Cooling and exhaust service: Include engine-cooling parts, exhaust service kits, and DPF service kits in preventive-maintenance planning. These items affect both uptime and emissions-system service.
- Electrical baseline: The listed Group 31 12V AGM battery is rated at 825 CCA, 200 RC, and 100 Ah. Keep the battery specification with the truck's VIN record rather than relying on appearance alone.
Electrical and lighting
Front-end repairs often involve more than a lamp. Inspect lamps, sensors, mirrors, harnesses, connectors, and mounting hardware as one assembly, especially after impact, vibration, or weather exposure. Replacing only the visible light can leave a damaged connector or harness behind and create a second repair.
Structural and body parts
Bumpers, end caps, brackets, fairings, mirrors, and lamp assemblies take road debris, winter salt, loading-yard contact, and collision damage. Fitment depends on the mounting pattern and the required openings for tow points, fog lamps, vents, and lighting. Material and finish also affect corrosion resistance, appearance, and serviceability, particularly for owner-operators maintaining a professional front end.
Replace a bumper only after checking the adjacent lighting and electrical pieces. That inspection catches damaged parts while the front end is already open, reducing repeat labor and avoidable shop returns.
How to Verify Exact Fitment Before You Order
A truck can look right in a listing and still reject the part at installation. Start with the complete VIN, then confirm the configuration and OEM reference before approving an order. Volvo's body-builder documentation explains that replacement components can be VIN- or configuration-specific assemblies, particularly in body, electrical, and upfit work. The all-new VNL body-builder documentation also covers approved fluids and electrical integration, so visual similarity is only one fitment check.
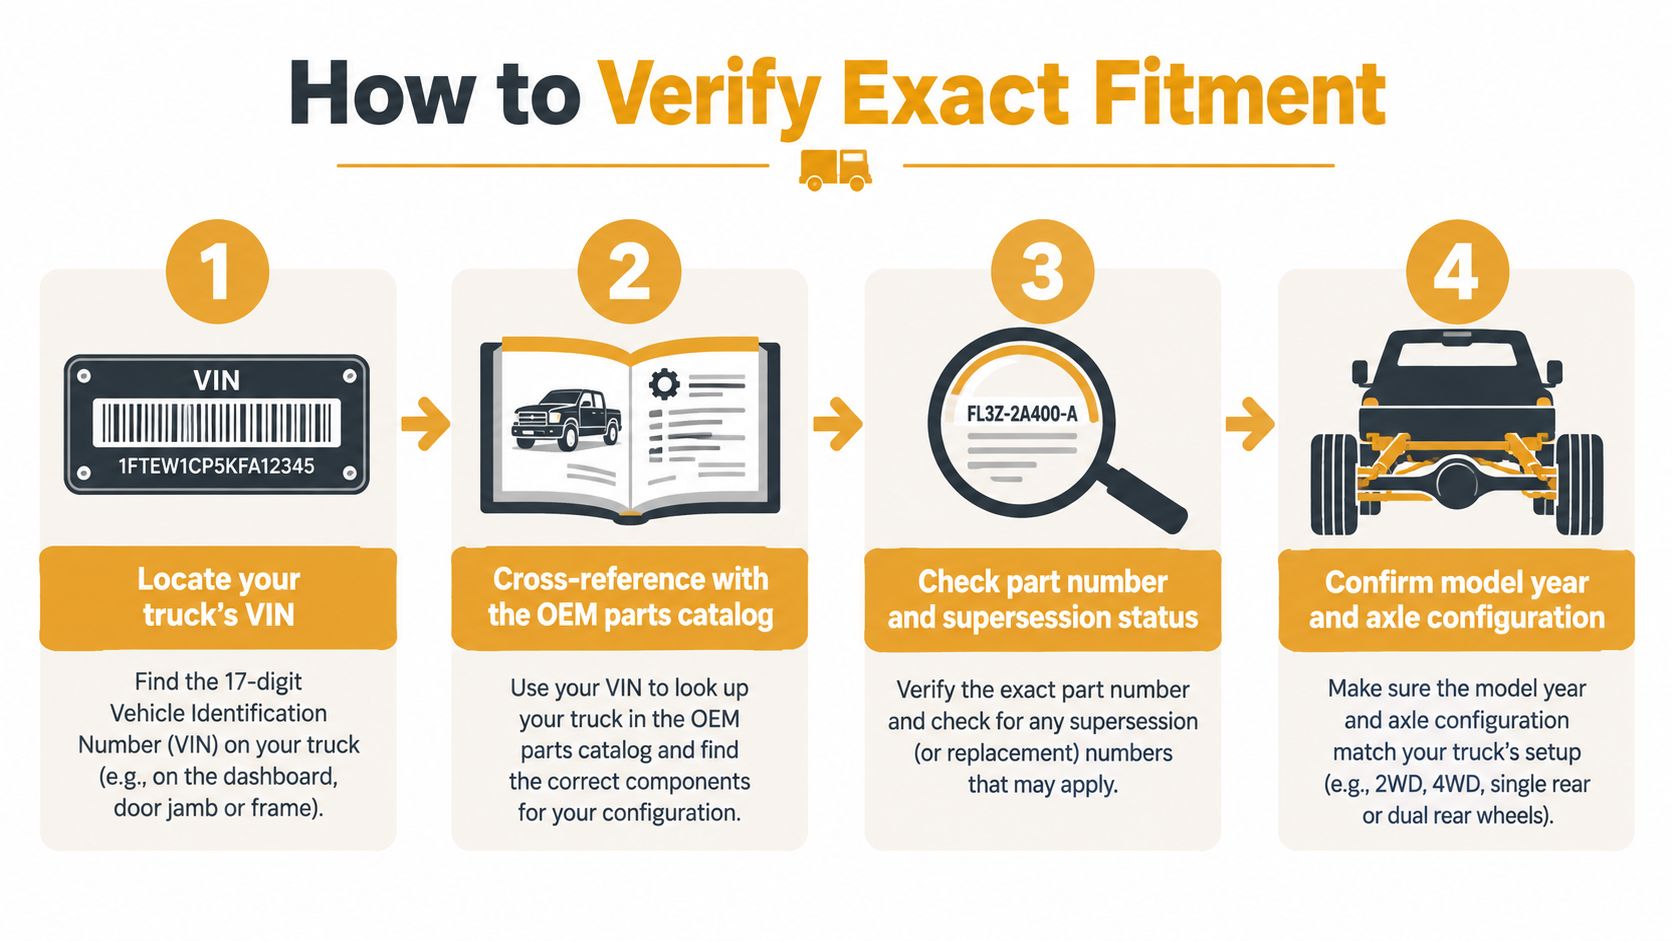
Follow four checks before checkout
-
Record the complete VIN.
Provide the supplier with the full VIN, model year, cab details, and known front-end options. A year filter alone can group trucks with different mounting and opening layouts. -
Use the matching catalog.
Select maintenance, collision, parts, or body-builder material for the truck's generation. Nearby systems may have separate catalog entries even when they share the same front-end area. -
Confirm the OEM number.
Check the exact number, supersession, and part scope. The listing may cover a center section, end cap, bracket, lamp, connector, or complete assembly. Volvo documentation lists bumper center 24408106, while the official VNL parts and accessories catalog lists 24408108. Treat those identifiers as separate until the supplier confirms their application. -
Verify the physical configuration.
Match axle layout, cab position, bumper-to-axle relationship, tow holes, fog openings, vent holes, lamp openings, and connector locations. For a bumper, the cutout pattern is part of the specification, not a cosmetic detail.
Check connectors before closing the order
Front-end work can damage a harness or connector behind the visible panel. The body-builder manual identifies connector housings 22236186 for the female housing and 22236185 for the male housing. Use those references when a harness, sensor, or upfit connection is part of the repair.
Save photos of the damaged component, mounting face, holes, cutouts, and connectors. Photos help a supplier spot a mismatch, but they do not replace VIN confirmation.
Ordering habit: Put the VIN, model year, generation, OEM number, and cutout pattern in one order record. Approve the part only after all five items agree.
Volvo VNL Bumper Systems and Replacement Options
A VNL bumper is a system, not always one universal piece. Volvo catalogs identify replaceable components such as a bumper center and matching end caps. The official parts and accessories material lists Bumper Center 24408108, while body-builder documentation identifies another bumper center reference, 24408106, which is why the exact truck and catalog revision must be confirmed before ordering.
Front-end dimensions also affect installation. Volvo's Canada specification sheet lists a bumper-to-front-axle measurement of 53.7 inches for a specified configuration, and bumper-to-back-of-cab values vary by configuration in the VNL specifications. That doesn't make the Canada sheet a substitute for U.S. fitment confirmation. It does show why packaging measurements and configuration details belong in the ordering conversation.
Compare the main fitment groups
| Generation | Years | Bumper system notes | Fitment rule |
|---|---|---|---|
| Early VNL family | 1996–2003 | Older body and mounting relationships | Confirm original design and OEM reference before replacement |
| Established mid-generation | 2004–2017 | Replacement bumpers may include center sections, end caps, brackets, and option cutouts | Use the exact year range and cutout layout |
| Gen III applications | 2018–2024 | Listings show generation-specific designs and multiple hole patterns | Don't cross-fit from 2004–2017 by appearance |
| All-new second-generation VNL | 2024 onward | Newer platform, trim, cab, service, and accessory relationships | Use current Volvo catalog and VIN confirmation |
Material selection is the next decision. Chrome-plated steel usually suits buyers who want a traditional polished appearance and a durable heavy-duty shell. Stainless steel can make more sense for operators who face frequent salt, wet roads, or long periods between cosmetic maintenance.
For a deeper explanation of how bumper design and replacement decisions affect installation, review this Volvo bumper replacement guide. The practical rule remains simple. Confirm the generation first, then the part family, then the cutouts and mounting hardware.
Material Choices and Corrosion Resistance for Long Haul Durability
A bumper's material affects more than appearance. It determines how the part handles rain, road salt, winter spray, gravel, yard contact, repairs, and the cost of keeping the truck presentable. Material choice should follow the truck's VIN-confirmed fitment and route conditions, not a finish viewed in a listing photo.
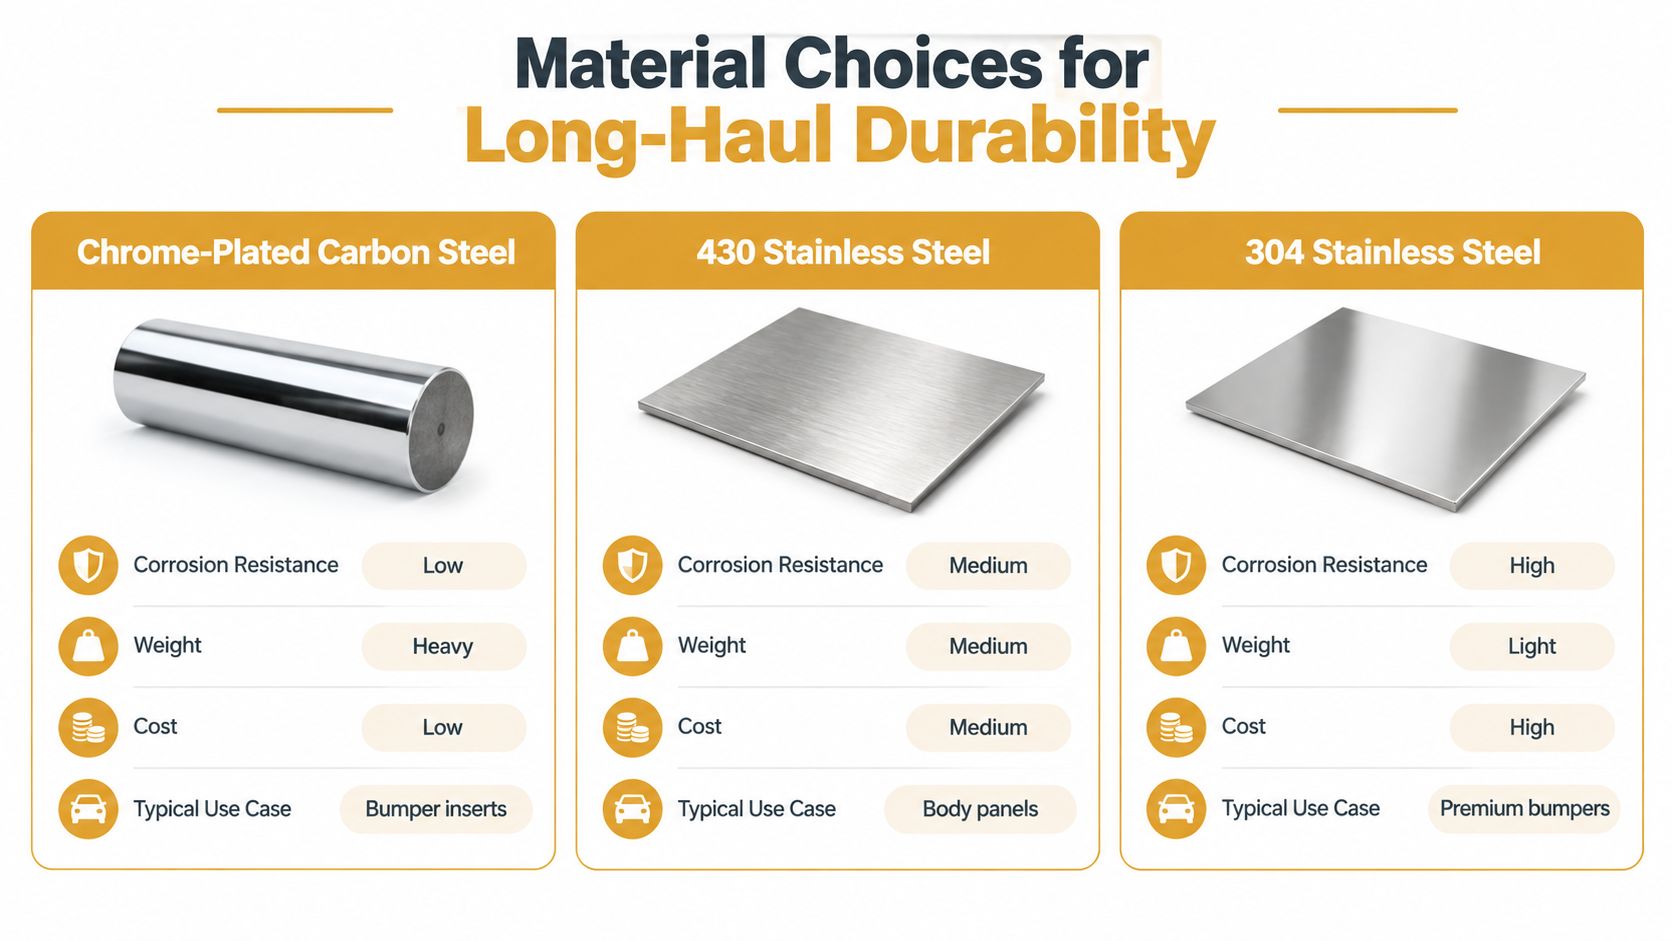
Chrome-plated carbon steel
Chrome-plated carbon steel suits operators who want a substantial bumper and the traditional polished appearance associated with many VNL builds. The documented application uses 10-gauge chrome-plated steel, a mirror-polished finish, and a triple-layer hexavalent chrome process with 35 microns of nickel, according to the VNL bumper product specifications.
Its weakness is surface damage. Once a chip or abrasion breaks through the plating, moisture and salt can reach the underlying steel. Inspect impact areas and repair exposed damage before corrosion spreads beneath the finish.
430 stainless steel
11-gauge 430 stainless steel is listed as another material option for the same VNL bumper application. It fits operators who want a stainless alternative to carbon steel and regularly run through wet or salted conditions. Stainless still needs cleaning and inspection, particularly around fasteners, cutouts, and areas that take road or yard impacts.
304 stainless steel
304 stainless steel is normally chosen when corrosion resistance carries the greatest weight. It does not remove the need to verify construction. Thickness, mounting design, cutout placement, and the front-end configuration still determine whether the bumper belongs on that truck. A lighter or more corrosion-resistant material cannot correct a wrong fit.
Choose by operating conditions
| Operating condition | Practical priority |
|---|---|
| Long-haul work in mixed weather | Balance finish, thickness, corrosion resistance, and service cost |
| Heavy winter salt exposure | Give corrosion resistance and easy inspection more weight |
| Frequent yard contact or debris strikes | Prioritize correct thickness, mounting support, and replaceable sections |
| Appearance-focused owner-operator truck | Compare mirror polish, chrome process, and cutout accuracy |
| Fleet with standardized maintenance | Use one documented fitment process for VIN, year, and material |
Use this corrosion resistance guide to review how exposure and material selection affect service life. The correct choice is the material that matches the route, maintenance practice, bumper construction, and VIN-specific fitment.
Configurable Bumpers Cutouts and Installation Notes
Cutout selection belongs at the start of the order, before the bumper is built or shipped. Tow holes, fog-light openings, vents, and lamp cutouts must match the truck's equipment and the original hole pattern. A bumper can share the correct overall shape and still fail because an opening is missing, misplaced, or sized for different hardware.
Configurations vary within the same bumper style. For example, a Gen III listing may offer combinations of bolt holes, tow holes, vent holes, fog openings, and other light cutouts, as shown in the VNL Gen III bumper listing. Treat the cutout pattern as a fitment detail tied to the VIN and front-end equipment, not as an appearance choice.
Build the order around the front end
Check these points against the truck before choosing a configuration:
- Tow openings: Confirm whether tow holes are required and compare their position with the original bumper.
- Fog-light openings: Match the lamp type, mounting position, and opening size.
- Vent and light openings: Record every opening used by the existing front end.
- Mounting holes: Verify spacing and the bracket relationship for the truck's year and generation.
- End-cap relationship: Determine whether the center section needs matching end pieces or whether the original end caps remain serviceable.
What direct bolt-on should mean
A direct bolt-on bumper should attach to the intended mounting points without drilling or cutting. A documented 2004–2017 VNL application includes a Gauge-7 mounting bracket and specifies installation without modifications, according to the manufacturer product snapshot. That description applies to the documented application, not automatically to every VNL.
Inspect the truck before fitting the replacement. Bent frame brackets, damaged fasteners, shifted lamps, or altered wiring can make a correctly configured bumper appear defective. For a 2004–2017 order, the documented example uses 10-gauge chrome-plated steel, with an 11-gauge 430 stainless steel option, a mirror-polished surface, and configuration-based cutouts. Use that information only as an order reference, then complete a fresh VIN and generation check before applying it to any 2018 or newer VNL.
Shop check: Lay the replacement over the old bumper before final installation. Compare the center profile, bracket holes, end transitions, and every lamp or tow opening.
Clean the mounting surfaces, replace damaged fasteners, and protect electrical connectors from contamination during installation. A bolt-on part saves shop time only when the brackets, hardware, lamps, and wiring are ready for the installation.
Quick Reference Cross References and Related Parts to Check
A VNL arrives after a front-end impact with more than a damaged bumper. Use the VIN, generation, and affected systems to identify related parts before placing the order. This prevents a bumper mismatch from becoming a second parts problem.
Front-end replacement checklist
- VIN and model year: Record both before searching for a bumper or body component.
- Generation: Separate older VNL applications from 2018 and newer front-end designs.
- Bumper center and end caps: Confirm whether the repair needs the center section, end pieces, brackets, or a complete system.
- Cutouts: Match tow holes, fog holes, vent holes, lamp openings, and bolt holes to the truck's configuration.
- Lighting: Inspect high-mounted inboard lamp kits, lamps, and mounting points.
- Electrical: Check sensors, harnesses, connector housings, and wiring near the impact.
- Mirrors: Look for cracked mounts, loose hardware, and wiring damage.
- Suspension and wheel end: Inspect nearby components if the impact reached the axle or frame.
- Cooling and exhaust: Review cooling parts, exhaust service items, and DPF components when the front or lower structure was disturbed.
Maintenance cross-reference
The official VNL maintenance and collision parts list cited earlier covers filters, batteries, oils, cooling parts, exhaust service kits, air-dryer filter cartridges, fuel and oil filter kits, sensors, suspension items, and wheel-end components. Use it as a starting reference, then confirm the truck-specific application against the VIN and current configuration.
For fleet buyers, keep one record with the VIN, model year, generation, OEM number, selected material, finish, cutouts, and shipping requirements. Owner-operators should save the same details with photos of the original bumper and mounting face. That file makes repeat orders faster and helps prevent another costly mismatch.
Galhor Inc. offers configurable direct bolt-on chrome bumper options for Volvo, Peterbilt, Kenworth, Freightliner, and International trucks, with selectable materials, finishes, styles, and cutouts. Confirm the truck details and front-end configuration before ordering. The correct part is the one that matches the VIN, mounting points, openings, and intended use.