

Freightliner Cascadia Parts Guide for Owner-Operators
You're in the bay with a Cascadia on stands, the old bumper already off, and the replacement sitting on the floor. The catalog said it fit. The bracket holes say otherwise. Now the truck is losing earning time while you chase a part number, compare cab photos, and call a counter that still needs the VIN.
That's the daily problem with Freightliner Cascadia parts. The platform is large, but its body panels, brackets, lighting, mirrors, and cooling components aren't one universal set. The right purchase depends on the truck's generation, cab style, duty cycle, chassis build, and prior modifications. This guide focuses on that decision process, with special attention to direct bolt-on bumpers for owner-operators and U.S. fleets.
Table of Contents
- Why Cascadia Owners Spend So Much Time Chasing Parts
- Cascadia Generations and Trim Years That Drive Fitment
- Main Body and Exterior Part Categories for the Cascadia
- How Big the Cascadia Parts Market Really Is
- How to Verify Cascadia Parts Fitment Before You Order
- OEM Versus Aftermarket Cascadia Body Parts
- Stainless Versus Chrome-Plated Carbon Steel Bumpers
- What a Direct Bolt-On Cascadia Bumper Install Looks Like
- Building a Cascadia Parts List Across a Mixed Fleet
- Cascadia Parts Buyer Checklist and Quick-Reference Table
- Cascadia Parts Questions Owner-Operators Ask Before Ordering
Why Cascadia Owners Spend So Much Time Chasing Parts
A single-truck owner-operator can lose hours over a bumper bracket that looks correct in a catalog but belongs to another Cascadia configuration. The mistake usually starts with a model name and stops there. That's not enough.
Cascadia trucks can differ by day cab, mid-roof sleeper, or raised-roof sleeper, along with wheelbase, aero equipment, lighting openings, sensor provisions, and body-builder changes. An upfitter may also have moved harness clips, air lines, or auxiliary equipment around the front structure. Two trucks can share a badge and model year while using different mounting hardware.
Where the catalog goes wrong
Mid-cycle exterior changes create another trap. A hood, bumper, grille, or headlamp assembly may have a pre-change and post-change version, even when sellers group both under the same broad Cascadia description. A body shop ordering from a generic listing can receive a part that's close enough to look right, but wrong enough to require shims, drilling, or a return.
Shop-floor rule: Don't order from the truck's name alone. Match the generation, cab configuration, bracket pattern, and cutouts before you compare finish or price.
The same problem affects Peterbilt, Kenworth, and International parts, but Cascadia volume makes catalog clutter especially noticeable. Freightliner's own service materials point buyers toward the vehicle's build record through PartsPro, which is a better starting point than a generic web search. The official Cascadia truck resource also shows why the platform has a broad range of configurations.
A useful order starts with three questions:
- What generation is it? Identify the front-end family before selecting a bumper, hood, grille, or lamp.
- What cab and aero package does it have? Day cabs and sleepers can use different exterior pieces.
- Has the chassis been modified? Check for body-builder harness routing, guard mounts, sensor plates, and non-factory brackets.
That process cuts down the wasted clock time before the part reaches the shop.
Cascadia Generations and Trim Years That Drive Fitment
Year matters, but it's only one part of the fitment answer. Earlier Cascadia trucks and newer Next Gen trucks use different front-end families, and exterior parts shouldn't be treated as interchangeable.
The independent Freightliner Cascadia parts generation guide identifies the earlier Cascadia and Cascadia Evolution family as 2008 through 2017, while the Next Gen family begins with 2018 and newer applications. Within those broad groups, lighting, bumper geometry, hood hardware, and grille design can still vary by configuration.
Use this compatibility map
| Generation | Model years | Notable body and exterior changes | Fitment note |
|---|---|---|---|
| Early Cascadia family | 2008 to 2010 | Original nose and front-end layout | Confirm bumper holes, hood hardware, and cab configuration |
| Cascadia Evolution family | 2011 to 2017 | Updated nose, lamps, grille, and mounting details | Don't assume every 2008 to 2017 part shares the same bracket pattern |
| Next Gen Cascadia | 2018 and newer | Swept front styling, revised lamps, grille, hood, and bumper mounting | Use VIN and build-record confirmation before ordering |
| Mid-2020s configurations | Current applications | Further equipment and alignment differences may affect the front end | Verify the exact chassis record and installed options |
The commonly referenced 2008 to 2017 hardware window is itself a warning. A listing may cover that range while still requiring a particular bumper style, fog-light opening, tow-hole layout, or bracket set. A 2018 truck also demands care because a model-year match doesn't prove that the same bumper fits every front-end configuration.
The practical order check
- Confirm the cab style, day cab, mid-roof, or raised roof.
- Identify the generation and nose design from the truck and build record.
- Check engine, brake, and wheel information when the part depends on chassis packaging.
- Inspect body-builder modifications before ordering brackets or panels.
- Match cutouts and mounting geometry, not just the product photograph.
The rule is simple: generation code, cab style, and chassis details come before trim language.
Main Body and Exterior Part Categories for the Cascadia
A Cascadia's exterior parts fail for different reasons, so the replacement strategy should match the damage. Bumpers usually deal with curb strikes, debris, wildlife, and low-speed collisions. Fenders and extensions take road rash and contact damage. Hood latches and hinges suffer from repeated opening, vibration, and winter exposure.
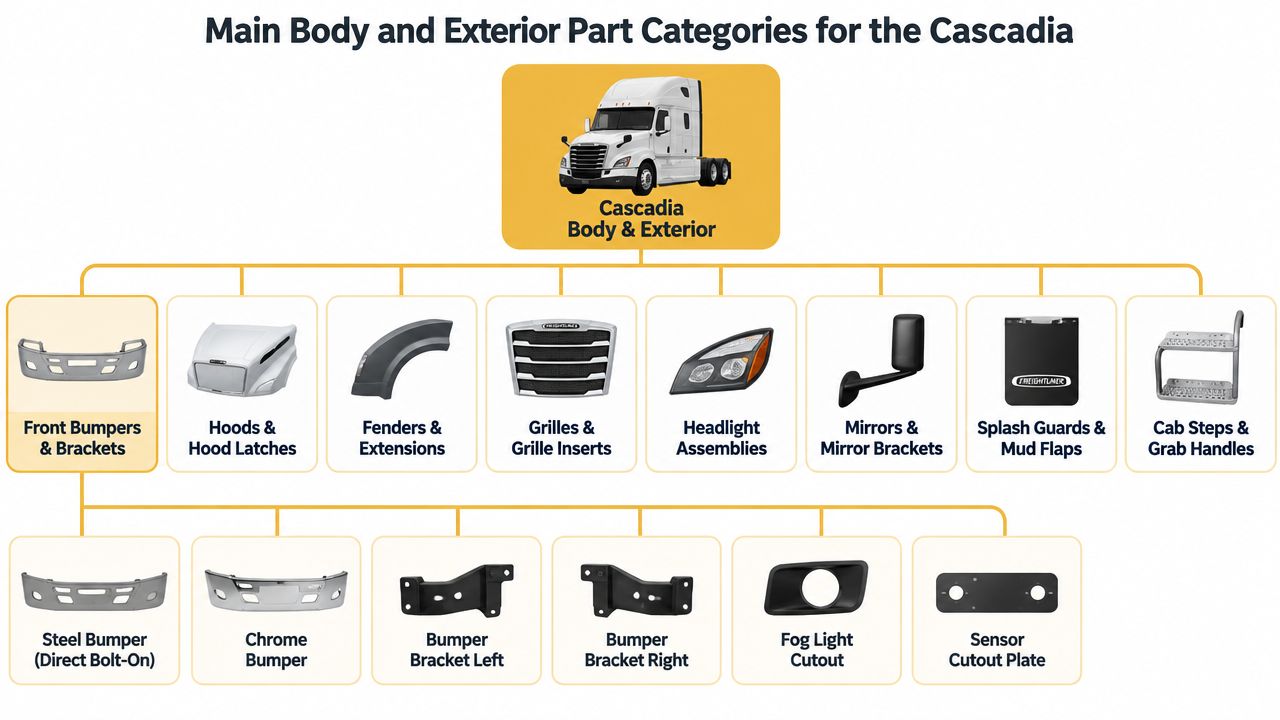
Match the part to the failure
- Front bumpers and brackets: Select the shell, bracket style, tow openings, fog openings, and sensor provisions together. A heavy-looking bumper is still a poor choice if the brackets don't match the chassis.
- Hoods and hood latches: A hood can look acceptable while worn hinges let it bounce or sit crooked. Verify hinge design and hood generation before protecting a costly panel with the wrong hardware.
- Fenders and extensions: Check cab width, hood shape, wheel position, and splash-shield attachment points. Fiberglass and composite pieces need careful support during installation.
- Grilles and inserts: These often follow the nose design closely. A grille that matches the year but not the hood and lamp family can leave uneven gaps.
- Headlamp housings: Halogen, projector, and LED assemblies may require different harnesses, brackets, or cutouts. Don't treat lighting style as a cosmetic-only choice.
- Mirrors and brackets: Heated, powered, hood-mounted, and door-mounted assemblies can use different wiring and supports.
- Cab steps, fairings, handles, splash guards, and mud flaps: These see constant contact with gravel, fuel islands, loading docks, and winter road spray.
The widest aftermarket supply usually sits around common collision and wear categories, especially bumpers, mirrors, lamps, and hood hardware. VIN-level confirmation remains important for parts tied to harnesses, sensors, mounting brackets, or aerodynamic trim.
For rural routes and wildlife exposure, a correctly matched Freightliner Cascadia deer guard guide can help you evaluate front protection as a system rather than buying a guard without checking its mounts.
How Big the Cascadia Parts Market Really Is
The Cascadia isn't a niche platform. Daimler Truck reported that the 1 millionth Freightliner Cascadia heavy-duty truck was produced on April 24, 2024 in its official milestone announcement. That installed base explains why Cascadia parts cover everything from body panels and lamps to filters, cooling components, mirrors, bumpers, and collision hardware. Daimler Truck's milestone announcement is the clearest evidence of the platform's scale.
A large fleet creates two opposing buying conditions. Common parts are supported by dealers, aftermarket manufacturers, remanufacturers, and online sellers. At the same time, the number of configurations creates more listings, more suffixes, and more opportunities to select a nearly correct part.
Maintenance creates a repeat pipeline
Freightliner's Cascadia maintenance manual separates service by duty cycle. For short-haul trucks operating under 60,000 miles per year, it lists initial maintenance at 10,000 miles, Maintenance 1 every 10,000 miles, Maintenance 2 every 50,000 miles, and Maintenance 3 every 150,000 miles. For long-haul trucks operating over 60,000 miles per year, the corresponding intervals are 25,000, 25,000, 100,000, and 300,000 miles.
| Metric | Value | Why it matters |
|---|---|---|
| Cascadia production milestone | 1 million units produced by April 24, 2024 | Supports a broad, mature aftermarket |
| Short-haul initial maintenance | 10,000 miles | Starts a scheduled parts pipeline |
| Short-haul M1 interval | 10,000 miles | Drives regular consumable and inspection demand |
| Long-haul initial maintenance | 25,000 miles | Reflects a different operating profile |
| Long-haul M3 interval | 300,000 miles | Shows why duty cycle must shape inventory planning |
The result is predictable demand, but fragmented fitment. A fleet manager can have a large group of Cascadias and still struggle to source one exact bracket. That's why inventory systems should group parts by VIN range and generation instead of storing everything under “Cascadia.”
How to Verify Cascadia Parts Fitment Before You Order
Start with the VIN and the vehicle build record. Freightliner's PartsPro system is designed to show the specific truck's build information, which is more reliable than selecting a part from a generic model-year dropdown.
The parts buyer should confirm six fields before releasing an order:
- Cascadia generation
- Day cab or sleeper configuration
- Aerodynamic package
- Bumper cutout configuration
- Brake and wheel code
- Paint and finish requirements
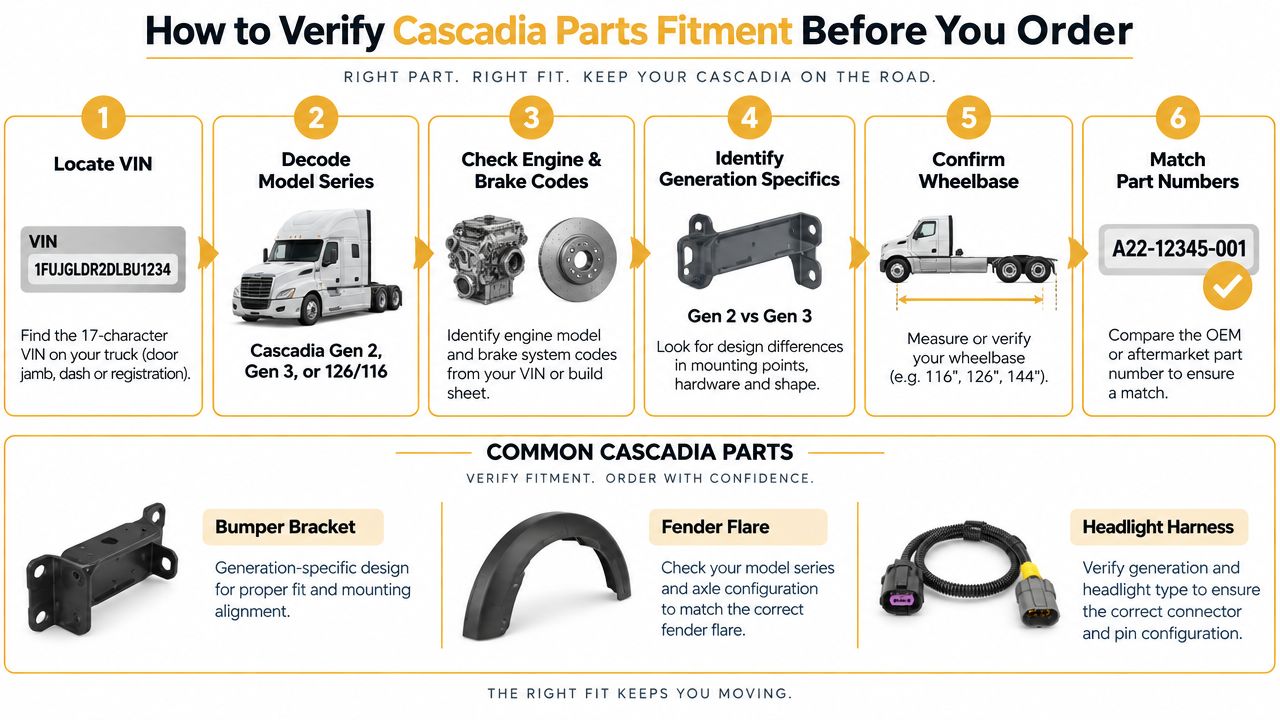
Use a two-minute counter routine
Pull the VIN from the truck and compare it with the driver-door-jamb information. Then open the PartsPro diagram and check the actual mounting illustration, not just the title.
The most common error is trusting the model year by itself. A Cascadia's bumper bracket, fender flare, or headlight harness may depend on generation, engine packaging, brake equipment, wheelbase, and installed body options. Freightliner's maintenance literature also ties specific service decisions to approved components and measured system conditions, so service parts deserve the same discipline as body parts.
Before clicking order: Pull the VIN, confirm the build record, inspect the diagram, verify the bracket and cutouts, then save the part number with the truck identifier.
For broader sourcing habits, the Freightliner parts online guide is useful when comparing catalogs. The final check should still happen against the truck, its VIN, and its physical mounting points.
OEM Versus Aftermarket Cascadia Body Parts
OEM and aftermarket parts solve different problems. The dealer route is useful when the truck needs an exact factory component, the finish must match closely, or the repair involves a part with complicated brackets and wiring. Premium aftermarket parts can make more sense when the owner needs a durable replacement without paying for every factory feature.
A direct price comparison isn't reliable without a specific part, generation, and configuration. Bumpers, hoods, fenders, lamps, and brackets each carry different manufacturing and freight costs. Instead, compare the trade-offs that affect the truck's return to service.
| Factor | OEM | Premium aftermarket |
|---|---|---|
| Fitment | Factory build record and original geometry | Must be matched carefully to generation and configuration |
| Finish | Usually consistent with factory specification | May be chrome, polished, or paint-ready depending on the part |
| Lead time | Depends on dealer stock and distribution | Depends on supplier stock and made-to-order options |
| Warranty | Follow the manufacturer's warranty terms | Warranty varies by manufacturer and material |
| Best use | Exact restoration or tightly controlled fleet repairs | Cost-conscious replacement and configurable upgrades |
| Installation | Usually intended for original hardware and mounts | May include brackets, but verify the complete package |
What works in the shop
For an owner-operator holding a truck for years, a good aftermarket bumper can deliver better value than a low-cost shell that needs fabrication. The important checks are material, thickness, bracket accuracy, cutout placement, finish, and warranty coverage.
For a fleet with repeated collision repairs, standardizing one verified bumper configuration can simplify purchasing. That only works if the trucks really share the same front-end family. A common part number is not automatically a common fit.
The buying rule is practical: choose OEM when exact factory fit and documentation matter most. Choose premium aftermarket when the supplier provides clear generation coverage, a measured bracket system, appropriate material options, and reliable freight support across the United States.
Stainless Versus Chrome-Plated Carbon Steel Bumpers
Bumper material should follow the route, not just the truck's appearance. Salt, coastal air, gravel, and repeated wash cycles expose weaknesses that may not appear on a show lot. A polished bumper can look excellent at delivery and still be the wrong choice for a truck that lives in winter brine.
Galhor's Freightliner front bumper material guide identifies chrome-plated carbon steel, 430 stainless steel, and 304 stainless steel as common Class 8 bumper options. It describes 304 as the strongest corrosion-resistant option of the three, especially for salt-belt, coastal, and long-term ownership use.
| Material | Corrosion resistance | Weight | Price band | Best duty cycle |
|---|---|---|---|---|
| 304 stainless steel | Strongest of these options | Depends on construction | Higher material cost | Coastal routes, salt belt, long ownership |
| 430 stainless steel | Better corrosion resistance than ordinary carbon steel | Depends on construction | Mid-range material choice | Regional and mixed-weather fleets |
| Chrome-plated carbon steel | Attractive deep chrome finish, but exposed damage can lead to corrosion | Depends on construction | Lower material cost | Show appearance, controlled climates, budget replacement |
The table avoids fake precision because bumper weight and price change with width, shape, reinforcement, cutouts, and bracket design. Material selection still gives a clear direction.
Route-based choices
A Midwest dry-van operator who washes regularly may choose chrome-plated carbon steel for its appearance and lower material cost. A Northeast salt-hauler should lean toward 304 stainless, where corrosion resistance matters more than the initial purchase decision. A regional flatbed operating across mixed weather may find 430 stainless a sensible middle ground.
Galhor's Cascadia chrome bumper comparison also emphasizes that the finish and construction need to be evaluated together. Don't buy a polished surface without checking the substrate, thickness, bracket package, and cutouts.
What a Direct Bolt-On Cascadia Bumper Install Looks Like
A real direct bolt-on replacement should use the truck's existing mounting locations without drilling, cutting, or fabricating new brackets. That doesn't mean every install is effortless. The old brackets may be bent, hardware may be damaged, and airlines or harness clips can interfere with the new shell.
The installation sequence
- Remove the stock bumper. Support the shell before removing the final fasteners, then label fog-light, sensor, and marker-light connections.
- Inspect the brackets. Check for bent ears, elongated holes, cracks, and impact damage. A new bumper can't correct a twisted mount.
- Mount the Gauge-7 reinforcement. Use the supplied reinforcement where the bumper package calls for it, and keep the bracket faces square.
- Test-fit the bumper shell. Align tow holes, fog openings, light openings, and sensor plates before tightening anything.
- Secure the hardware. Reuse undamaged original hardware only when it matches the application. Replace bent or stretched fasteners.
- Reconnect lights and sensors. Confirm clearance around airbag sensors, harness clips, air lines, and the back of every cutout.
The 2012 to 2017 Cascadia application is represented by the Chrome bumper for Freightliner Cascadia (2012–2017). The listed construction is 10-gauge chrome-plated steel, with an 11-gauge 430 stainless steel option, a Gauge-7 mounting bracket, configuration-based cutouts, and a triple-layer chrome process with 35 microns of nickel. It's sold individually and is specified for direct bolt-on installation without modifications.
Avoid the fitment trap
Gen 2 and Gen 3 bracket geometry can differ, so don't force a bracket into place because the bumper shell looks close. Take time to route the harness and airlines before final tightening. That short inspection prevents a rubbing line, crushed connector, or sensor-clearance problem after the truck leaves the bay.
The payoff of a true bolt-on package is simple. The truck returns to service in the same shift, without a torch, drill, or improvised steelwork.
Building a Cascadia Parts List Across a Mixed Fleet
A fleet manager with a mixed Cascadia group shouldn't build one giant “Freightliner parts” list. Start with the VINs, then separate the trucks by front-end family, cab type, and duty cycle.
Consider a yard with 12 trucks, including Gen 2 day cabs, Gen 3 sleepers, and one legacy Columbia. The manager's first move should be to place each unit in its own row, then record the verified bumper, bracket, hood, lamp, mirror, grille, and fairing references. The Columbia stays separate because its exterior parts shouldn't be assumed to cross with Cascadia components.
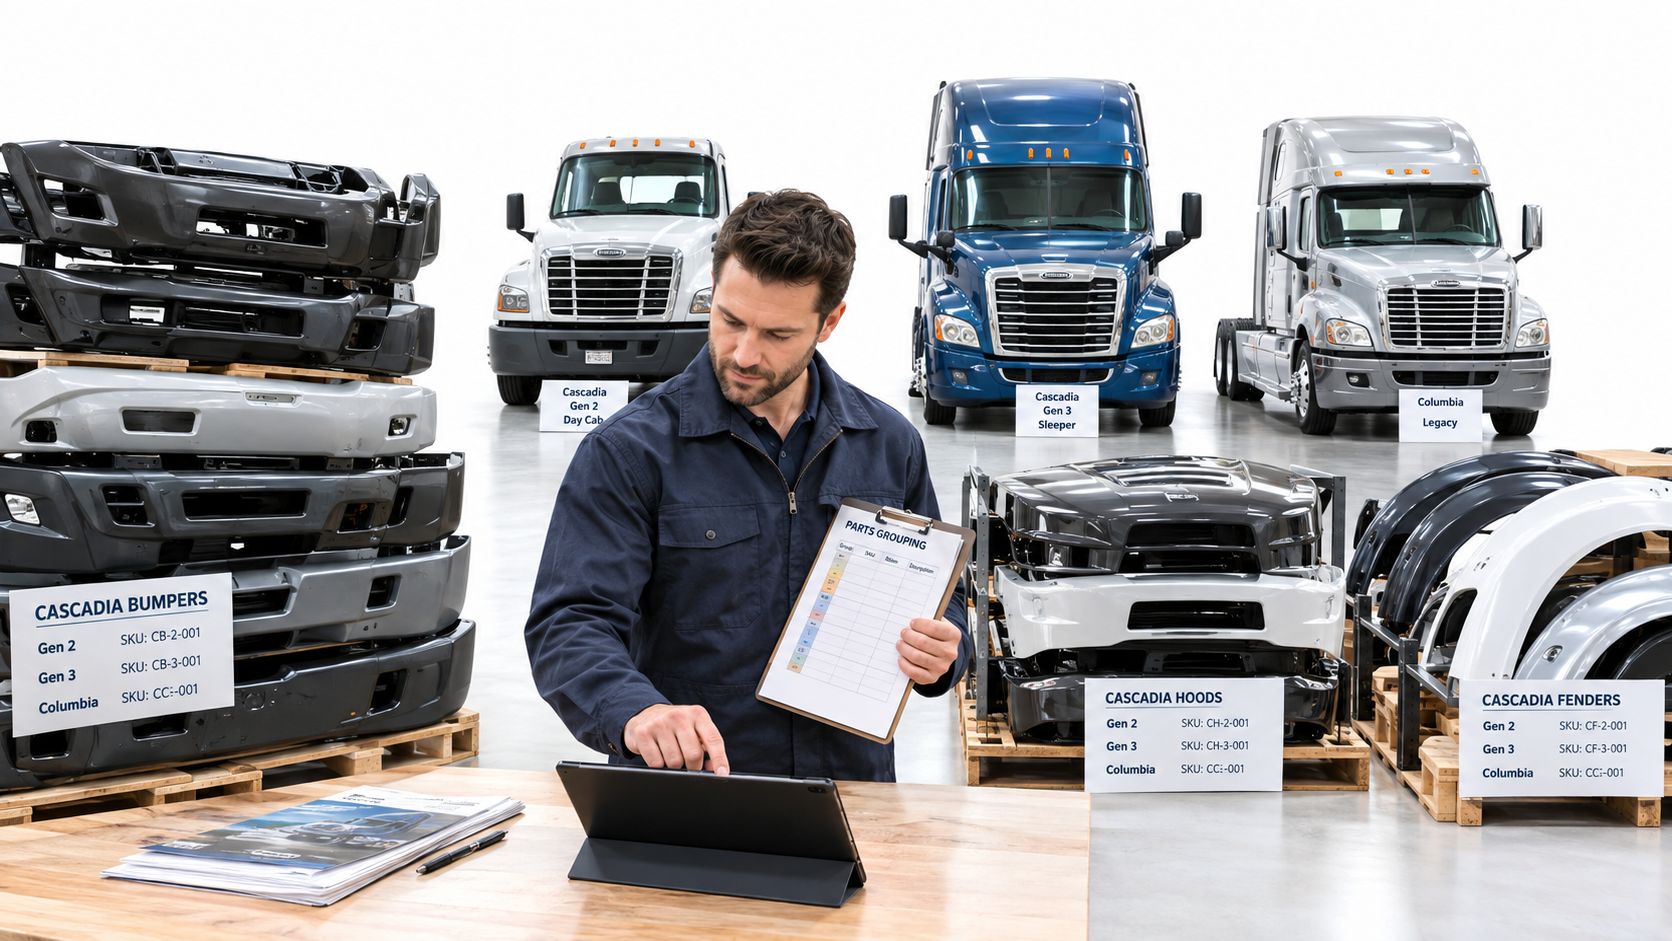
Build the list around repeat failures
Common wear items deserve a different stocking decision from low-turn body panels.
- Mirrors and brackets: Group only the assemblies that share the same mounting and electrical setup.
- Grille inserts: Keep them separated by nose design and side-corner pattern.
- Bumper brackets: Stock left and right pieces as matched, generation-specific sets where possible.
- Hood hardware: Link hinge and latch references to the truck range that uses them.
- Fenders and extensions: Record cab, hood, wheel, and splash-shield details before adding them to inventory.
Bulk buying only saves money when the part is common enough to move and the storage cost stays controlled. A shelf full of the wrong bumper brackets is not inventory. It's tied-up cash and a future return problem.
A master spreadsheet should include the VIN, generation, cab style, duty cycle, approved part number, material, finish, supplier, warranty, and last verification date. When a truck changes jobs or receives an upfit, update the row immediately. That record turns a parts counter conversation into a quick confirmation instead of a new investigation.
Cascadia Parts Buyer Checklist and Quick-Reference Table
Use this four-step filter before buying any exterior component:
- Confirm generation and cab from the VIN. Don't rely on the title, badge, or a marketplace photo.
- Define the duty cycle. Linehaul, regional, vocational, coastal, and salt-belt work expose parts differently.
- Choose OEM or premium aftermarket. Base the choice on fitment evidence, lead time, finish, and warranty support.
- Lock the bumper specification. Select material, thickness, finish, bracket style, and cutouts as one package.
| Part category | OEM source | Premium aftermarket | Common fitment trap |
|---|---|---|---|
| Bumper shell | Build-record matched factory part | Configurable direct bolt-on package | Wrong generation or cutout pattern |
| Bumper brackets | VIN and chassis matched | Included or sold as matched hardware | Left and right brackets confused |
| Hood and latch hardware | Factory build record | Model-range replacement parts | Old and updated nose hardware mixed |
| Headlamp assembly | Correct lamp and harness family | Halogen, projector, or LED alternatives | Lamp style does not match harness |
| Grille and inserts | Generation-specific factory assembly | Pattern-specific replacement | Side corners and grille don't align |
| Mirrors | Cab and electrical configuration | Heated, powered, or standard alternatives | Door and hood mirror mounts confused |
| Fenders and extensions | Cab, hood, and wheel matched | Replacement panel by configuration | Wheelbase and splash-shield mismatch |
Keep a photo of the VIN and the parts record on the phone used at the counter. That small habit makes it easier to compare a Peterbilt 389 bumper, a Kenworth W900 chrome bumper, or an 18 inch drop bumper for another truck without applying the wrong fitment assumptions to a Cascadia.
Cascadia Parts Questions Owner-Operators Ask Before Ordering
How will a bumper or large body panel ship? These parts commonly move by LTL freight, usually protected on a pallet or with heavy wrapping. Ask whether your delivery point needs a liftgate, and inspect the finish before signing.
What should I do before returning an unused part? Confirm the seller's return window, restocking terms, packaging requirements, and freight responsibility before opening or installing it. Save photos of the carton and part.
How are chrome or stainless warranty claims handled? Document pitting, finish defects, cracks, damaged brackets, and installation conditions. Submit clear photos, the order record, and the truck fitment details instead of attempting a repair first.
Can I trust a “fits Cascadia” listing? Not without generation, cab, bracket, and cutout confirmation. Send the VIN and configuration details before payment.
Choose the Cascadia part by generation, duty cycle, material, finish, and bracket pattern, not by a generic title. Galhor Inc. offers configurable direct bolt-on bumpers for Class 8 applications, including chrome-plated carbon steel and stainless options, through its Galhor Inc. catalog. Visit the site with your VIN and bumper configuration ready, then order the replacement that matches the truck before it goes back to work.